Install WooCommerce Guide
Step-by-step tutorial to install and configure your first WordPress WooCommerce store.
Want to turn your existing WordPress site into an online store? Installing WooCommerce is the fastest way to add products, carts, and secure checkout without switching platforms or hiring a developer. The good news: you can get the basics running in less than an hour if you follow a clear, structured process.
This guide walks you step by step through how to install WooCommerce, run the setup wizard, configure payments and shipping, and test your first order. The walkthrough is written for site owners using the Classic Editor and themes like Jannah, but it works for most modern WordPress setups.
If you are still unsure how WooCommerce relates to your main site, read the difference between WordPress and WooCommerce first, then come back here to complete the installation.
Prerequisites
Before you install WooCommerce, make sure your hosting, WordPress install, and account permissions are ready. These basics will prevent most “white screen” or “critical error” problems during activation.
- An existing WordPress site that you can log into as an Administrator.
- SSL certificate installed (your site loads over HTTPS, not HTTP).
- PHP and MySQL versions that meet WooCommerce’s current requirements (ask your host if you’re unsure).
- Pretty permalinks enabled under Settings > Permalinks (Post name is recommended).
- Recent backup of your WordPress site (files + database).
Step 1: Check Hosting and WordPress Requirements
WooCommerce adds database queries, scripts, and extra pages to your site. If your hosting is underpowered or outdated, store performance and checkout reliability will suffer.
- Log in to your hosting control panel or contact support to confirm:
- PHP version meets or exceeds the current WooCommerce recommendation.
- MySQL / MariaDB versions are supported.
- Server has sufficient memory (512MB+ recommended for busy stores).
- Log in to your WordPress dashboard and go to Dashboard > Updates to update WordPress core, themes, and existing plugins.
- Visit Settings > Permalinks and select Post name, then click Save Changes.
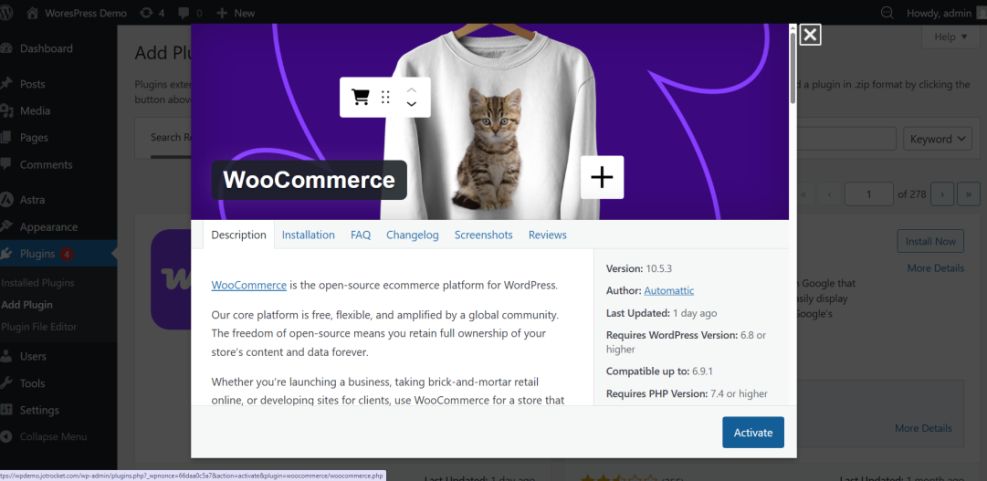
Step 2: Install the WooCommerce Plugin
With your site ready, you can now add WooCommerce from the WordPress plugin repository. This method ensures you get the official plugin from Automattic.
- In your WordPress admin, go to Plugins > Add New.
- In the search box, type WooCommerce.
- Locate the plugin labeled “WooCommerce” by Automattic.
- Click Install Now, then click Activate once installation completes.
If you need a refresher on installing plugins, see this detailed tutorial on how to install a plugin in WordPress before proceeding.
Advanced users comfortable with the command line can install WooCommerce using WP-CLI from an SSH terminal:
wp plugin install woocommerce --activateRun this command from the root directory of your WordPress installation.
Step 3: Run the WooCommerce Setup Wizard
Immediately after activation, WooCommerce usually launches its setup wizard to help you configure core store settings. If it doesn’t appear, you can access it from WooCommerce > Home and look for the setup tasks panel.
- Store details: Enter your business address, city, and country. Choose your main currency and select whether you’ll sell physical, digital, or both types of products.
- Industry and product types: Select your industry (e.g., Fashion, Health & Beauty) and the main product types you plan to sell.
- Business details: Answer questions about how many products you plan to list and whether you’re setting up WooCommerce for a client.
- Theme: When asked about themes, keep your existing theme (such as Jannah). WooCommerce will automatically add store templates that match your current design as closely as possible.
Step 4: Configure General, Tax, and Shipping Settings
The setup wizard only covers the basics. Next, refine your store behavior from the main WooCommerce settings pages so taxes, shipping, and currency behave correctly.
4.1 General settings
- Go to WooCommerce > Settings > General.
- Confirm your Store Address and Selling locations (sell to all countries or specific ones).
- Set your default Currency, Currency position, and Thousand/Decimal separators to match your market.
4.2 Tax options (if applicable)
- Under WooCommerce > Settings > General, ensure “Enable taxes” is checked.
- Click the new Tax tab that appears.
- Choose how to calculate tax (based on store address, customer address, or shipping address).
- Create standard tax rates for each region where you must collect tax.
4.3 Shipping zones
- Go to WooCommerce > Settings > Shipping.
- Create a Shipping zone for each region you ship to (e.g., “Domestic”, “Europe”, “International”).
- Within each zone, add shipping methods such as flat rate, free shipping, or local pickup.
- Configure costs and any minimum order values for free shipping.
Step 5: Set Up Payment Gateways
Without payments, your WooCommerce store is just a catalog. WooCommerce supports many gateways, including Stripe, PayPal, and region-specific providers.
- Go to WooCommerce > Settings > Payments.
- Toggle on the payment methods you want to offer (e.g., Cash on Delivery for testing, PayPal, or Stripe).
- Click Set up or Manage next to each gateway and enter API keys or account details provided by your payment processor.
- Where available, enable Test mode so you can run transactions without charging real cards.
For smoother checkout and better conversion rates, plan to optimize your store’s performance once everything works. When you’re ready, use these WooCommerce performance tips for faster stores to reduce friction at checkout.
Step 6: Add a Test Product and Place a Test Order
Before you invite real customers, verify that your catalog, cart, and checkout all work from a shopper’s point of view.
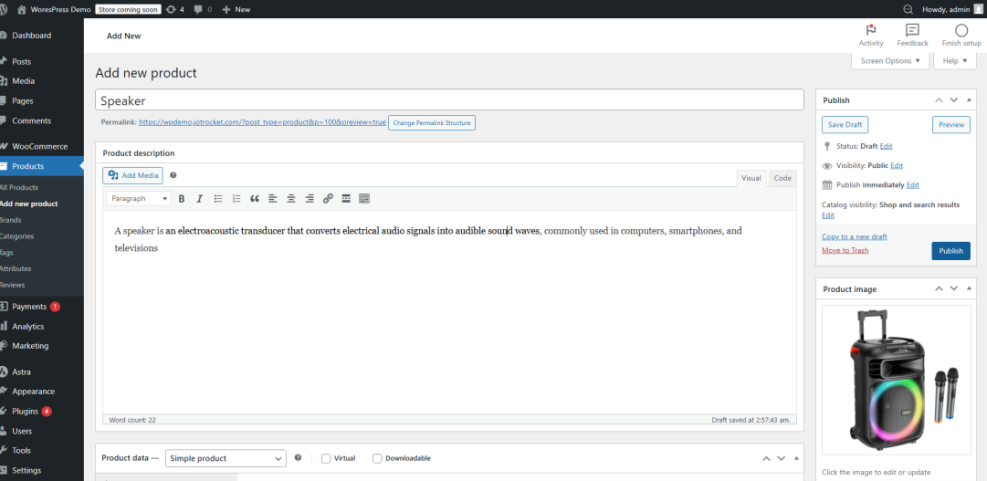
6.1 Add a test product
- Go to Products > Add New.
- Enter a product name (e.g., “Test Product – Do Not Buy”) and short description.
- In the Product data box, set the product type (Simple product is fine for testing) and add a regular price.
- If it’s a physical item, add weight and dimensions under the Shipping tab.
- Set a Product image and click Publish.
6.2 Place a test order
- Open your site in an incognito/private browser window.
- Find your test product (via shop page or direct URL), add it to the cart, and proceed to checkout.
- Fill in dummy billing/shipping details and complete checkout using a test payment method.
- Return to WooCommerce > Orders in your admin dashboard to confirm the order appears and its status (e.g., Processing or Completed).
Your WooCommerce Store Is Ready to Sell
By now, you’ve installed WooCommerce, run the setup wizard, configured your core settings, enabled payments, and successfully placed a test order. That means your WordPress site has officially evolved into a working online store.
From here, you can focus on adding real products, improving your product pages, and fine-tuning your design with the Jannah theme and Classic Editor. As traffic grows, don’t forget to monitor performance, security, and backups so your new store remains fast, stable, and profitable.
Further Reading
- How to Make an eCommerce Website with WordPress
- Best WordPress eCommerce Plugins Compared
- WooCommerce Optimization Guide for Better Performance
- WooCommerce Hardening Checklist for Store Security
- Best WordPress Backup Plugins for Online Stores