WordPress Update Checklist
A safe, step-by-step process for updating WordPress without breaking your site

Clicking “Update” in WordPress can feel risky, especially if you’ve seen a white screen of death or a broken layout after a plugin or theme update. The good news: with a clear, repeatable checklist, you can keep WordPress up to date while dramatically reducing the chance of downtime or data loss.
This WordPress update checklist walks you step by step through preparing your site, backing up properly, updating plugins, themes, core, and PHP, and then testing everything so you know your site is safe. You’ll turn updates from a scary chore into a simple maintenance routine.
If you’re wondering why keeping everything current matters so much, start by quickly reviewing why WordPress maintenance is important, then come back here and follow the checklist below.
Prerequisites
Before you start updating WordPress, make sure you have the right access and a small maintenance window. This will help you avoid mid-update interruptions and make it easier to fix issues if something goes wrong.
- Administrator login for your WordPress dashboard.
- Hosting control panel or SSH access (for backups and rollbacks).
- Access to your domain’s DNS or CDN (optional but useful for maintenance mode).
- Up-to-date contact details for your developer or hosting support (in case of emergencies).
- A planned low-traffic time window (evenings or weekends for most sites).
Step 1: Audit Your Current WordPress Setup
Start by understanding what needs to be updated. A quick audit shows you which plugins, themes, and core versions are out of date and whether your environment is ready for changes.
- Log in to your WordPress dashboard.
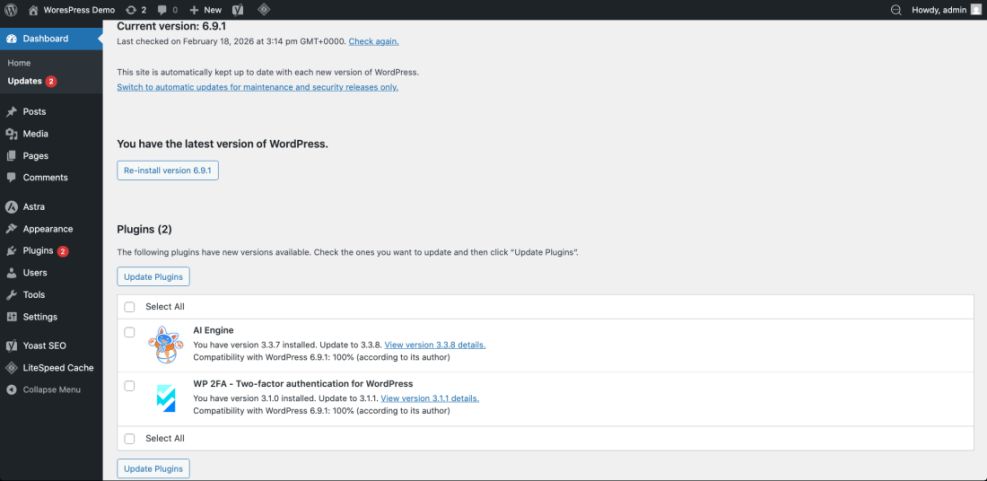
- Go to Dashboard > Updates to see available core, plugin, and theme updates.
- Note the current WordPress version shown at the top of this page.
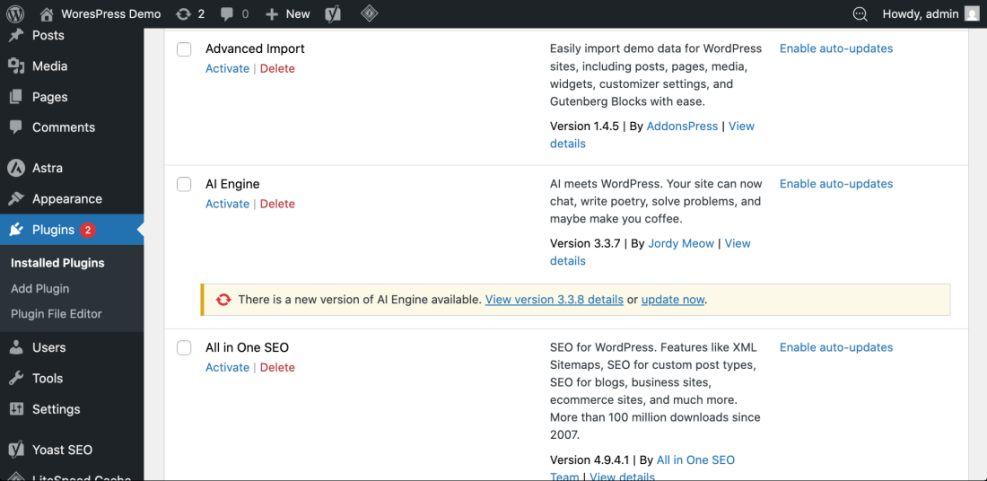
- Go to Plugins > Installed Plugins and look for any plugins marked as needing an update.
- Go to Appearance > Themes and check for theme updates.
Checkpoint: You should now have a list of what needs updating (core, plugins, themes), plus an idea of how many changes you’ll be making in this session.
Step 2: Take a Complete Backup Before Updating
A verified backup is the most important part of this entire checklist. If anything breaks, you can quickly restore your site to its previous working state.
You should have both a database backup and a full file backup (themes, plugins, uploads, and core files).
- From your hosting control panel, open your backup tool or File Manager and phpMyAdmin.
- Export your WordPress database via phpMyAdmin (or equivalent database tool).
- Create a zip archive of your WordPress root folder (usually
public_htmlor a subfolder). - Download both the database export and file archive to your local computer or secure cloud storage.
- Optionally, run your backup plugin to create an extra application-level backup.
If you’re designing a robust ongoing backup process, follow the detailed guidance in this WordPress maintenance backup plan and align your update schedule with your backup strategy.
Using WP-CLI for backups (advanced): If you have SSH and WP-CLI access, you can run:
# From your WordPress root directory (SSH terminal)
wp db export backup-before-updates.sql
zip -r backup-before-updates.zip .
Checkpoint: Confirm that your backup files exist and can be opened. Never move forward until you have verified backups.
Step 3: Update WordPress Plugins Safely
Plugins are the most common cause of conflicts after updates. Updating them in a controlled way reduces risk and makes it easier to identify which plugin caused a problem if something breaks.
- Go to Plugins > Installed Plugins.
- Sort by “Update Available” (if your admin supports this view).
- Update critical plugins in small batches:
- Start with security, backup, and caching plugins.
- Then update SEO, forms, and other core functionality.
- Leave WooCommerce and payment-related plugins for their own batch.
- After each batch, visit your homepage and a few key pages (contact, shop, blog) to confirm they still work.
Using WP-CLI for plugin updates (advanced):
# Update all plugins from SSH (WP-CLI)
wp plugin update --all

# Or update a single plugin
wp plugin update woocommerce
Checkpoint: All plugins show as up to date, and your key pages load without obvious errors or layout problems.
Step 4: Update Themes and Child Themes
Theme updates often include security fixes, compatibility updates, and performance improvements. If you’re using a child theme (recommended), make sure your customizations are safe before updating the parent theme.
- Go to Appearance > Themes.
- Identify your active theme (e.g., Jannah) and any parent/child theme relationship.
- Update the parent theme first, then confirm the child theme still works.
- After updating, review:
- Header and footer areas (logo, menus, widgets).
- Single post layout (title, meta, featured image, content).
- Archive pages (categories, tags, blog index).
Checkpoint: Your site’s design and navigation should look the same as before. If menus, widgets, or sidebars disappear, reassign them in Appearance > Menus and Appearance > Widgets.
Step 5: Update WordPress Core
Updating WordPress core delivers security patches, new features, and performance improvements. Because core changes affect the entire CMS, you should always update core after your plugins and themes.
- Go to Dashboard > Updates.
- If a new WordPress version is available, review the release notes briefly.
- Click “Update Now” and wait for the process to finish without closing your browser tab.
- Once complete, you’ll see the “Welcome to WordPress” screen for the new version.
Using WP-CLI for core updates (advanced):
# Check current version
wp core version

# Show available updates
wp core check-update

# Run core update
wp core update
Checkpoint: Your dashboard shows the new WordPress version and you can still access the admin area and key front-end pages without errors.
Step 6: Check PHP and Server Versions
PHP, database, and web server versions can also affect WordPress stability and performance. While not part of every single update session, they should be reviewed regularly as part of your broader maintenance plan.
- In WordPress, go to Tools > Site Health > Info and check the PHP and database versions.
- Compare them with the recommended versions from your hosting provider and WordPress.org.
- If your PHP version is outdated or marked as insecure, plan a PHP upgrade from your hosting control panel.
Checkpoint: You know which PHP version you’re running and whether an upgrade is required. If you decide to upgrade PHP, do it in a separate maintenance window following your host’s documentation.
Step 7: Test Your Site After Updates
Once all updates are applied, testing confirms that your site is fully functional and performing well. This is where you catch subtle issues that might not show up immediately.
- Open your site in a private/incognito browser window.
- Test key user flows:
- Homepage > key landing page > contact form submission.
- For WooCommerce: product page > add to cart > checkout (in test mode).
- Search, navigation menus, and category/archive pages.
- Check your site on mobile (phone or responsive test) to confirm menus, sliders, and forms work.
- Run a quick performance and speed check following this WordPress speed test checklist to see if load times changed after updates.
Checkpoint: All critical user actions (reading, searching, buying, submitting forms) work correctly and page load times are similar or better than before.
Step 8: Document Changes and Schedule Your Next Update Window
Finishing strong means documenting what you changed and planning the next update cycle. This helps you troubleshoot future issues and keeps your maintenance predictable.
- Record the date of this update session and what was updated (plugins, themes, core, PHP).
- Note any issues you encountered and how you fixed them.
- Save this information in a shared document or ticket system if you work with a team or agency.
- Schedule your next update window (e.g., weekly, biweekly, or monthly) on your calendar.
Checkpoint: You have a short log of updates and a recurring reminder for future maintenance, so you’re not relying on memory next time.
Stay Confident Every Time You Update WordPress
WordPress updates don’t have to be stressful. By auditing your site, taking reliable backups, updating plugins, themes, and core in the right order, and testing carefully afterward, you can keep your site secure, fast, and stable.
Save this WordPress update checklist and follow it every time you plan maintenance. Over time, you’ll build a solid, repeatable process that protects your content, your traffic, and your business from unexpected update surprises.
Further Reading
- How to Update WordPress Plugins
- How to Update a WordPress Theme
- How to Update PHP in WordPress
- How to Check if WordPress Plugins Are Up to Date
- WordPress Maintenance Plans for Growing Businesses