WordPress Speed Optimization Checklist for Busy Site Owners
A practical, high-impact speed checklist you can run in under an hour
Your site feels slow, your visitors are impatient, and you barely have time to log into WordPress—let alone read a 5,000-word performance guide. This checklist is built specifically for busy site owners who want clear, high-impact actions they can run through in under an hour.
You’ll walk through a focused sequence: measure where you are, fix the biggest bottlenecks first, and then put your site on a simple maintenance rhythm so speed doesn’t slowly deteriorate again. When you start to understand the common causes of slowness, it becomes much easier to prioritize what matters.
If you want a deeper look at underlying bottlenecks, you can also read our explainer on why WordPress is so slow before or after running this checklist, but it’s not required to get results today.
Prerequisites
Before you start flipping switches, make sure you have the basics in place. This keeps you safe and avoids wasting time on changes you might need to undo.
- Access to your WordPress admin dashboard (Administrator role).
- Access to your hosting control panel or support chat.
- A recent full backup of your site (files and database).
- Login details for any performance tools you already use (CDN, security, caching, etc.).
Step 1: Benchmark Your Current Speed
You can’t improve what you don’t measure. A quick benchmark gives you a “before” snapshot so you can see which wordpress speed optimizations actually make a difference.
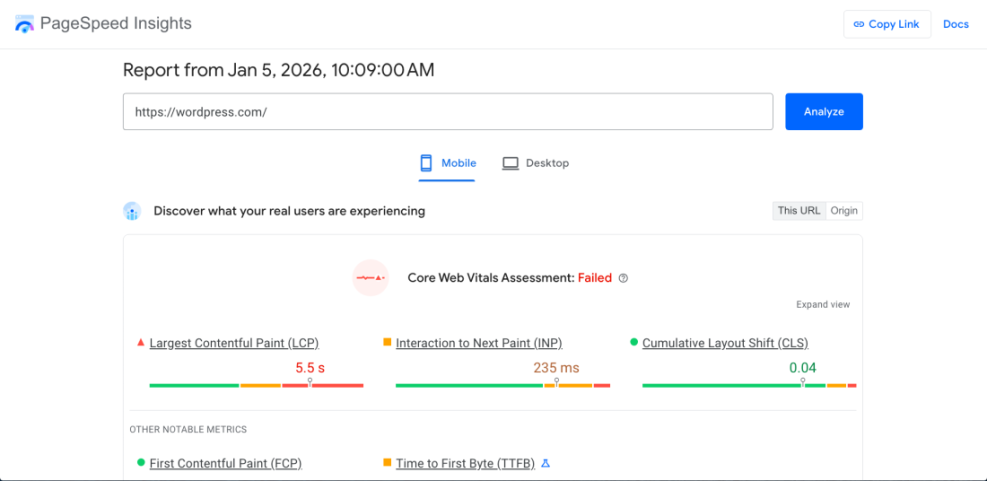
- Open Google PageSpeed Insights in your browser.
- Test your homepage URL and at least one important landing page or product page.
- Record the mobile and desktop scores plus key metrics like LCP (Largest Contentful Paint) and CLS (Cumulative Layout Shift).
- Optionally run a second tool such as GTmetrix or WebPageTest to confirm the results.
For a deeper understanding of metrics like LCP and CLS, skim the beginner guide to WordPress speed and Core Web Vitals when you have a few extra minutes.
Checkpoint: You have a simple note or spreadsheet with your key pages, mobile/desktop scores, and any obvious red flags (very slow LCP, layout shifts, or long server response time).
Step 2: Fix the Big Hosting Bottlenecks
If your web server is slow, every other wordpress speed optimization works harder for less benefit. This step makes sure your foundation is not holding you back.
- Check which PHP version your site is running from your host’s control panel or WordPress Site Health (look under Tools > Site Health > Info).
- Upgrade to a modern PHP version (usually PHP 8.0 or higher) if your host allows it and your theme/plugins are compatible.
- Ask your host if they provide built-in server-side caching (LiteSpeed Cache, NGINX FastCGI cache, etc.) and make sure it’s enabled.
- Confirm that your plan is not extremely oversold (very cheap shared hosting with constant resource limits is a common bottleneck).
Checkpoint: Your site is running a supported PHP 8.x version, server caching is enabled where available, and you know whether your hosting plan is adequate for your traffic.
Step 3: Remove Heavy Themes and Plugins
Every extra plugin adds code, database queries, and sometimes external requests. A leaner setup is simpler to maintain and almost always faster.
- In WordPress, go to Appearance > Themes and remove unused themes (leave one default theme as a fallback).
- Go to Plugins > Installed Plugins and list any you don’t recognize or no longer use.
- Temporarily deactivate non-essential plugins one at a time, reloading your site to make sure nothing critical breaks.
- Delete plugins you’ve confirmed are unnecessary (e.g., duplicate sliders, old form plugins, unused page builders).
Checkpoint: You have one active theme (plus a default backup) and a trimmed list of plugins where every item has a clear purpose.
Step 4: Enable Caching and Compression
Page caching and compression are where most busy site owners see the biggest speed gains in the shortest time. One well-configured plugin plus server compression can dramatically reduce load times.
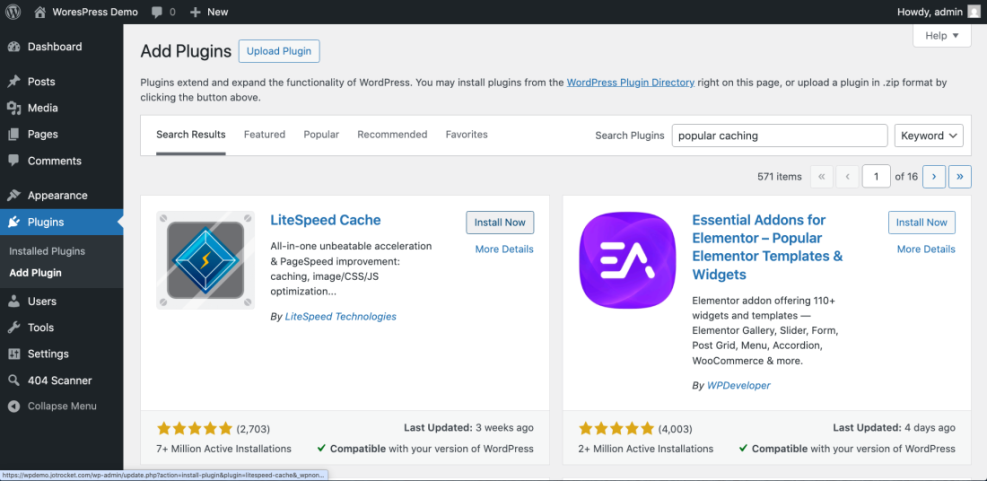
- From your dashboard, go to Plugins > Add New and search for a reputable caching plugin (e.g. ones with high ratings and frequent updates).
- Install and activate exactly one caching plugin and run its setup wizard, choosing the “recommended” or “safe” defaults.
- Enable browser caching, page caching, and (if offered) minification for CSS/JS, starting cautiously with CSS/JS options.
- Ask your host or check their docs to confirm that GZIP or Brotli compression is enabled at the server level.
If you want a more in-depth, technical walkthrough, layer this checklist with our guide on how to speed up a WordPress site when you have a bit more time.
Checkpoint: Your caching plugin is active with default settings, server compression is enabled, and your key pages load noticeably faster for logged-out visitors.
Step 5:WordPress Speed Optimize and Lazy Load Images
Oversized images are one of the most common speed killers, especially on mobile. A quick pass with the right settings can cut page weight dramatically.
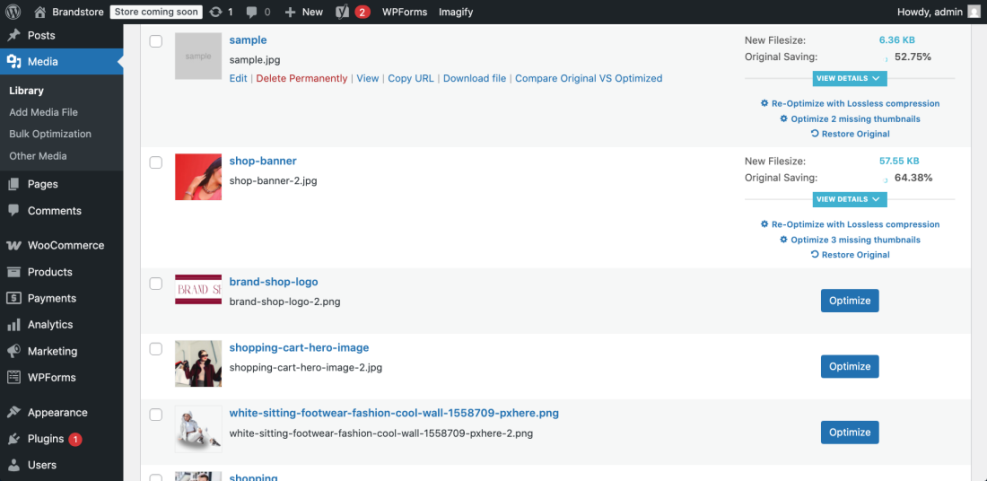
- Install a well-rated image optimization plugin that supports automatic compression and WebP generation.
- Run a bulk optimization of existing images (start with conservative settings like “lossless” or “balanced” quality).
- Enable lazy loading for images and thumbnails so below-the-fold images load only when the user scrolls.
- For future uploads, resize images before upload (e.g. max 1200–1600px wide for most content images).
Checkpoint: Your existing images are compressed, lazy loading is enabled, and you have a simple rule for maximum upload dimensions going forward.
Step 6: Offload Assets with a CDN
If you have visitors from multiple countries or your host is in a different region than most of your traffic, a CDN (Content Delivery Network) can noticeably reduce load times.
- Check whether your host includes a built-in CDN option. If they do, enable it for your primary domain.
- If not, sign up for a reputable CDN service and follow their WordPress Speed Optimization integration guide (often via a plugin or DNS change).
- Make sure images, CSS, and JavaScript files are being served from the CDN domain once it’s active.
Checkpoint: Static assets (especially images) are being delivered from a CDN, and your pages feel snappier for international visitors.
Step 7: Set Up a Simple Ongoing Speed Routine
WordPress Speed optimization is not a one-time project. With a simple routine, you can keep your WordPress site fast without spending hours every week.
- Monthly: Re-run your PageSpeed tests on a few key pages and compare with your original baseline.
- Monthly: Update WordPress core, themes, and plugins, then spot-check your homepage and a key landing page.
- Quarterly: Review plugins and remove anything no longer needed; clean up unused images and old backups.
- Before campaigns: If you expect a traffic spike, test the pages you’ll be promoting so you can fix issues before visitors arrive.
Checkpoint: You have a realistic, repeating schedule for quick speed audits and basic maintenance, and you’re not relying on memory alone.
Keep Your WordPress Speed Optimization Site Fast With Minimal Time
You don’t need to become a performance engineer to run a fast WordPress site. By benchmarking, fixing hosting bottlenecks, trimming bloat, enabling caching, optimizing images, and setting a simple routine, you’ve covered the highest-impact actions a busy site owner can take.
From here, you can decide whether to go deeper into advanced tuning or simply stick with this checklist every month. Either way, you now have a practical, repeatable process that keeps your site fast for visitors and favorable in search results—without consuming your entire week.
Further Reading
- WordPress Speed Optimization Checklist
- WordPress Performance and Speed Optimization
- Monthly Speed Audit for WordPress
- Best WordPress Caching Plugins