Beginner Guide To Redis Object Cache In WordPress
Practical speed tuning steps for new WordPress users

Redis object cache in WordPress is one of the easiest ways to make your site feel fast and stable without upgrading your hosting plan right away. Instead of hitting the database for every page view, Redis stores frequently used data in memory so WordPress can reuse it in a split second.
In this beginner-friendly guide, you will see what Redis object caching is, when it helps the most, and how to enable it step by step. You will also learn how it works under the hood, how to configure it safely, how to fix common issues, and how it compares to normal page caching plugins.
How Redis Object Cache Speeds Up WordPress
Simple Explanation Of Redis Object Cache
Every time someone visits your WordPress site, PHP runs and asks the database for posts, menus, options, and other data. Redis object cache keeps the results of those repeated database requests in memory. When the same data is needed again, WordPress pulls it from Redis instead of hitting the database, which makes dynamic pages and the dashboard feel much faster.
When You Will Notice The Biggest Gains
Object caching shines when your site has many logged-in users, WooCommerce carts, membership pages, or a busy wp-admin. In those cases, page caching alone cannot cache every view. With Redis handling database results, you reduce server load, handle more traffic on the same hardware, and avoid slow queries that appear only under peak load.
Understanding WordPress Object Caching Basics
How Object Cache Fits Into WordPress
WordPress has a built-in object cache layer that developers use to store data during a single page load. Without a persistent backend, that cache disappears after each request. When you install a Redis backend, the cache survives between page loads, so expensive queries run once, get stored, and serve many future visitors.
Where Redis Stores Cached Data
Redis runs as a separate service on your server or hosting platform. It keeps key-value pairs in memory, which makes lookups extremely fast. In practice, WordPress sends a key, such as a query hash or option name, and Redis returns the stored value. Because the data lives in RAM, access times are measured in microseconds rather than milliseconds.
What You Need Before Enabling Redis
Check If Your Host Supports Redis
Before you turn anything on, you should confirm that Redis is available on your hosting plan. Many managed WordPress hosts expose a simple toggle in their control panel, while others require a VPS where you install Redis yourself. If you are unsure, ask support whether Redis and the PHP Redis extension are available for your account.
Key Requirements For Beginners
- A host or server with Redis installed and running.
- The PHP Redis extension enabled for your PHP version.
- Access to edit wp-config.php or add environment variables.
- Administrator access to your WordPress dashboard.
When these pieces are in place, you can connect WordPress to Redis safely. If any part is missing, you may see connection errors or timeouts when you enable the plugin.
Setting Up The Caching Plugin
Install Redis On Your Server
On many managed hosts, you enable Redis from a control panel toggle instead of installing it manually. On a VPS, you or your server admin install Redis from your package manager and make sure it starts on boot. In both cases, you should note the host, port, and any password your provider gives you.
Install And Activate The Plugin
Next, you add the WordPress plugin that speaks to Redis. The most common option is the free Redis Object Cache plugin, which provides a persistent backend for the WordPress object cache API and supports features like clustering and health checks.
- Log in to your WordPress dashboard as an administrator.
- Go to Plugins » Add New and search for “Redis Object Cache.”
- Click Install Now, then click Activate when the button changes.
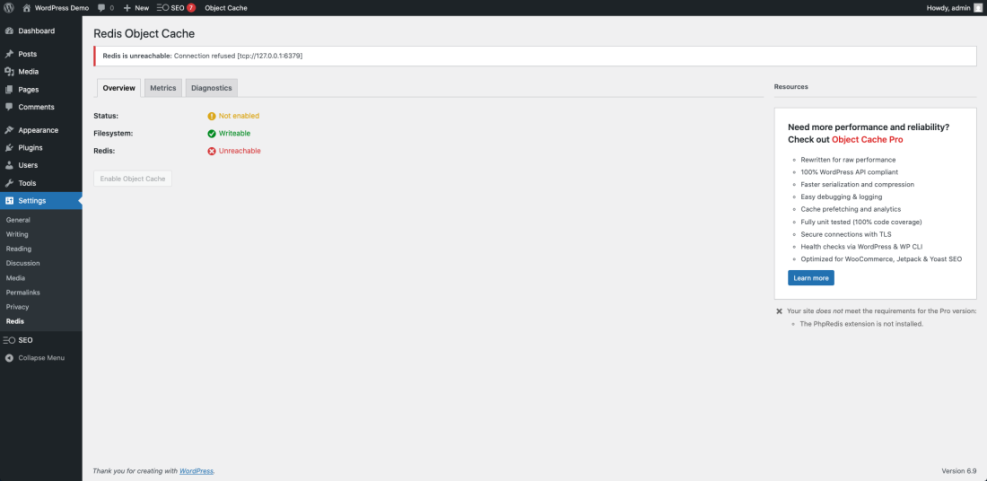
Navigate to Settings » Redis to view the plugin’s status page after activation.
Can You Use Redis With Shared Hosting?
Some shared hosts offer Redis only on higher-tier plans, and some do not support it at all. When your host does not provide Redis, you usually cannot add it yourself. In that case, focus on page caching and see a separate guide like Redis object cache WordPress beginner guide before you consider moving to a VPS or managed provider.
Configuring Redis Settings In WordPress
Add Safe Settings To wp-config.php
Most beginners can rely on the plugin’s default settings. However, adding a few constants to wp-config.php gives you safer prefixes and clearer separation between environments. You usually do this once per site when Redis is first enabled.
define( 'WP_REDIS_HOST', '127.0.0.1' );
define( 'WP_REDIS_PORT', 6379 );
define( 'WP_REDIS_DATABASE', 0 );
define( 'WP_REDIS_PREFIX', 'site_1:' );
define( 'WP_CACHE_KEY_SALT', 'example.com:' );
Place these lines above the “That’s all, stop editing!” comment and adjust the values to match your host. The WP_REDIS_PREFIX and WP_CACHE_KEY_SALT values help prevent key collisions when several sites share the same Redis server.
Enable And Validate The Connection
Once the constants are in place, visit Settings » Redis again and click Enable Object Cache. The status should change to “Connected” with a key hit ratio that increases over time. For deeper insight, you can read the WP_Object_Cache class reference to see which data types get cached at this layer.
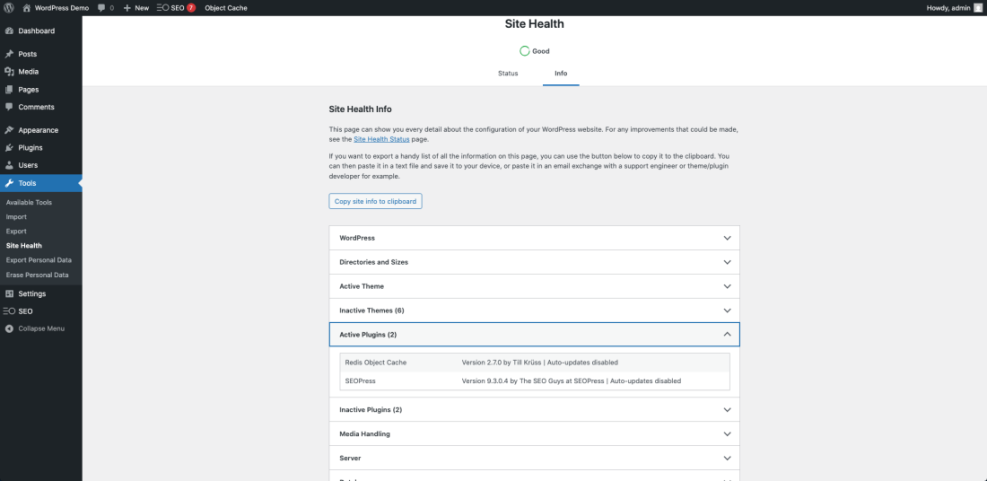
Navigate to Tools » Site Health and open the Info tab to confirm that object caching now appears as active in your environment details.
How Do You Know Redis Cache Is Working?
A quick way to test Redis is to install a profiling plugin such as Query Monitor, load a few pages, and compare the number of database queries before and after enabling object cache. When Redis works, you will normally see fewer queries on repeated page loads and a higher cache hit ratio in the plugin’s status panel.
Best Practices For Safe Caching
Use Redis With Page Caching
Redis object cache does not replace your page cache plugin; it complements it. Page caching turns full HTML responses into static files for anonymous visitors, while Redis speeds up dynamic requests that still hit PHP. Together, they give you fast first views, quick repeat visits, and smoother performance in the dashboard and checkout flows.
Avoid Common Misconfigurations
To keep things stable, you should avoid sharing one Redis database between unrelated projects without unique prefixes. You should also ensure that cron jobs and background workers do not constantly flush the entire cache. Instead, let plugins invalidate specific keys when content changes, and reserve full cache flushes for rare maintenance tasks.
Navigate to WooCommerce » Status when you run a store and confirm that your cache plugin does not disable important WooCommerce cache exemptions.

Should You Cache Logged In Users?
Redis object cache safely speeds up most logged-in requests, because it only stores data that is already safe to reuse. However, page caching for logged-in users can be dangerous unless a plugin is designed for it. As a result, you should combine Redis with conservative page caching rules on stores and communities, especially when user-specific data appears on many pages.
Solving Common Redis Cache Issues
Fix Connection And Authentication Errors
If the plugin shows “Not connected,” you should first verify the host, port, and password values with your provider. Many connection issues come from firewalls blocking the port or from using the wrong socket path. After updating wp-config.php, disable and re-enable the cache from the plugin screen to force a fresh connection attempt.
Deal With Timeouts And Memory Limits
Sometimes Redis runs out of memory or responds slowly under heavy load. When that happens, your site may feel slower instead of faster. You can ask your host to increase the Redis memory limit, reduce object cache lifetime for large objects, or move other noisy applications to a different Redis database so your WordPress keys stay responsive.
When Should You Disable Redis Temporarily?
When you debug strange behavior, you may want to disable Redis for a short time. If disabling the object cache makes the issue disappear, you likely have a plugin that stores the wrong data in the cache or fails to clear it correctly. In that case, keep Redis enabled on staging only while you identify and replace the offending plugin.
Redis Cache Versus Other Caching Types
When Object Caching Shines
Redis object cache helps most when requests cannot be fully cached as static HTML. Dynamic carts, dashboards, and personalized account pages all benefit from faster database access. Therefore, sites with many logged-in users, complex queries, or large product catalogs often see the clearest improvement when Redis is enabled correctly.
When Page Caching Is Enough
On small blogs or brochure sites with anonymous visitors, a simple page cache plugin may already provide excellent performance. In those cases, Redis brings smaller gains and adds another moving part to your stack. However, it can still act as a nice safety net during traffic spikes or when you run heavy reporting queries from the backend.
Here is a compact comparison of common caching options.
| Feature | Redis Object Cache | Page Cache Plugin | Database Optimization |
|---|---|---|---|
| Main Focus | Database query results | Full HTML pages | Cleaning old data |
| Best For | Dynamic and logged-in views | Anonymous visitors and blogs | Long-term stability |
| Where It Lives | RAM on server | Disk or memory | Database tables |
| Setup Difficulty | Moderate | Easy | Easy |
| Risk If Misused | Stale dynamic data | Serving wrong user data | Accidental data loss |
| Works Together | Yes, complements page cache | Yes, with Redis | Yes, with both |
When you understand how these layers interact, you can design a stack that matches your site’s real needs instead of over-optimizing the wrong layer. For future upgrades, pair Redis with a clean migration plan like WordPress migration checklist for blogs so your cache server details stay in sync.
Redis Object Cache Conclusion
Redis object cache gives you a powerful way to speed up WordPress without rewriting your theme or installing dozens of extra plugins. By caching database results in memory, it reduces query load, keeps dynamic pages responsive, and helps your server survive real-world traffic spikes that would otherwise expose bottlenecks.
The best way to proceed is simple: confirm that your host supports Redis, enable the Redis Object Cache plugin, add a few safe settings to wp-config.php, and watch your query counts drop. After that, refine your page caching rules, review your WooCommerce or membership flows, and treat Redis as a core part of your performance toolkit rather than a one-time tweak.
More WordPress Guides You Might Like
To deepen your WordPress performance skills, you can explore related topics that build on what you learned about Redis and object caching.
- WordPress seo complete beginners guide
- How to choose the best WordPress hosting
- Woocommerce performance tips for faster stores
- Install WordPress step by step
- WordPress maintenance backup plan
These resources round out your toolkit so you can plan caching, hosting, optimization, and maintenance as one connected strategy instead of isolated tweaks.