How to Install Google Analytics on WordPress
Step by step GA4 tracking for beginners

Install Google Analytics on your WordPress site to start collecting accurate traffic and conversion data from day one. In this tutorial you will connect a Google Analytics 4 property, install the free Site Kit by Google plugin, and confirm that page views are being tracked correctly.
By the end, you will have a working GA4 setup on WordPress, a simple way to check that tracking works, and clear next steps for using reports. If you want a broader overview of metrics later, read the WordPress seo complete beginners guide.
What You Need to Start
- An active WordPress site with admin access to /wp-admin.
- A Google account you can use for Analytics.
- Basic ability to install plugins on your WordPress site.
- Optional but recommended access to a staging site if you test changes before going live.
Step 1: Create your Google Analytics 4 property
First, create or confirm your GA4 property so WordPress has somewhere to send data. You only do this once per website.
- Sign in to Google Analytics with your Google account.
- Click the Admin gear icon in the lower left of the Analytics interface.
- Under the Account column, choose your account or create a new one if needed.
- Under the Property column, click Create property, then enter a descriptive name (for example, your site name plus “GA4”).
- Choose your Reporting time zone and Currency, then click Next and complete the business details.
- When prompted for What do you want to measure, choose Web and click Next.
- Enter your WordPress site URL and a clear Stream name, then click Create stream.
- On the stream details screen, note your Measurement ID (starts with “G-”). You will not need to paste it manually when using Site Kit, but it is useful for verification.
Open the new web data stream to double check that your domain is correct and that GA4 shows a valid Measurement ID.
Step 2: Install Site Kit plugin in WordPress
The easiest and safest way to install Google Analytics on WordPress is with the official Site Kit by Google plugin. It automatically inserts the tag on every page and keeps tracking code up to date.
- Log in to your WordPress admin dashboard at https://yoursite.com/wp-admin.
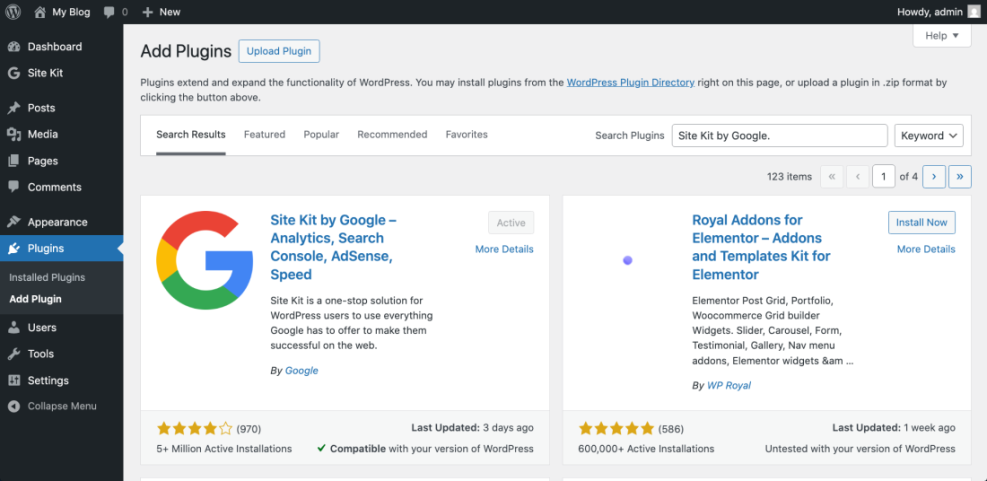
- In the left menu, navigate to Plugins » Add New.
- Use the search box in the top right to search for Site Kit by Google.
- Locate the plugin named Site Kit by Google – Analytics, Search Console, AdSense, Speed.
- Click Install Now, then after installation click Activate.
Confirm that Site Kit now appears in your left admin menu and that the plugin is listed as Active under Plugins.
Step 3: Connect Site Kit to Google Analytics
Next, connect Site Kit to your Google account and link it to the GA4 property you created. Site Kit will then add the Google tag to your theme automatically.
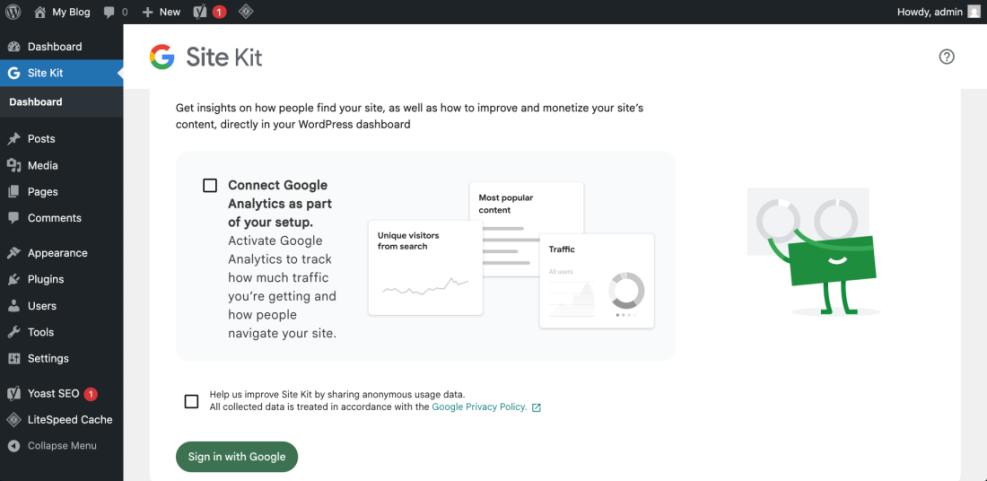
- In your WordPress dashboard, click Site Kit in the left menu.
- On the Site Kit welcome screen, click Sign in with Google.
- Choose the same Google account you used for Analytics, then review the requested permissions and click Allow.
- Complete the on-screen steps to verify site ownership and connect Site Kit to your Google account.
- After the initial connection, go to Site Kit » Settings » Connect more services.
- Find Analytics and click Set up or Connect.
- In the setup flow, select your existing Google Analytics account, the correct GA4 property, and your Web data stream.
- Confirm any additional options (such as who can view reports), then click Finish or Save.
When you return to the Site Kit dashboard, you should see Analytics listed as a connected service without errors.
Step 4: Confirm that GA4 tracking works
Before relying on your reports, confirm that page views are being recorded. You can check this in both Google Analytics and inside Site Kit.
- Open a new private or incognito browser window.
- Visit your WordPress site homepage and click through to one or two posts.
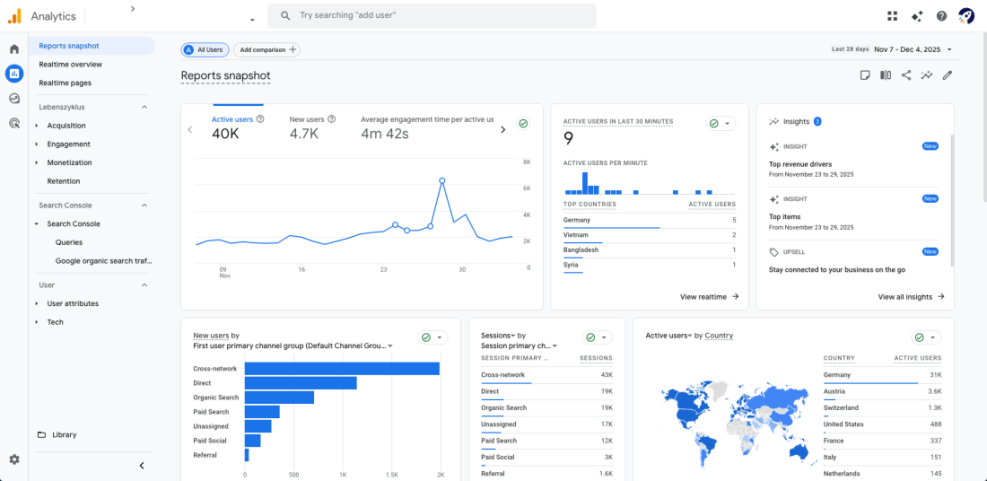
- Return to Google Analytics, open your GA4 property, and go to the Reports section.
- Under Realtime, confirm that at least one active user appears, and that the Page path or Screen class list shows the pages you just visited.
- In WordPress, go to Site Kit » Dashboard and check that basic Analytics summaries load without any connection errors.
If you see yourself as a realtime user and Site Kit displays Analytics data, your GA4 install on WordPress is working correctly.
Once tracking is live, use the deeper walkthrough in How to do seo for WordPress blog to interpret blog metrics and traffic sources.
Step 5: Add Google Analytics code manually without a plugin
If you prefer to minimize plugins or cannot use Site Kit, you can install Google Analytics by pasting the GA4 tag directly into your theme or via a header script plugin. This requires more care, but gives you full control.
- In Google Analytics, open your GA4 property and web data stream.
- Under Tagging instructions, locate the Google tag (gtag.js) snippet and copy it.
- In WordPress, install a header script manager plugin from the official directory (for example, one that lets you add code to the <head> of every page).
- Go to the plugin’s settings page and paste your Google tag snippet into the site-wide Head field.
- Save your changes and clear any caching plugin or CDN cache so new visitors get the updated code.
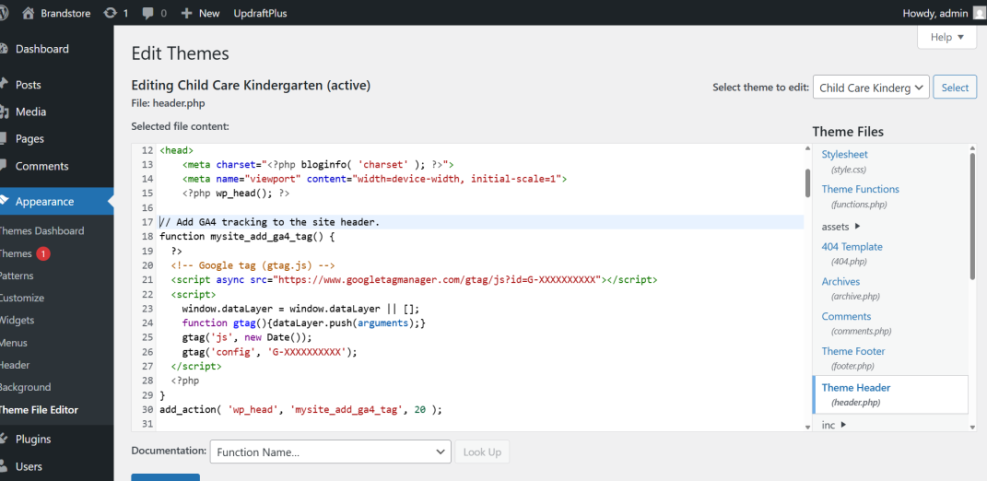
<!-- Google tag (gtag.js) -->
<script async src="https://www.googletagmanager.com/gtag/js?id=G-XXXXXXX"></script>
<script>
  window.dataLayer = window.dataLayer || [];
  function gtag(){dataLayer.push(arguments);}
  gtag('js', new Date());
  gtag('config', 'G-XXXXXXX');
</script>
Replace G-XXXXXXX with your real GA4 measurement ID. Then repeat the verification steps from Step 4 to confirm tracking is live.
Conclusion You Are Ready to Go
You have now installed Google Analytics on WordPress, connected a GA4 property, and confirmed that page views are being tracked correctly. Whether you used Site Kit or a manual snippet, your site is sending traffic data to Analytics so you can measure performance, identify top content, and track conversions over time.
From here, refine your reporting setup by defining events, tracking conversions, and segmenting your audience. Combine this guide with other analytics-focused tutorials on WPHeadliner to build a complete measurement plan for your blog, store, or business site.
Further Reading
- Analytics setup WordPress google analytics
- Google Analytics for WordPress Setup and Tracking Basics
- How to start a blog WordPress
- WordPress seo complete beginners guide