How to start a WordPress website is often the first big question new site owners have, especially when terms like DNS, SSL, themes, and plugins feel confusing.
In this guide you will follow a clear, step-by-step process to start a WordPress website from scratch: choosing a domain and hosting, installing WordPress, configuring settings, picking a theme, adding essential plugins, and publishing your first content.
What You Need Before You Start a WordPress Website
- A clear goal for your site (blog, business website, portfolio, or online store).
- Basic monthly budget for your domain and web hosting.
- Access to a payment method (card, PayPal, or similar) for your hosting provider.
- 30–60 minutes of focused time to complete the initial setup.
Step 1: Clarify Your Plan Before You Start a WordPress Site
Before you register a domain or buy hosting, decide what your WordPress website should actually do. This makes every later decision easier.
- Choose your main site type: blog, service business, local company, portfolio, or store.
- Write one sentence describing your site’s purpose and ideal visitor.
- Save 3–5 example websites you like and note the layout, colors, and fonts.
- Sketch a simple sitemap: Home, About, Services, Blog, Contact, etc.
Step 2: Choose a Domain Name and WordPress Hosting
To start a WordPress website you need two things: a domain name (yourwebsitename.com) and a hosting account where your files live.
Pick a domain name
- Brainstorm 5–10 domain ideas that are short, clear, and easy to spell.
- Prefer a .com if possible, or choose a trusted local or industry extension.
- Avoid hyphens, numbers, and confusing spellings that are hard to say out loud.
- Use your brand or main topic in the name if it feels natural.
Pick beginner-friendly WordPress hosting
When you start a WordPress website for the first time, look for hosting that offers:
- One-click or guided WordPress installation.
- Free SSL certificate (HTTPS).
- Reliable support that understands WordPress basics.
- A simple dashboard for managing your site and email.
Most shared or managed WordPress hosts let you buy the domain and hosting in one checkout, which keeps setup easier.
Step 3: Install WordPress on Your Domain
Once you own a domain and hosting, the next step in starting a WordPress website is to install the WordPress software.
Option A: Domain and hosting from the same company
- Log in to your hosting dashboard.
- Go to Websites or My Sites and click Add Site or Create Website.
- Select WordPress when asked what type of site you want to create.
- Choose your domain from the dropdown list.
- Set an Admin Username, Strong Password, and Admin Email.
- Click Install or Finish Setup and wait for the confirmation screen.
Option B: Domain and hosting from different companies
- In your hosting dashboard, find the Nameservers or DNS information.
- Log in to your domain registrar and open the DNS or Nameservers section.
- Replace the existing nameservers with the ones from your host and save.
- Wait for DNS propagation (typically a few hours, sometimes up to 24).
- Back in your hosting panel, use the one-click WordPress installer to install WordPress on that domain.
Step 4: Log In to Your New WordPress Website
After installing, you can access the WordPress dashboard where you’ll manage your website.
Open the WordPress login page
- In your browser, go to
https://yourdomain.com/wp-admin/. - Enter the Username and Password you set during installation.
- Click Log In to open the WordPress Dashboard.
Set basic site settings
- Go to Settings > General.
- Enter your Site Title and short Tagline that match your plan.
- Confirm the WordPress Address (URL) and Site Address (URL) use
https://. - Check your Administration Email Address.
- Click Save Changes.
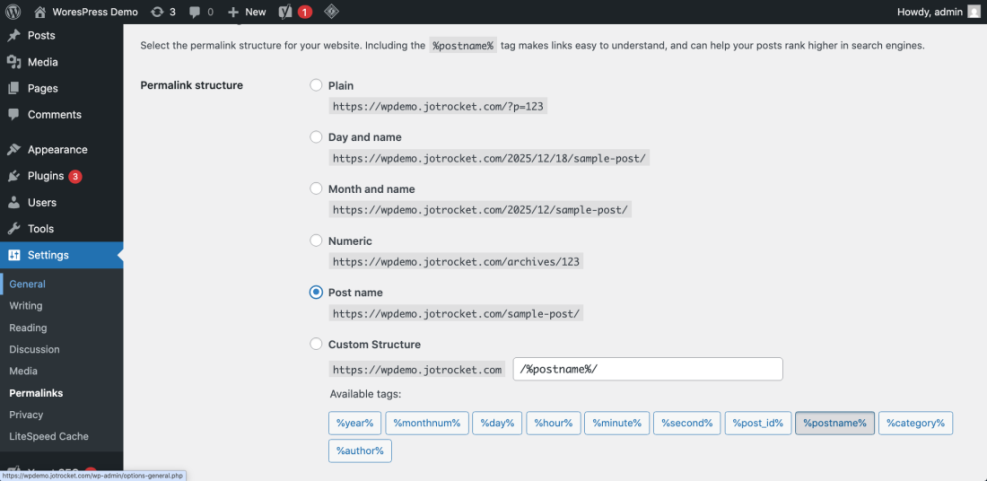
Set clean permalinks
- Go to Settings > Permalinks.
- Select Post name so URLs look like
/my-first-post/. - Click Save Changes.
Step 5: Choose and Customize a WordPress Theme
The theme controls your site’s design. When you start a WordPress website, pick a simple, well-supported theme instead of chasing dozens of fancy options.
Install a theme
- From the dashboard, go to Appearance > Themes.
- Click Add New.
- Use the search box or filters (Blog, Business, Portfolio, etc.).
- Hover over a theme you like and click Install, then Activate.
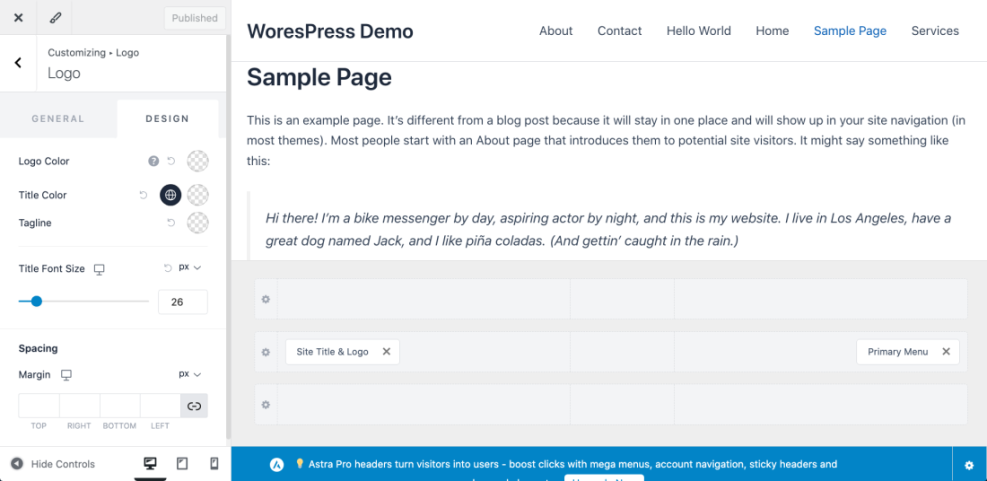
Customize your design
- Go to Appearance > Customize or the Site Editor for block themes.
- Adjust Site Identity (logo, title, tagline).
- Set your colors and fonts to match your brand.
- Preview changes on both desktop and mobile.
- Click Publish when you are happy with the look.
Step 6: Add Essential Plugins to Your WordPress Website
Plugins add features to your site without coding. When you first start a WordPress website, keep your plugin list lean and focused on essentials.
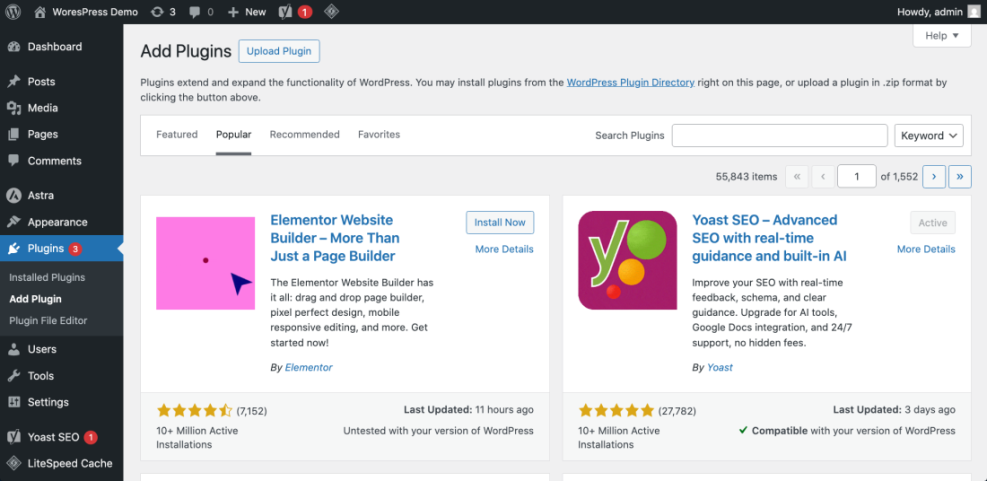
Install core plugins
- Go to Plugins > Add New.
- Search for plugins that cover:
- SEO (titles, meta descriptions, sitemaps).
- Caching or performance optimization.
- Contact forms.
- Security and backups.
- Click Install Now, then Activate for each plugin.
Step 7: Create Core Pages on Your WordPress Site
Now you are ready to add real content. Every new WordPress website should start with a few essential pages.
Create pages like Home, About, and Contact
- Go to Pages > Add New.
- Create these core pages:
- Home – overview of who you are and what you offer.
- About – your story and why visitors should trust you.
- Services or What I Do – if you offer services.
- Contact – form, email, and any key details.
- Use headings, paragraphs, and image blocks to structure the pages.
- Click Publish when each page is ready.
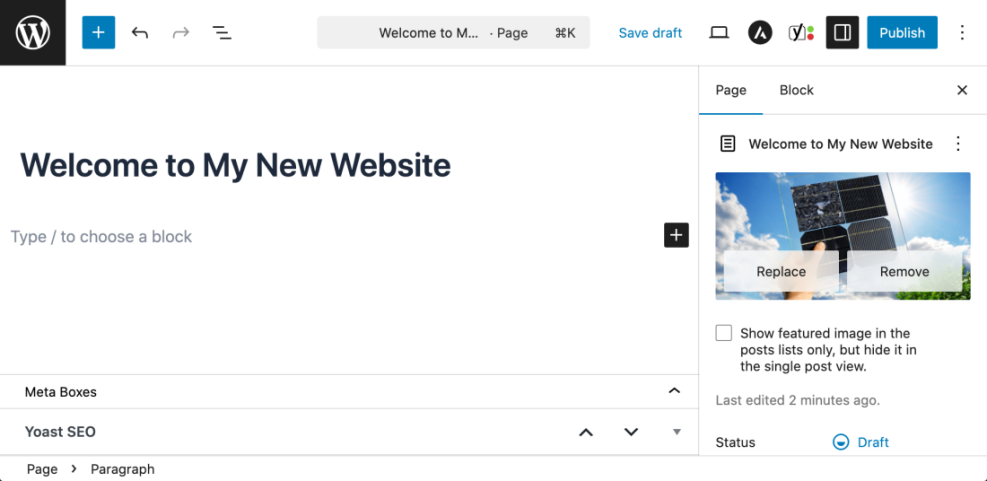
Write your first blog post
- Go to Posts > Add New.
- Add a clear Post Title, such as “Welcome to My New Website”.
- Use the block editor to write your introduction, main content, and conclusion.
- Set a Featured Image under the post settings.
- Click Publish.
For a deeper writing workflow, see How to Create Your First Blog Post in WordPress.
Optional: Duplicate WordPress Pages to Reuse Layouts
After your first pages are live, you might want to reuse the same layout for new services, landing pages, or blog templates. Instead of rebuilding each page from scratch, you can duplicate an existing one using any of the methods below.
| Duplication Method | Best For | WordPress Setup Method | Notes |
|---|---|---|---|
| One-Click Plugin (Duplicate Page / Yoast Duplicate Post) | Most users who want fast, reliable cloning | Install plugin, enable for Pages, use “Duplicate” or “Clone” links | Keeps layout and blocks intact, supports bulk actions in some plugins |
| Manual Copy and Paste | Sites where installing plugins is restricted | Use “Copy all content/blocks” (block editor) or copy HTML in Classic Editor | Works everywhere, but slower and easier to make mistakes |
| Custom PHP Code Snippet | Developers who want no extra plugins and full control | Add duplication function in a child theme or code snippets plugin | Lightweight, customizable; must be tested carefully on staging first |
| Staging Workflow for Bulk Layouts | High-traffic or complex sites scaling many new pages | Duplicate and refine layouts on staging, then push changes to live | Safest way to test big changes without affecting real visitors |
Step 8: Build Menus and Navigation for Your WordPress Website
Good navigation helps visitors quickly find content on your new WordPress site.
Create the main menu
- Go to Appearance > Menus or Appearance > Editor (for block themes).
- Create a menu named Main Menu or Primary Menu.
- Add key pages: Home, About, Services, Blog, Contact.
- Assign the menu to the Primary or Main location.
- Save the menu and preview it on the front end.
Configure sidebar or footer widgets
- Go to Appearance > Widgets or edit template parts in the Site Editor.
- Add widgets such as Search, Recent Posts, or Categories.
- Drag to reorder widgets and adjust how much content each one shows.
- Save or update your template.
Step 9: Set Up Backups and Security Before You Launch
Part of learning how to start a WordPress website is protecting it from day one. Do not skip backups and basic security.
Enable site backups
- Check if your host offers daily automatic backups and where they are stored.
- If needed, install a trusted backup plugin from Plugins > Add New.
- Schedule backups to remote storage (cloud drive or remote server).
Hardening basic security
- Install and configure a reputable security plugin.
- Enable Two-Factor Authentication (2FA) for your admin account.
- Use long, unique passwords and avoid “admin” as a username.
Step 10: Launch and Share Your New WordPress Website
Before you announce your site, run a quick launch checklist.
- Browse your site on desktop and mobile to check layout and readability.
- Test your Contact form to confirm messages arrive.
- Check menus and links so there are no 404 errors.
- Go to Settings > Reading and ensure “Discourage search engines from indexing this site” is unchecked.
- Verify your SSL certificate by looking for the padlock icon in the browser.
Next Steps After You Start a WordPress Website
Your WordPress website is now online, but growth comes from consistent maintenance and content.