How to Speed Up WordPress Websites
A practical step-by-step checklist to make your WordPress site load in under 3 seconds
Slow WordPress websites cost you visitors, leads, and sales. A few extra seconds of load time can tank your conversion rates and make ranking in search engines much harder.
The good news: you can dramatically speed up WordPress without becoming a developer. In this guide, you’ll follow a clear, practical checklist to upgrade hosting, configure caching, optimize images, streamline CSS/JS, and pass Core Web Vitals on both desktop and mobile.
If you want a high-level overview first, you can start with this beginner guide to WordPress speed optimization and then come back here for the hands-on implementation.
Prerequisites
Before you change any performance settings, make sure you have a safe way to test and, if needed, roll back your site.
- Administrator access to your WordPress dashboard.
- Access to your hosting control panel (cPanel, Plesk, or managed hosting panel).
- Recent full-site backup (files + database) via your host or a backup plugin.
- Optional but recommended: a staging site where you can test changes before going live.
Step 1: Choose Faster WordPress Hosting
Your hosting is the foundation of your WordPress performance. Even the best caching and image optimization cannot fully fix an overloaded or underpowered server.
How to evaluate your current host
- Run a speed test from multiple regions and look at Time to First Byte (TTFB). High TTFB often points to slow servers.
- Check your hosting dashboard for CPU, RAM, or I/O usage hitting 80–100% during traffic spikes.
- Ask support if your plan has limits on PHP workers or concurrent processes.
When to upgrade or move
- You are on very cheap shared hosting and routinely see slow TTFB.
- Your store or membership site now has constant traffic and background tasks.
- Support suggests “upgrade to the next plan” more than actually optimizing.
If you’re not sure which plan or provider to choose, follow this detailed guide on choosing the best WordPress hosting to shortlist fast, WordPress-optimized options.
Checkpoint
After moving to better hosting (or upgrading your plan), your TTFB should drop, and your site should feel snappier even before additional optimization.
Step 2: Enable Full-Page Caching
Caching stores a pre-generated copy of your pages so WordPress and PHP don’t have to rebuild them on every visit. This is one of the biggest wins for speeding up WordPress.
Configure a single caching solution
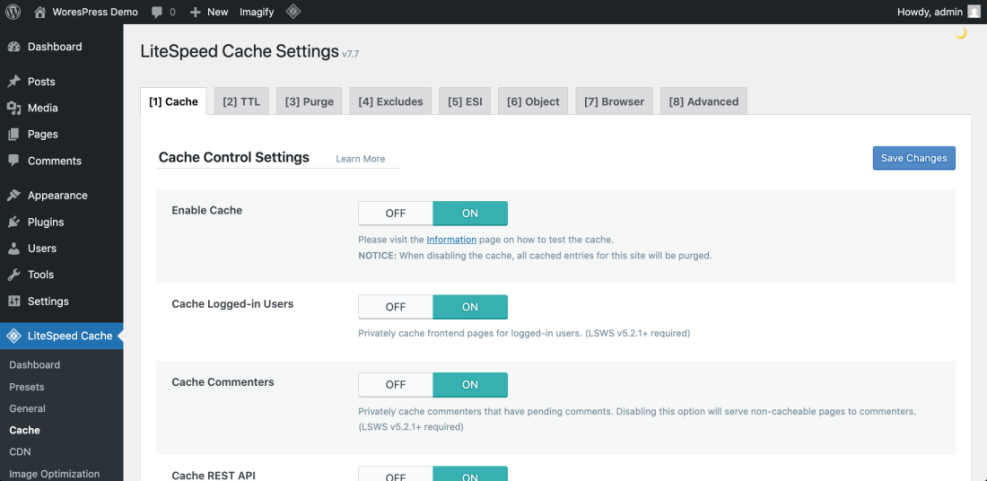
- From the WordPress dashboard, go to Plugins → Add New and install a reputable caching plugin if your host doesn’t already provide one.
- Activate the plugin and enable page caching so that posts and pages are served as static HTML.
- Turn on browser caching so repeat visitors re-use static files instead of downloading them again.
- Enable GZIP or Brotli compression (via the plugin or hosting panel) to reduce file sizes.
- Exclude dynamic pages such as cart, checkout, account, or other pages that must stay uncached.
Checkpoint
After enabling caching, your home and blog pages should load significantly faster for repeat tests, and server response times should drop in your speed-testing tools.
Troubleshooting common caching issues
- Changes not visible: Clear your plugin cache and your browser cache after making design changes.
- Logged-in users see broken layouts: Ensure your cache plugin is not caching admin or logged-in sessions.
- Cart/checkout problems: Verify that eCommerce pages and “Add to Cart” URLs are excluded from caching.
Step 3: Optimize and Lazy Load Images
Images are usually the heaviest assets on a WordPress site. Compressing them and loading only what’s needed can cut your page weight dramatically.
Compress existing images
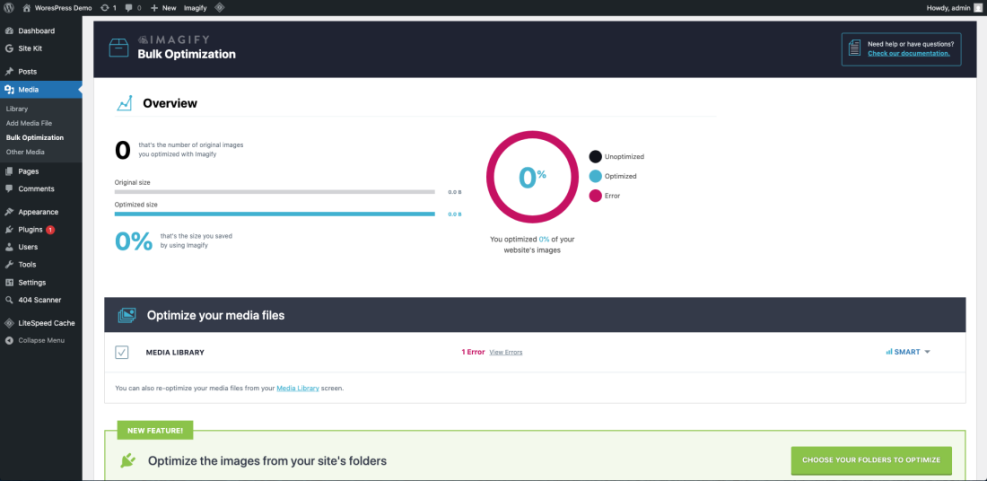
- Install a dedicated image optimization plugin from Plugins → Add New.
- Set automatic compression to a “lossy” setting around 70–80% quality to balance size and appearance.
- Run a bulk optimization job to compress existing images in your media library.
Use modern formats (WebP/AVIF)
- Enable WebP or AVIF conversion in your image plugin so compatible browsers get smaller files.
- Keep fallback JPEG/PNG versions for older browsers automatically via the plugin.
Enable lazy loading
- Turn on lazy loading so off-screen images only load as the user scrolls.
- Exclude critical above-the-fold images (like your logo or hero image) if they flicker or appear late.
For a deeper walkthrough of file formats, compression levels, and workflows, see this full guide to optimizing images for WordPress.
Checkpoint
Your test pages should now show much smaller total page size, and “Serve images in next-gen formats” or “Properly size images” warnings should decrease in performance reports.
Step 4: Minify and Defer CSS and JavaScript
Every extra CSS or JavaScript file is another request the browser must download and parse. Minimizing and deferring these files helps your site render faster.
Minify and combine where safe
- Open your caching or optimization plugin and enable CSS minification and JS minification.
- If available, cautiously enable file combination to reduce the number of separate CSS/JS requests.
- Test your site thoroughly after saving. If layouts break, disable combination and keep only minification.
Defer render-blocking assets
- Enable the option to defer JavaScript so non-critical scripts load after initial paint.
- Load large, non-essential scripts (like analytics or chat widgets) after user interaction or via a delay.
Checkpoint
Render-blocking resource warnings in your performance tools should decrease, and the first visible content on your pages should appear sooner.
Step 5: Clean Up and Optimize Your Database
Over time, your WordPress database fills up with post revisions, spam comments, transients, and other clutter. Cleaning it up can reduce query times and speed up dynamic parts of your site.
Safe database cleanup
- Install a database optimization plugin or use the tools built into your chosen caching plugin.
- Back up your database before running any cleanup routines.
- Remove post revisions, auto-drafts, spam/trashed comments, and expired transients.
- Optimize tables to reclaim unused space.
Advanced: clearing transients via WP-CLI
If you have SSH access and WP-CLI installed, you can clear transients directly from the command line (run this in your site’s root directory):
wp transient delete --allThis command removes all stored transients so WordPress can rebuild only what it needs.
Checkpoint
Your database size should shrink, and dynamic pages like search results, user dashboards, or shop archives may respond more quickly.
Step 6: Use a CDN for Global Visitors
A Content Delivery Network (CDN) stores copies of your static assets on servers around the world. Visitors are served from the nearest location, which cuts latency and speeds up asset delivery.
Set up a CDN for WordPress
- Sign up with a reputable CDN provider that integrates with WordPress.
- Connect your site either by:
- Installing the provider’s WordPress plugin and entering an API key, or
- Pointing your DNS to the CDN if it also acts as a proxy.
- Enable CDN delivery for images, CSS, JS, and other static assets.
- Clear both your CDN cache and your WordPress cache after activation.
Checkpoint
Visitors from other countries should now see significantly faster load times, and tests from different regions should show improved performance metrics.
Step 7: Measure Performance and Core Web Vitals
Optimization without measurement is guessing. You need repeatable tests to confirm that each change actually makes your WordPress site faster.
Establish a baseline
- Pick one or two key pages (home, a popular blog post, or a key landing page).
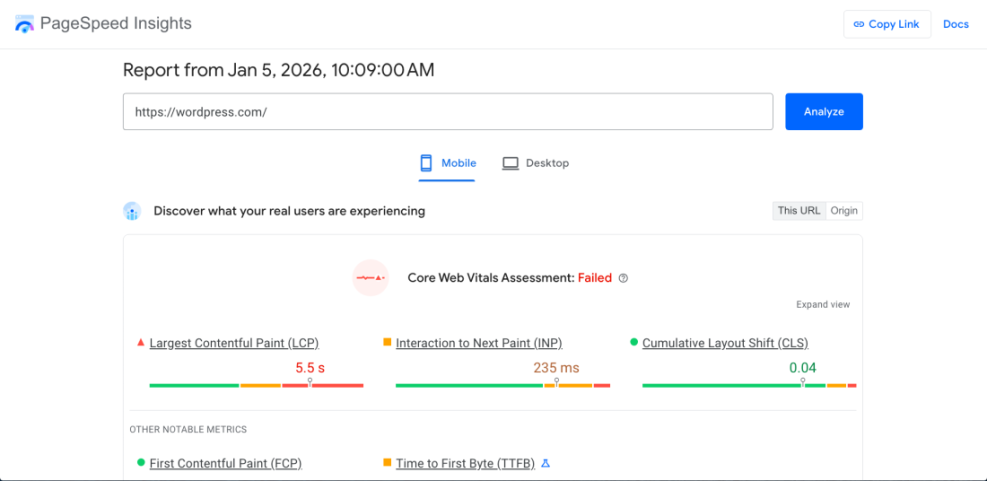
- Test them using tools like Google PageSpeed Insights or WebPageTest on both mobile and desktop.
- Record metrics such as Largest Contentful Paint (LCP), Interaction to Next Paint (INP), and Cumulative Layout Shift (CLS).
Test after each major change
- Re-run your tests after enabling caching, image optimization, and a CDN.
- Compare scores and waterfall charts to see where improvements came from.
- Undo or adjust any change that hurts user experience, even if a score looks slightly better.
Checkpoint
Your site should now load in a few seconds or less on a typical 4G mobile connection, and Core Web Vitals should be in the “Good” range for your main pages.
Step 8: Keep Your WordPress Site Fast Over Time
Speed optimization is not a one-time project. New plugins, themes, and content can slowly erode performance if you don’t monitor and maintain your setup.
Ongoing maintenance habits
- Update WordPress core, themes, and plugins regularly to get performance improvements and security fixes.
- Remove unused plugins and themes instead of leaving them deactivated.
- Run a quick speed test whenever you add a new plugin, page builder, or marketing script.
- Schedule periodic database cleanups and media library reviews.
Checkpoint
With ongoing monitoring and small monthly tune-ups, your site should stay consistently fast instead of slowing down again after a few months.
Wrap Up Your Faster WordPress Site
You’ve seen how much of WordPress speed comes down to fundamentals: quality hosting, smart caching, optimized images, efficient assets, a lean database, and a good CDN.
By following this step-by-step workflow, you’re not just chasing a single performance score. You’re building a repeatable process you can apply to every site you manage, keeping page loads fast and user experience smooth as your content and traffic grow.
From here, treat speed optimization as part of your regular maintenance routine, not an emergency project when things already feel slow.
Further Reading
- WordPress Performance and Speed Optimization
- WordPress Speed Optimization Step by Step
- WordPress Performance Tuning Beginner Guide
- How to Run a Monthly Speed Audit for WordPress
- How to Fix Common WordPress Performance Issues