How to Speed up WordPress
A practical no-code guide to making your WordPress site faster, even on shared hosting.
Does your WordPress site feel slow, even though you are “just” on a simple blog or business site? Long load times hurt SEO, conversions, and user trust—especially on mobile and on lower-cost shared hosting.
In this guide, you will learn how to speed up WordPress using safe, repeatable steps that work with the Classic Editor, Jannah theme, and most other themes and plugins. You will benchmark your current performance, clean up bloat, configure caching, optimize images, and tune your hosting settings—without touching code or moving hosts.
If you want a deeper theory background later, you can pair this tutorial with the dedicated beginner guide to WordPress speed optimization, but for now we will stay practical and action-focused.
Prerequisites
Before you start changing performance settings, it is important to protect your site and set up basic tools.
- Full site backup: Make sure you have a recent backup of your WordPress files and database (via your host or a backup plugin).
- Login access: Administrator access to your WordPress dashboard and to your hosting control panel (cPanel, Plesk, or a custom panel).
- Test URL: Choose one or two key pages to test—usually your homepage and your main money/landing page.
- Speed testing tools: A browser with access to Google PageSpeed Insights and a waterfall tool like GTmetrix or WebPageTest.
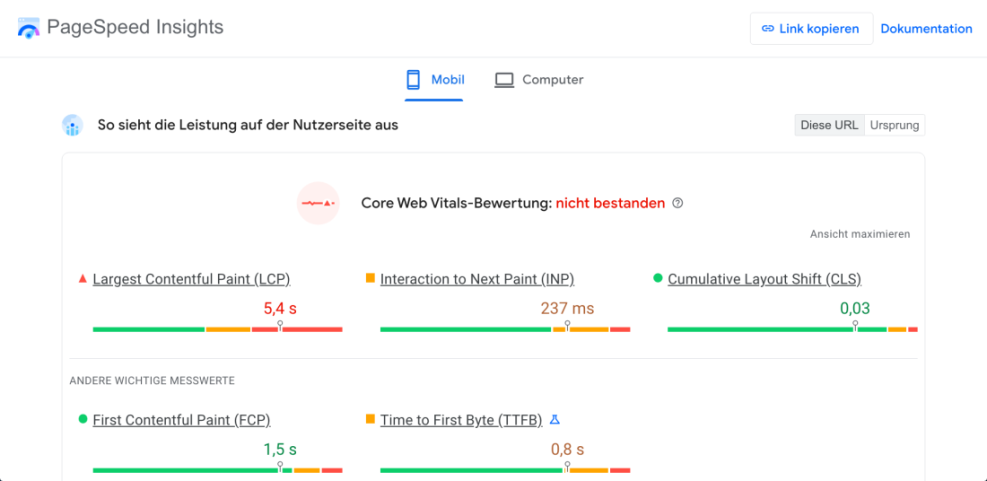
Step 1: Benchmark your current WordPress speed
Your first step is to see how slow (or fast) things are right now. This gives you a baseline so you can prove your improvements and catch any regressions later.
- Open Google PageSpeed Insights and test your homepage URL, focusing on the mobile tab first.
- Note key metrics such as Largest Contentful Paint (LCP), Total Blocking Time (TBT), and Cumulative Layout Shift (CLS).
- Run the same URL in GTmetrix or WebPageTest to see total load time, page size, and number of requests.
Write these results down in a simple spreadsheet or document. You will run the same tests again after each major optimization round.
Step 2: Remove heavy themes and plugins
No caching or CDN can fully fix a bloated site. The easiest and safest way to speed up WordPress is to remove what you do not actually need.
- In your WordPress dashboard, go to Appearance > Themes and make sure you have only your live theme (for example, Jannah) and one lightweight default theme as a fallback (such as Twenty Twenty-Three). Delete unused themes.
- Go to Plugins > Installed Plugins and mark plugins you no longer use (old form plugins, deactivated sliders, test tools, etc.). Deactivate them, confirm everything still works, then delete them.
- Look for overlapping plugins. For example, you do not need multiple page builders, multiple analytics plugins, or multiple caching plugins at the same time.
- Replace all-in-one “do everything” plugins with focused, lightweight alternatives where possible.
Step 3: Configure caching on your WordPress site
Caching lets WordPress serve static HTML versions of your pages instead of rebuilding them on every request. This is one of the biggest “speed per minute” wins you can get, especially on shared hosting.
- Check your host’s documentation for built-in caching (e.g., LiteSpeed Cache, NGINX cache, or a custom “server cache”). If it exists, enable it from your hosting control panel.
- If your host does not provide caching, install a reputable caching plugin from Plugins > Add New and activate it.
- In your caching plugin settings, enable:
- Page caching: Creates static HTML versions of your pages.
- Browser caching: Adds headers so visitors’ browsers reuse cached files.
- GZIP or Brotli compression: Compresses text-based resources before sending them.
- Save the settings and clear the cache from the plugin or host panel. Then re-run your speed tests.
For a more detailed, plugin-by-plugin walkthrough, you can follow the dedicated complete WordPress caching setup guide after you finish this core tutorial.
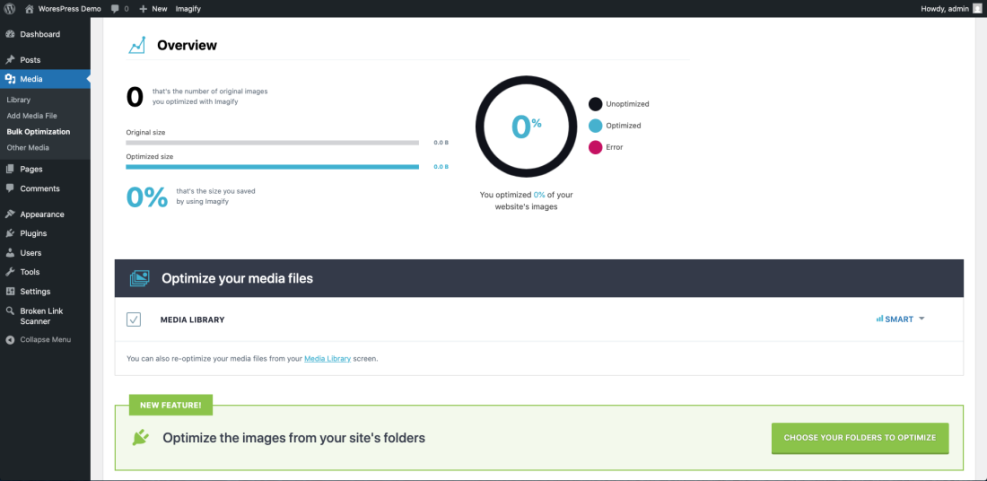
Step 4: Optimize images for faster loading
Large, uncompressed images are one of the most common causes of slow WordPress sites. Your goal is to serve the right format, size, and dimensions for each image.
- Audit a few slow pages and check the size of the largest images in your speed test waterfall. Anything above 200–300 KB for a single image is a red flag.
- Resize hero images to a reasonable maximum width (for example, 1600 px) and blog content images to 1200 px or less before uploading.
- Use a compression and WebP conversion plugin to automatically compress existing and new uploads.
- Enable lazy loading in your theme options (Jannah has performance-related settings) or within your optimization plugin so off-screen images load only when needed.
To go deeper into formats, compression levels, and workflow best practices, follow the dedicated image optimization checklist for WordPress websites once you have your basic setup in place.
Step 5: Clean and optimize your WordPress database
Over time, your WordPress database fills up with post revisions, transients, spam comments, and data from plugins you no longer use. Cleaning this can shave seconds off some queries, especially on busy sites.
- Ensure you have a current backup (files and database) from your backup plugin or hosting control panel.
- Install a reputable optimization plugin or use your caching plugin’s database optimization tab if it has one.
- From the WordPress dashboard, go to the optimization interface and select safe tasks such as cleaning revisions, spam/trashed comments, and expired transients.
- Run the optimization and then check your site front-end for any issues.
Step 6: Tune your hosting and PHP version
Even on low-cost shared hosting, you can often unlock extra speed by updating PHP and enabling specific performance features offered by your provider.
- In WordPress, go to Tools > Site Health > Info and review your server and PHP versions.
- Log into your hosting control panel and find the PHP selector or “PHP Manager.” Upgrade to a supported PHP 8.x version if you are still on 7.x, then test your site.
- Look for options like OPcache or object cache and turn them on if your host supports them.
- If your host provides Redis or Memcached, follow their documentation to enable persistent object caching for WordPress.
If you still see poor performance after all optimizations, it may be time to plan a move to faster hosting, but you should first squeeze everything you can out of your current plan.
Step 7: Test, monitor, and avoid regressions
Speed optimization is not a one-time task. Every new plugin, theme change, or content update can affect performance, so you need a simple ongoing process.
- Re-run the same PageSpeed Insights and GTmetrix tests you used in Step 1 and compare metrics.
- Create a short monthly checklist: check homepage load time, scan for oversized images, and review plugin changes.
- Keep a change log: note dates when you install or remove plugins, switch themes, or change caching settings.
- Educate your team or authors to avoid uploading enormous images or installing plugins without approval.
Bringing your WordPress site up to speed
By benchmarking your site, removing bloat, enabling smart caching, optimizing images, cleaning your database, and tuning your hosting settings, you can dramatically speed up WordPress without writing a single line of code or changing providers.
Going forward, keep your plugin stack lean, test major changes, and revisit your performance metrics regularly. When speed becomes part of your normal WordPress maintenance routine, both search engines and visitors will reward you with better rankings, higher engagement, and more conversions.
Further Reading
- How to Speed Up Your WordPress Site
- WordPress Speed Test Checklist
- Fast WordPress Hosting: How to Pick a Faster Provider
- WordPress Speed Optimization Checklist for Busy Site Owners
- How to Fix Common WordPress Performance Issues