How to Migrate a WordPress Blog Safe Step by Step
Move your site without downtime using backups and smart planning
WordPress blog migration feels scary when your site holds years of work and steady search traffic. You worry about downtime, broken images, and losing rankings. However, when you follow a clear process with backups, staging, and testing, you can move your blog safely to a new host or domain without nasty surprises.
This tutorial walks you through safe, step by step WordPress blog migration. You will first see a quick overview, then detailed plugin and manual methods, plus checklists for backups, URL fixes, and troubleshooting. By the end, you can repeat the process with confidence whenever you need to move your site.
Safe WordPress Blog Migration Quick Steps
Core Steps At A Glance
Before diving into details, it helps to see the big picture. The safe migration flow is almost always the same, no matter which plugin or host you use.
- Take a full backup of files and database.
- Set up the new hosting or server environment.
- Create a copy of your site with a migration or backup tool.
- Import that copy to the new host or server.
- Update URLs, permalinks, and configuration if needed.
- Test everything on a staging URL or hosts file override.
- Switch DNS or domain and run a final post-migration check.
When you treat the process as a checklist, you greatly reduce the risk of missed steps and hidden errors.
How Long Does A Typical WordPress Blog Migration Take?
Most small blogs move in under an hour of actual work time, plus DNS propagation. Larger sites with many images, big databases, or complex plugins need more time for backups and imports. Therefore, you should schedule the move for a quiet traffic window and never rush through the testing phase.
Plan Your Migration And Choose Tools
Decide Why You Are Moving And When
Before touching files, you should write down why you are migrating. Are you switching hosts for performance, changing domains for branding, or moving environments from staging to live? Clear goals help you decide whether you need only a host change, a domain change, or both, and which steps must include SEO-friendly redirects.
In addition, choose a low-traffic time for the actual DNS switch. Late evenings or weekends usually reduce the number of visitors who might see cached pages or short glitches.
Choose Between Plugin, Manual, Or Host Service
You can migrate your WordPress blog with a migration plugin, with manual file and database copies, or with a host’s built-in migration service. Each option has strengths and weaknesses, so it helps to compare them quickly before you commit.
The table below summarizes the most common methods so you can match them to your skills and site size.
| Migration Method | Pros | Cons |
|---|---|---|
| Migration Plugin | Simple interface, handles files and database together, often rewrites URLs automatically. | May struggle with very large sites, can hit host upload limits, depends on plugin reliability. |
| Manual Files And Database | Works on almost any host, full control, good for learning how WordPress works. | More technical, easier to make mistakes, slower for beginners. |
| Host Migration Service | Minimal effort, experts handle details, often included in hosting plans. | Less control, might not support complex setups, sometimes limited scheduling options. |
For most beginners, a good migration plugin or a free host-provided migration is the safest starting point. Manual migration is excellent when you need more control or when plugin limits become a problem.
Backup And Staging Before You Move
What Should You Back Up Before A WordPress Blog Migration?
Safe migration always starts with backup. At minimum, you need the full database and the entire wp-content directory, which contains themes, plugins, and uploads. Ideally, you also copy wp-config.php and .htaccess so you can restore configuration and custom redirects if something goes wrong.
Create A Staging Or Test Copy First
Whenever possible, you should first migrate to a staging site. Many managed hosts provide one-click staging copies of your WordPress site. Alternatively, you can create a subdomain like staging.yourdomain.com and migrate there first. This lets you test plugins, layouts, and performance without affecting your live visitors.
Document Your Current Site Settings
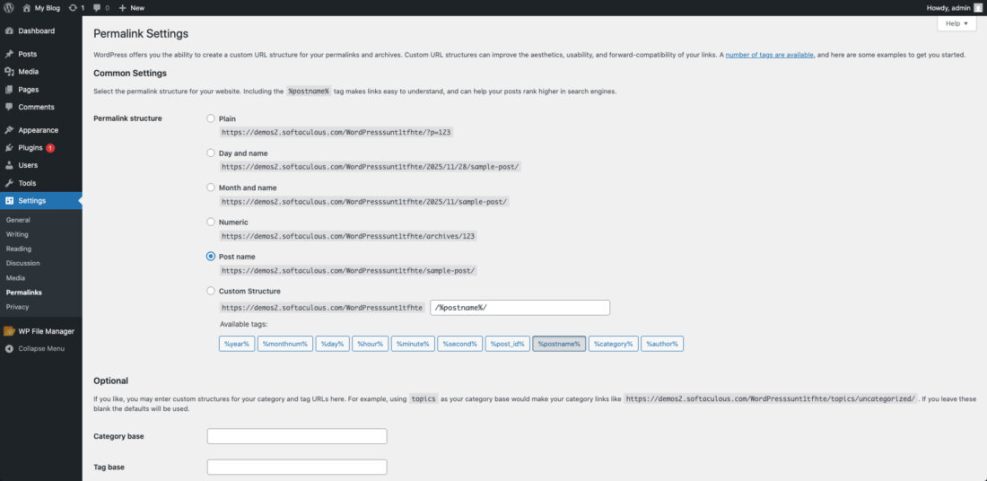
Before you move anything, take screenshots of important settings. For example, note permalink structure, reading settings, and plugin configurations so you can rebuild them if needed.
Navigate to Settings » Permalinks and confirm which structure you use, such as “Post name.”
- Confirm your current permalink structure and write it down.
- Verify your main theme and any child theme in use.
- Note critical plugins and their key settings screens.
- Ensure your backup plugin or host backups are working.
This simple documentation step saves time when you troubleshoot and ensures your migrated blog behaves like the original.
Migrate Your WordPress Blog With A Plugin
Prepare The New Hosting Environment
First, log in to your new hosting panel and create an empty site or an empty folder for the new installation. Most control panels let you create a fresh WordPress site with a one-click installer. However, for plugin-based migration, you usually keep that new site very basic, install the migration plugin, and then overwrite it with your imported copy.
Export Your Site With A WordPress Blog Migration Plugin
Next, log in to your current WordPress dashboard and install a trusted migration plugin. Common options include tools that create a single archive file and an installer, or plugins that export a special file you later upload on the new site. After activating the plugin, follow its wizard to build a full site package that includes files and database.
Navigate to the plugin’s menu in your dashboard, such as All-in-One WP Migration or Duplicator, and start a new export or package.
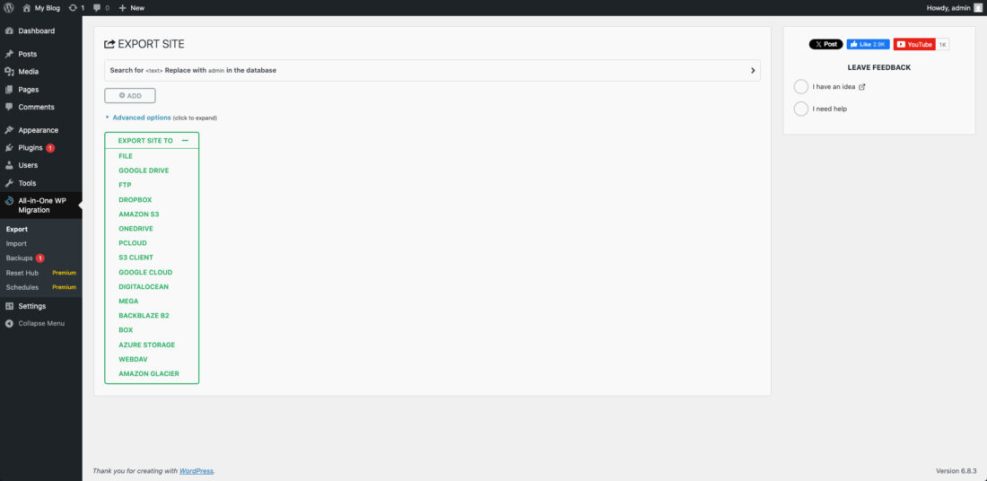
Import The Package On The New Host
On the new host, log in to the fresh WordPress site and install the same migration plugin. Then upload the exported file from your old site, or upload the installer and archive pair through FTP, depending on how the plugin works. The plugin restores your database and files so the new site matches the old one as closely as possible.
What Is The Easiest Way To Move A WordPress Site?
For most beginners, the easiest way is to use a migration plugin that creates a single archive and restores it on the new host. This avoids manual database exports and imports. However, you should still keep a separate backup and test the restored site carefully before changing DNS records or going live.
Manual Migration For Full Control
Export Files And Database From The Old Host
Manual migration gives you more control and is close to the process described in official WordPress documentation. Start by exporting the database with a tool like phpMyAdmin, and by copying your WordPress files from the old host using FTP or the file manager. Save everything to a safe folder on your computer in case you need to restore it later.
Create Database And User On The New Host
On the new host, create an empty MySQL or MariaDB database plus a user with full privileges. Most cPanel-style dashboards provide a “MySQL Databases” tool that lets you create the database, user, and assign permissions. Write down the database name, username, password, and server hostname, because you will need them in the configuration file.
Upload Files And Update wp-config.php
Upload your WordPress files to the new host using FTP or the file manager, usually into the public_html directory or the folder that matches your domain. Then edit wp-config.php and replace the old database name, username, password, and host with the new values. Finally, import your SQL file into the new database using phpMyAdmin or a similar tool.
When Should You Use Manual WordPress Blog Migration Instead Of Plugins?
Manual migration is helpful when your site is very large, when plugins hit host upload limits, or when you want to understand every piece of the process. It is also useful when you manage many sites and prefer a repeatable, scriptable workflow using tools like WP-CLI or server-level automation.
Fix URLs, Permalinks And Common Issues After Moving
How Do You Update URLs After WordPress Blog Migration?
If you changed your domain, moved WordPress into a different folder, or switched from HTTP to HTTPS, you must update your URLs. The safest way for most users is to use a search-and-replace plugin designed for WordPress databases, or a trusted migration plugin that already handled URL rewrites. Always do a dry run first and then verify images and internal links.
Reset Permalinks To Fix 404 Errors After WordPress Blog Migration
After any migration, you should refresh permalinks so WordPress rebuilds its URL rules.
Navigate to Settings » Permalinks on the new site and click Save Changes without modifying the structure.
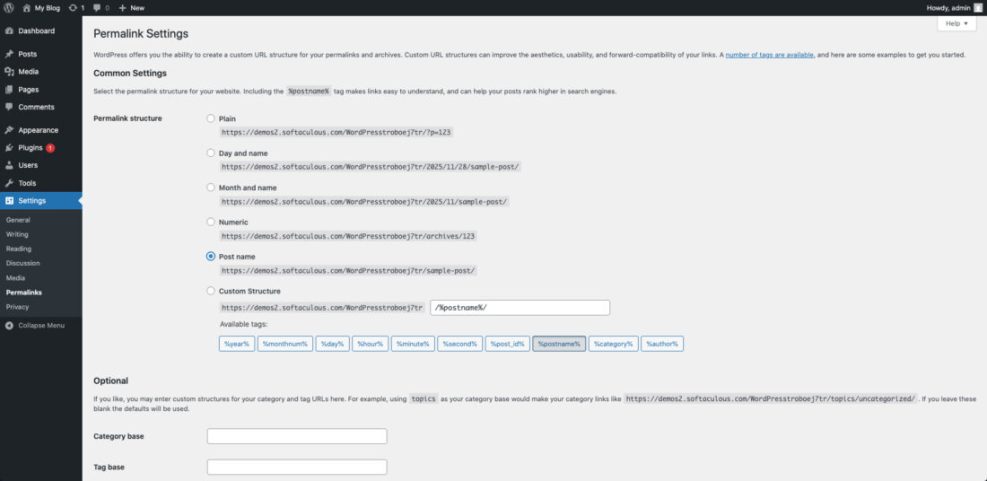
This step often fixes 404 errors on posts and pages, especially when your new server uses a different web server configuration.
Update Site Address And SSL Settings After The Move
If you changed from a temporary URL to the final domain, or enabled HTTPS, you should confirm the WordPress and Site Address values.
Navigate to Settings » General and confirm that both WordPress Address (URL) and Site Address (URL) use the correct domain and protocol, such as https://www.yourdomain.com.
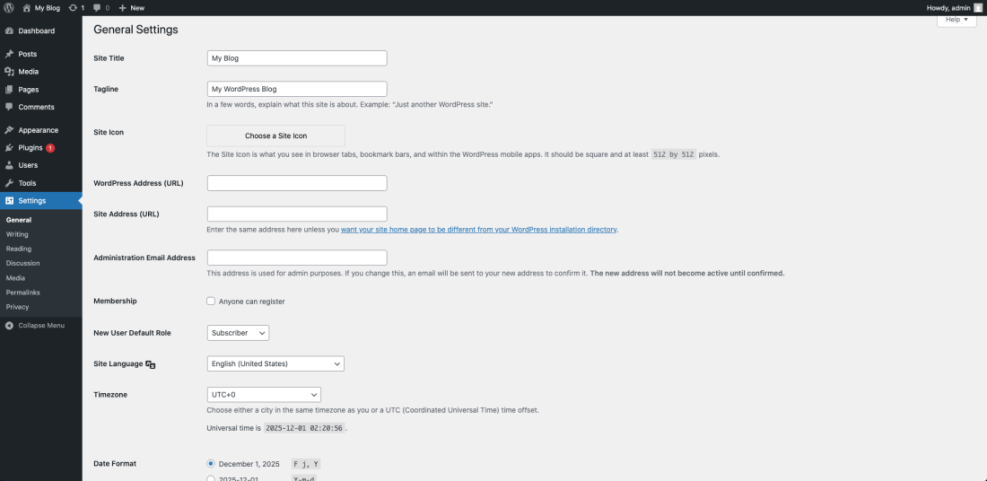
If those fields are locked, your host or developer might have defined constants in wp-config.php, so you may need help adjusting them.
Add Redirects When You Change Domains
When you move to a new domain, you should set up 301 redirects from old URLs to new ones so search engines and visitors reach the right content. On Apache servers, you often do this in the .htaccess file in the root of the old site.
RewriteEngine On
RewriteCond %{HTTP_HOST} ^oldexample.com$ [NC]
RewriteRule ^(.*)$ https://www.newexample.com/$1 [L,R=301]
If your host uses Nginx or a managed panel, you configure redirects there instead. After you add redirects, test them with a browser and an online redirect checker.
Test Content, Forms, And Speed After Your WordPress Blog Migration
Once URLs and redirects look good, you should click through your main pages. For example, test menus, recent posts, search, comment forms, and contact forms. In addition, compare basic speed metrics between the old and new hosts. If you see big slowdowns, review caching, image optimization, and any security or firewall settings that changed during migration.
For more advanced SEO checks and redirects planning, you might later create a dedicated article such as WordPress migration checklist for blogs to support long-term optimization.
WordPress Blog Migration Conclusion
Safe WordPress blog migration is less about fancy tools and more about discipline. When you always take complete backups, practice on a staging copy, and follow a repeatable checklist, moving hosts or domains becomes routine instead of stressful. The real goal is to treat migration as part of your long-term maintenance process, not as a one-time emergency.
Your next step is simple: document your current site, choose a migration method that fits your skills, and run a practice migration to a staging URL. Once you succeed there, you can confidently move the live site with the same steps and keep your visitors and search traffic intact.
More Guides To Help You Move Your Site
If you want to go deeper into backups, staging, and SEO after migration, these related guides would fit naturally alongside this article.
- Best WordPress lms plugins compared
- How to use ai in WordPress
- Install WordPress step by step
- WordPress migration checklist for blogs
- Common WordPress backup errors and how to fix
You can use these topics to build a small migration hub, giving readers a clear path from basic moves to more advanced tuning and troubleshooting.