How to Edit WordPress Site (Beginner’s Guide)
Learn how to update your WordPress pages, posts, menus, header, and footer without breaking your site.
Opening your WordPress Dashboard for the first time can feel risky. One wrong click and you worry the entire site might break, your layout will collapse, or your homepage will disappear.
In this guide, you’ll learn exactly how to edit your WordPress site step by step: pages, posts, menus, header, and footer. You’ll do it safely, without touching code, so you can make confident changes as your business and content evolve.
If you’re completely new to WordPress, you may also want to bookmark our WordPress guides and tutorials overview for broader learning while you work through this tutorial.
Prerequisites
Before you start editing your WordPress site, make sure you have these basics in place. This keeps your changes safe and saves you from painful mistakes.
- Working WordPress install: Your site should already be installed and accessible in a browser.
- Login credentials: You have a username and password with the role of Administrator (or at least Editor).
- Recent backup: A backup plugin or hosting backup so you can roll back if something goes wrong.
- Stable internet and browser: Use a modern browser (Chrome, Firefox, Edge, Safari) to avoid editor glitches.
Step 1: Understand How Your Edit WordPress Site Is Organized
Editing is much easier when you understand how WordPress structures a site. Most of what you see on the front end is controlled by a combination of content, design, and navigation.
- Content: Pages (static content like Home, About, Contact) and Posts (blog articles or news updates).
- Design: Your active theme (plus any page builder) controls fonts, colors, layouts, and templates.
- Navigation: Menus, header, footer, and sometimes sidebars help visitors move through your site.
Modern WordPress sites may use the Block Editor (Gutenberg) or the Classic Editor. The basic actions are the same—edit text, images, and settings—but the interface looks slightly different. This guide will mention what to expect in both.
Step 2: Log In to the WordPress Dashboard
To change anything on your site, you need to be in the WordPress admin area (Dashboard). Here’s the standard way to log in:
- Open your browser and go to
https://yourdomain.com/wp-admin/(replaceyourdomain.comwith your actual domain). - Enter your username and password and click Log In.
- After login, you’ll see the Dashboard with the left-hand admin menu (Posts, Pages, Appearance, Plugins, etc.).
- Use this admin menu for all editing tasks—never edit your site by changing files directly unless you know exactly what you’re doing.
Step 3: Edit Existing Pages and Posts
Most day-to-day changes you’ll make are to pages (like Home or About) and posts (blog articles). The process is similar for both.
Edit a Page
- In the left admin menu, click Pages > All Pages.
- Find the page you want to edit (e.g., Home or Contact) and hover over it.
- Click Edit (or Edit (Block Editor) / Edit (Classic Editor) depending on your setup).
Inside the editor:
- Block Editor: Each paragraph, heading, image, or button is a “block.” Click a block to change its text, alignment, color, or other settings in the right sidebar.
- Classic Editor: You’ll see a single content box similar to a word processor. Edit text directly and use the toolbar for headings, bold, lists, and links.
When you have finished your changes:
- Click Preview to view your edits without publishing.
- Click Update to make the changes live on your site.
Edit a Blog Post
- Go to Posts > All Posts.
- Hover over the post you want to edit and click Edit.
- Change the content, title, categories, tags, and featured image as needed.
- Click Update when you’re happy with the changes.
Step 4: Change the Look of Your Site Safely
Your theme controls the overall look and feel of your Edit WordPress site. You can adjust logos, colors, fonts, and layout without touching code.
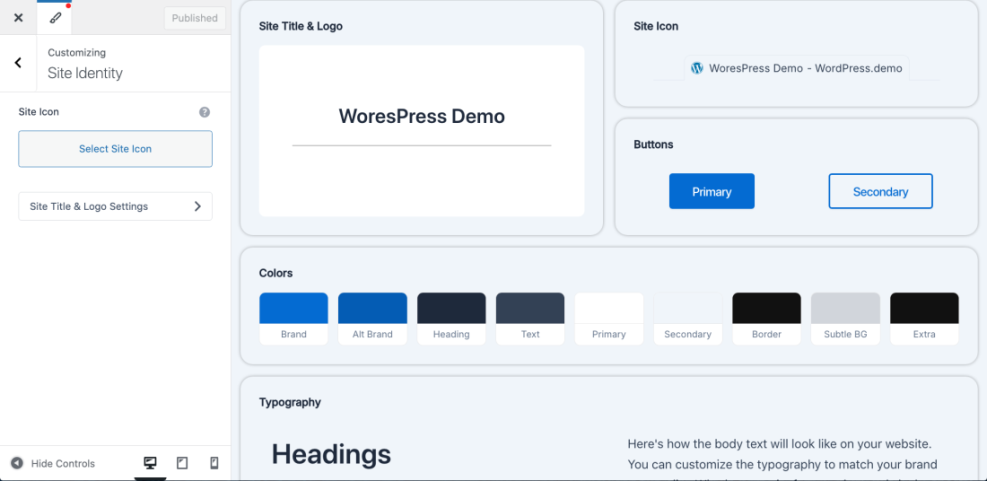
Using the Customizer (Classic Themes like Jannah)
- Go to Appearance > Customize.
- The Customizer shows a live preview of your site on the right and settings on the left.
- Use panels like Site Identity, Colors, Typography, and Header to tweak your design.
- As you change options, the preview updates so you can see exactly how your site will look.
- Click Publish to save and apply design changes.
Using the Site Editor (Block Themes)
- Go to Appearance > Editor (sometimes labeled Editor (beta) or Site Editor).
- Choose which template you want to edit (e.g., Home, Single, Page, Header, or Footer).
- Click elements directly on the page to change text, blocks, layout, and patterns.
- Click Save to apply your changes.
Step 5: Edit Menus and Navigation Links
Navigation menus help visitors find their way around your site. Keeping them tidy and up to date is a crucial part of editing your WordPress site.
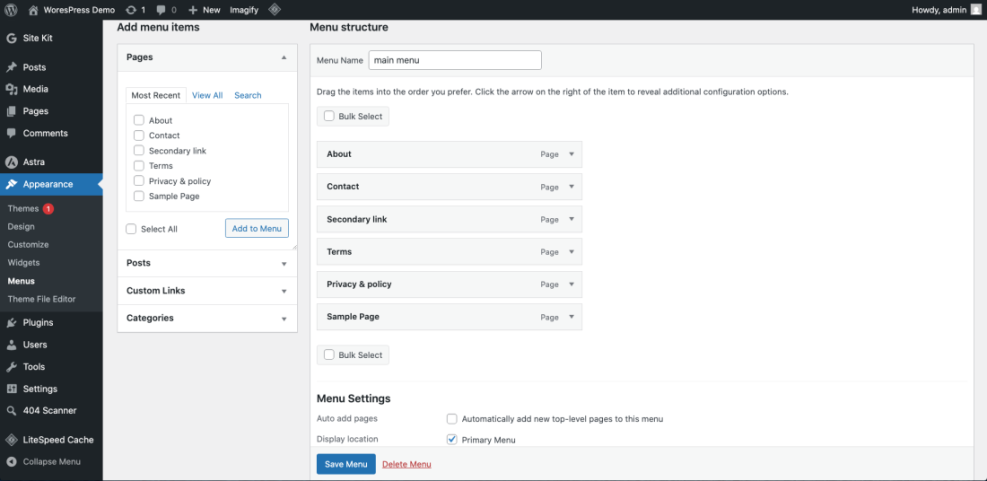
Edit Menus in Classic Themes
- Go to Appearance > Menus.
- Choose the menu you want to edit from the dropdown (e.g., Main Menu or Primary).
- To add items, use the left sidebar to select Pages, Posts, or Custom Links and click Add to Menu.
- Drag and drop menu items to reorder them. Indent an item slightly to create a dropdown (submenu).
- Use the Menu Settings section to assign the menu location (e.g., Primary, Footer, or Mobile).
- Click Save Menu to apply changes.
Edit Menus in the Block Site Editor
- Go to Appearance > Editor and open the Header template or template part.
- Click the navigation block that contains your menu.
- Use the block toolbar to add, remove, or reorder menu links.
- Click Save to update the header site-wide.
For a deeper dive into structuring menus and navigation, see the beginner guide to WordPress menus and navigation which explores more layout and usability tips.
Step 6: Update Header and Footer Without Breaking Layout
Your header and footer often include key links, contact details, and branding. Editing them correctly keeps your site professional and easy to navigate.
Edit Header and Footer in Classic Themes
- Widgets: Go to Appearance > Widgets. Many themes use widgets for footer columns and sometimes header areas. Edit widget titles and content or drag new widgets into the areas you want.
- Theme Options: Some themes add a dedicated options panel (e.g., Theme Options or Header Settings) where you can control logos, social icons, and top bar content.
- Menus: Assign special menus to header or footer locations in Appearance > Menus (e.g., “Top Menu,” “Footer Menu”).
Edit Header and Footer in the Block Site Editor
- Go to Appearance > Editor.
- Open the Header or Footer template part.
- Click text, icons, or menus directly to edit them using blocks.
- Click Save to apply changes globally.
If you want a very detailed walkthrough devoted just to the bottom area of your site, check out the dedicated guide on how to edit your WordPress footer.
Step 7: Make Advanced Edits with Code (Optional)
Most site owners can do everything they need with the visual editors and theme settings. But if you’re comfortable with code, there are advanced options for deeper customization.
Use Additional CSS Instead of Editing Theme Files
- Go to Appearance > Customize > Additional CSS (for classic themes).
- Add small snippets of CSS to tweak spacing, colors, or fonts.
- Use Preview to confirm everything looks correct before publishing.
/* Example: Make site title slightly larger */
.site-title {
  font-size: 2.2rem;
}
Use a Child Theme for Bigger Code Changes
- Create a child theme so your changes are not overwritten by theme updates.
- Edit templates like
header.php,footer.php, orsingle.phpfrom your child theme only. - Use an FTP client or your hosting file manager instead of the built-in Theme File Editor whenever possible.
functions.php or other PHP files incorrectly can cause a white screen or fatal error. Always ensure you have SFTP access and a recent backup before changing code.You’re Ready to Confidently Edit WordPress Site
Editing WordPress site doesn’t have to be stressful. You’ve learned how to log in, update pages and posts, adjust design settings, manage menus, and safely modify headers and footers.
With regular practice and small, controlled changes, you’ll quickly move from “afraid to touch anything” to confidently maintaining and improving your website. From here, you can dive deeper into speed optimization, SEO, and more advanced design work, knowing you understand the core editing tools.
Further Reading
- How to Edit WordPress Website
- How to Edit a WordPress Site
- Beginner Checklist for Optimizing WordPress Blog Posts
- Beginner WordPress Security Best Practices Guide


