How to Edit WordPress Navigation Bar
Step by step menu editing tutorial for classic WordPress themes
If you are unsure how to control your WordPress navigation bar, this tutorial will guide you step by step. You will learn exactly how to edit navigation bar links, change their order, and assign the correct menu to the header without breaking your layout.
By the end, you will confidently manage your main menu on classic themes such as Jannah and newer block themes. If you also want to improve your overall page layout, review our WordPress migration blog guide after finishing this tutorial.
What You Need to Start
- Access to the WordPress Dashboard with an Administrator account.
- An active WordPress theme installed and running on your site, such as Jannah.
- A list of pages or links you want to show in your navigation bar.
- Optional a recent full site backup or a staging site where you can test changes safely.
Step 1: Identify your menu system
Before you edit the navigation bar, identify whether your theme uses the classic Menus screen or the newer Site Editor. This determines where you will make your changes.
- Log in to your WordPress Dashboard at yourdomain.com/wp-admin.
- Look at the left-hand sidebar and find Appearance.
- Check whether you see Menus listed under Appearance.
- If you see Menus, your site uses the classic menu system used by themes like Jannah.
- If you see Editor or Site Editor instead of Menus, your site uses a block theme and full site editing.
How to verify Decide which path you will follow in this guide. If you saw Menus, follow Steps 2 to 4 and 6. If you saw only Editor, pay special attention to Step 5 for block themes.
Step 2: Open and select your navigation menu
Now open the correct screen to edit the navigation bar and select the menu that controls your main header links.
- In the WordPress Dashboard, go to Appearance » Menus.
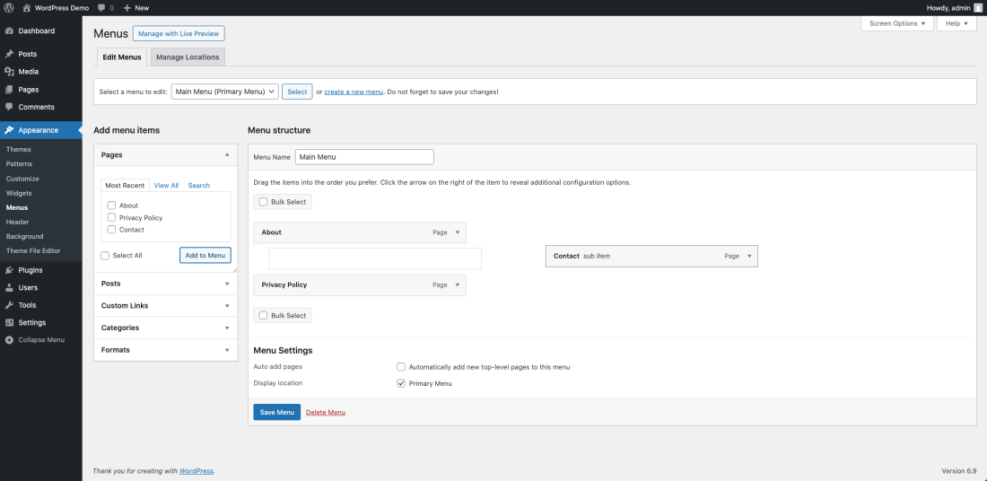
- At the top of the page, find the Select a menu to edit dropdown list.
- Open the dropdown and look for menu names such as Main Menu, Primary Menu, or a theme-specific name like Main Navigation.
- Select the menu that most closely matches what you see in your current navigation bar.
- Click the Select button to load that menu.
- Review the items under Menu structure and confirm they match the links currently shown in your site header.
How to verify Open your site in a new browser tab. Compare the links in the header navigation bar to the items listed in the Menu structure area. If they match, you are editing the correct menu.
For more background on this screen, you can also check the official WordPress.org Menus documentation.
Step 3: Add remove and reorder menu items
With the correct menu selected, you can add new links, remove unwanted items, and reorder everything to match how you want your navigation bar to appear.
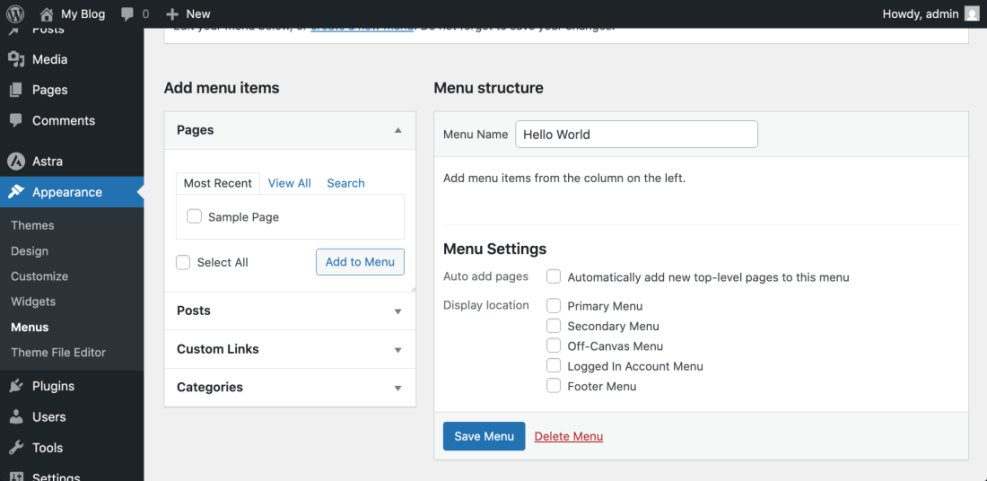
- On the left side of the Menus screen, expand the Pages box.
- Check the pages you want to add to your navigation bar, then click Add to Menu.
- To add a custom link (for example, an external site or a phone link), open the Custom Links box, enter the URL and Link Text, then click Add to Menu.
- To include blog categories, open the Categories box, select the categories, and click Add to Menu.
- In the Menu structure area, click and drag each item up or down to reorder how they appear from left to right in the navigation bar.
- Drag an item slightly to the right under another item to create a dropdown submenu under that parent link.
- Click the small down arrow on any menu item to open its settings, then edit the Navigation Label if you want a shorter link text.
- In the same panel, click Remove if you want to delete that item from the navigation bar.
- Scroll down and click Save Menu to apply your changes.
How to verify Refresh your live site in the browser. Confirm that new links appear, removed items are gone, and dropdown menus open correctly when you hover or tap parent items.
Step 4: Assign the menu to theme locations
Your navigation bar will only display correctly if the menu is assigned to the right theme location, such as Primary or Main Navigation. This is especially important with themes like Jannah that support multiple header menus.
- Stay on the Menus screen for the menu you just edited.
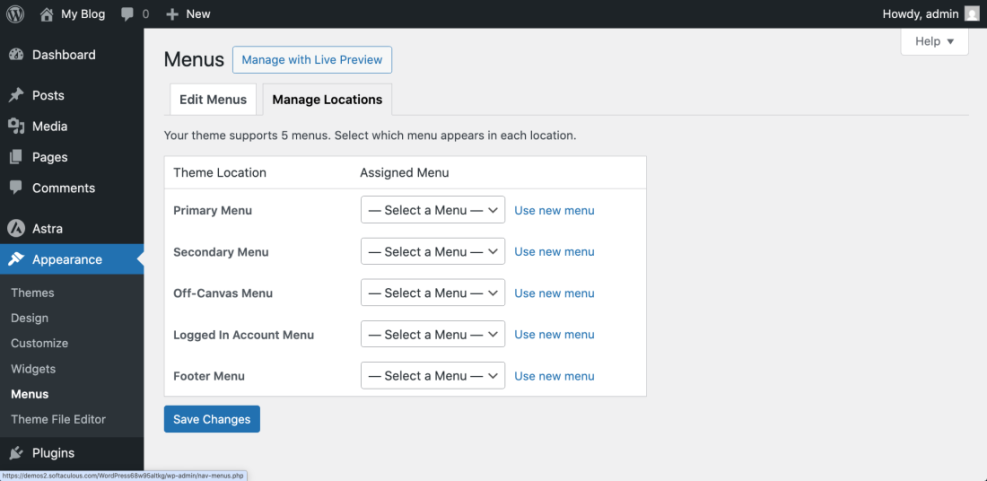
- Scroll down to the Menu Settings area and look for the Display location checkboxes, or click the Manage Locations tab at the top.
- Identify the location that controls your main header navigation bar, usually named Primary, Main Navigation, or Main Menu.
- Tick the checkbox or choose your edited menu from the dropdown next to that location.
- Optionally assign other menus to locations such as Top Menu or Footer Menu if your theme provides them.
- Click Save Changes or Save Menu to confirm.

How to verify Refresh your homepage. Confirm that the correct set of links appears in the header navigation bar. If your theme supports a separate top bar or footer menu, check those areas as well.
Step 5: Edit the WordPress navigation bar in block themes
If your site uses a block theme and full site editing, you will edit the navigation bar inside the Site Editor using the Navigation block instead of the classic Menus screen.
- From the WordPress Dashboard, go to Appearance » Editor.
- On the opening screen, click the Templates or Home template you want to modify, or click directly on the header area in the preview.
- In the top toolbar, click the List View icon to open the block tree and locate the Header and then the Navigation block.
- Select the Navigation block, then use the + button to add new links and type the page or post you want to insert.
- Drag items up or down in the List View to reorder them, or drag them slightly to the right to create nested dropdown menus.
- Use the block toolbar and sidebar settings to adjust alignment and responsive behavior, then click Save in the top right corner.
- Confirm the templates you want to update in the Save panel, then click Save again.
How to verify Visit your homepage and any key pages. Confirm that the navigation bar in the header matches the changes you made. For more details on this block, see the official Navigation block documentation.
Step 6: Style your WordPress navigation bar and clear cache
After you adjust the links, refine the visual style of your navigation bar so it matches your brand and works well on mobile devices. Then clear any caches so visitors immediately see your changes.
- For classic themes, go to Appearance » Customize. For block themes, stay in the Editor screen.
- In classic themes like Jannah, open panels such as Header, Navigation, or Colors, then adjust background color, text color, font size, and alignment for your menu.
- In block themes, click the Styles icon (half-filled circle), then open Typography and Colors to style the Navigation block.
- Locate the mobile menu options (often under Header or Navigation) and choose how the hamburger icon, logo, and menu behave on small screens.
- Click Publish or Save to apply your style changes.
- If you use a caching plugin, open its menu in the admin bar (for example, WP Rocket or LiteSpeed Cache) and click Clear cache or Purge All. Also clear any CDN or host-level cache if available.
To fine-tune spacing or highlight active links, add custom CSS under Appearance » Customize » Additional CSS in classic themes, or in the Additional CSS area if provided by your theme.
/* Increase padding and highlight the active menu item */
.main-navigation ul li a {
    padding: 0.75em 1.25em;
}

.main-navigation ul li.current-menu-item > a,
.main-navigation ul li.current-menu-ancestor > a {
    color: #ffffff;
    background-color: #0073aa;
}
How to verify Open your site in an incognito window and on a mobile device. Check that the colors, spacing, and dropdowns look correct and that the mobile menu opens and closes smoothly. If you still see the old menu, clear your browser cache and any remaining caches from your host or CDN.
Conclusion You Are Ready to Go
You have now learned how to edit your WordPress navigation bar using both the classic Menus screen and the newer Site Editor. You can add and remove links, create dropdowns, assign menus to theme locations, style the header, and confirm that everything works on desktop and mobile.
Whenever you change the structure of your site, return to these steps to update your navigation bar so visitors can always find your most important pages quickly.
Further Reading
- Beginner guide to WordPress speed optimization
- Best WordPress seo plugins and tools
- How to edit WordPress files
- How do you change your WordPress password