How to Edit Header in WordPress
Step-by-step methods to safely customize your WordPress header layout, logo, and navigation.
Your header is the first thing visitors see on your WordPress site. It usually contains your logo, main navigation menu, search, and sometimes a call-to-action button or banner. If it looks messy, outdated, or off-brand, the whole site can feel unprofessional.
In this guide, you’ll learn how to edit the WordPress header using the Customizer (classic themes), the Site Editor (block/FSE themes), and theme-specific header builders like Jannah’s options panel. We’ll walk through changing your logo, menus, and layout—plus safer, more advanced methods for code-level tweaks.
If you’re new to WordPress, it can help to skim a general WordPress guides and tutorials overview first so the admin screens feel familiar, then come back and follow this header walkthrough step by step.
Prerequisites
Before you start editing your WordPress header, make sure you have the basics in place. A few minutes of prep can save you from breaking your layout or losing changes.
- Admin access to your WordPress dashboard (login URL, username, and password).
- Knowledge of which theme you’re using (e.g., Jannah, Astra, a block theme like Twenty Twenty-Four).
- A recent backup of your site (database + files), or at least backup from your host or plugin.
- Optional but recommended: a staging site to test header changes before going live.
Step 1: Identify Your WordPress Header Type
WordPress doesn’t use a single header editor. How you edit the header depends on your theme and whether it uses the older Customizer, the newer Site Editor (block themes), or a custom header builder.
- Log in to your WordPress dashboard.
- In the left menu, hover over Appearance.
- Look for what you see:
- Appearance → Customize (and no “Editor”): you’re likely on a classic theme using the Customizer.
- Appearance → Editor (sometimes labeled “Site Editor”): you’re using a block/FSE theme.
- Additional items like Theme Options, Jannah, or Header Builder: your theme has its own header panel.
Step 2: Edit the Header Using the Customizer (Classic Themes)
If your theme uses the Customizer, you’ll edit the header from a live preview panel. This is common with many classic themes and some older versions of Jannah.
- In the dashboard, go to Appearance → Customize.
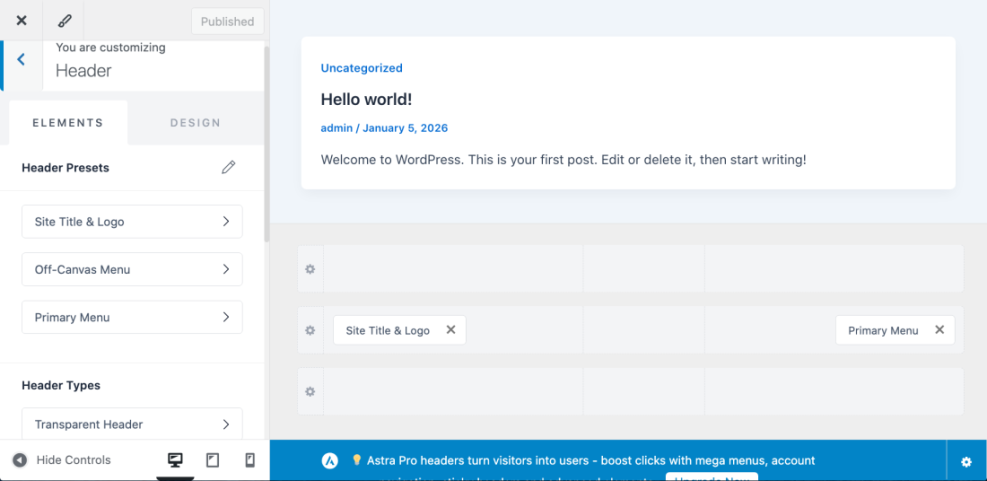
- Look for panels such as Site Identity, Header, Menus, or theme-specific Header Layout options.
- Click Site Identity to:
- Change the logo.
- Edit the site title and tagline.
- Toggle “Display Site Title and Tagline.”
- Open the Header or Header Layout panel, if available, to choose header style, enable a top bar, or control sticky header options.
- Use the live preview on the right to confirm your changes, then click Publish.
Step 3: Edit the Header in the Site Editor (Block/FSE Themes)
If you see Appearance → Editor, you’re using a block theme (Full Site Editing). Here, the header is a template part that you edit with blocks, just like a page.
- Go to Appearance → Editor in your dashboard.
- In the left sidebar, click Template Parts, then locate Header (there may be multiple header variations).
- Click the header template part to open it in the editor.
- Use the block toolbar to edit:
- The Site Logo block (upload/change your logo).
- The Site Title or Tagline blocks.
- The Navigation block (for menus).
- Additional blocks like Buttons, Search, or Social Icons.
- Click Save (WordPress may ask to confirm changes to the header template part and related templates—confirm to apply.
Step 4: Edit Header Menus and Navigation Links
Your header menu is often the main way users move around your site. Once you’ve found the right editor, it’s time to adjust the menu items themselves.
4.1 Adjust the Header Menu in Classic Themes
- Go to Appearance → Menus in your dashboard.
- Select your main or Primary menu from the dropdown.
- Add pages, posts, or custom links from the left-hand columns.
- Drag items up and down to reorder them, or slightly to the right to create dropdowns.
- In the Menu Settings area, make sure the menu is assigned to the Primary or Main header location.
Some themes also let you manage the menu directly in the Customizer under Appearance → Customize → Menus, where you’ll see live changes as you add or remove items. For a deeper dive into menu strategy and structure, see this beginner guide to WordPress menus and navigation.
4.2 Adjust the Header Menu in Block Themes
- Open Appearance → Editor and edit your Header template part.
- Click the Navigation block in the header.
- Use the block toolbar and sidebar to:
- Select a different menu or create a new one.
- Add, remove, or rearrange menu items.
- Toggle settings like “Open on click” vs “Open on hover” (depending on theme).
- Click Save to update the header.
Step 5: Add or Remove Header Elements (Logo, Search, Buttons)
Beyond the menu, your header may include a logo, tagline, search bar, social icons, or a “Contact” or “Shop Now” button. You can usually show, hide, or reposition these elements without touching code.
5.1 Editing Header Elements in the Customizer
- Go to Appearance → Customize.
- Explore panels like Header, Top Bar, Logo & Menu, or theme-specific header settings.
- Use checkboxes or dropdowns to enable or disable elements such as:
- Search icon in the header.
- Secondary menu or social icons.
- Top bar with contact info or breaking news.
- Click on logo or button controls to upload new images or change button text/links.
- Click Publish once you’re satisfied.
5.2 Editing Header Elements in the Site Editor
- Open Appearance → Editor → Template Parts → Header.
- Use the block inserter (+) to add blocks such as Search, Buttons, or Social Icons.
- Click an existing block to reposition it using drag-and-drop or the List View.
- Configure alignment, spacing, and visibility in the block settings sidebar.
- Save your changes.
Step 6: Edit the Header with Theme Header Builders or Plugins
Some premium themes (including Jannah) ship with their own header builder or options panel. Others rely on page builders or header/footer plugins to manage the layout.
- In your dashboard, look for theme panels such as Jannah, Theme Options, or Header Builder.
- Open the header-related section (for Jannah, this may be under Jannah → Theme Options → Header or Header Builder).
- Choose a header layout preset and drag elements (logo, menu, social icons, search, ads) into different rows or columns.
- Save or apply the layout, then visit the front-end to confirm everything looks correct.
If you’re using a plugin-based header builder, the steps are similar: open the plugin’s header editor screen, adjust the layout, and assign the header to your entire site or specific templates.
Step 7: Make Advanced Header Edits with a Child Theme
For changes that the Customizer or Site Editor can’t handle—like inserting custom HTML above the menu, adding tracking pixels in the header, or restructuring markup—you’ll need code-level edits. The safest way to do this is with a child theme.
First, create and activate a child theme so your custom code doesn’t get overwritten by theme updates. You can follow this detailed tutorial on how to create a child theme in WordPress before editing any header files.
7.1 Editing Header Templates (header.php)
- Using FTP/SFTP or your hosting file manager, navigate to
/wp-content/themes/your-child-theme/. - If you need to override the header template, copy
header.phpfrom the parent theme into your child theme folder. - Edit the
header.phpfile in a code editor to add or adjust HTML, PHP, or extra widget areas. - Save and upload the file, then refresh your site to check for errors.
<div> or ?> in header.php can break your entire site. Always test on staging and keep a backup of the original file. 7.2 Using Hooks to Inject Content into the Header
Many themes and plugins offer hooks that let you insert content into the header without editing templates directly. You can add this code to your child theme’s functions.php.
// In functions.php of your child theme
function mysite_header_promo_bar() {
    echo '<div class="header-promo">Free shipping on orders over $50!</div>';
}
add_action( 'wp_head', 'mysite_header_promo_bar' );
This example adds a simple promo bar via the wp_head hook. Your theme may also have its own header hooks (check its documentation) for more precise placement.
Step 8: Test Your Header on Desktop and Mobile
After editing your header, it’s essential to verify that it looks correct, remains usable, and doesn’t hurt performance.
- Visit your homepage and a few inner pages to confirm the header is consistent.
- Resize your browser window or use your phone/tablet to test the mobile header and menu toggle.
- Check that the logo is crisp, the menu is readable, and buttons or search fields are easy to tap.
- If you use caching or a CDN, clear cache so visitors see the updated header.
- Use an online speed test to ensure your changes didn’t dramatically slow down the site.
Wrap-Up: Take Control of Your WordPress Header
Editing the header in WordPress feels confusing at first because every theme exposes it differently. Once you know whether you’re using the Customizer, the Site Editor, or a theme header builder, the process becomes predictable and manageable.
By following these steps—preparing a backup, choosing the right editing method, adjusting menus and elements, and testing on multiple devices—you’ll end up with a header that matches your brand and helps visitors navigate effortlessly. As you get comfortable, you can layer in more advanced changes via child themes and hooks while keeping your site stable and secure.
Further Reading
- How to Edit a WordPress Website (Beginner Walkthrough)
- How to Edit a WordPress Site Step by Step
- How to Customize a WordPress Theme Safely
- How to Design a WordPress Website That Looks Professional
- How to Edit the WordPress Navigation Bar
Frequently Asked Questions
Why can’t I see header options in my WordPress Customizer?
My header broke after editing header.php. How do I fix it?
header.php, restore the original file from your backup or by re-uploading the unedited header.php from the parent theme. If you can’t access the dashboard, use FTP or your host’s file manager to replace the file.Going forward, use a child theme and test changes on staging where possible. Make small edits, save, and refresh after each change so you can quickly identify what caused the break. Is it better to edit the header with code or with the Customizer/Site Editor?
Are there any security risks when editing the WordPress header?
How long does it usually take to edit a WordPress header?
header.php or writing custom functions, should be planned with extra time for testing and rollback in case something goes wrong.