If you want to Edit Footer areas in WordPress without breaking your layout, this step by step guide shows you every safe way to edit footer in WordPress, from simple theme options to custom code. You will learn which method your theme uses and how to update footer text, links, and widgets confidently.
By the end, you will know how to change the copyright notice, update footer menus, add widgets or blocks, and insert tracking scripts in the footer so your site looks polished and professional.
What You Need to Start
- Administrator access to your WordPress dashboard at yourdomain.com/wp-admin.
- An active theme installed and activated on your site.
- A recent full site backup. If you are not backing up yet, follow the Beginner guide to WordPress speed optimization first.
- Optional but strongly recommended staging site so you can test footer changes safely. See How to use ai in WordPress.
- For code changes, access to your hosting file manager or an SFTP client.
Step 1: Identify your footer type
Before you edit footer content, you must know how your theme controls it. Classic themes often use the Customizer and widgets, while modern block themes use the Site Editor. Some premium themes, including Jannah, add their own footer panels.
- Log in to your WordPress dashboard at /wp-admin.
- In the left menu, hover over Appearance.
- Look for menu items such as Customize, Widgets, Theme Options, or Editor.
- Write down which of these you see. This tells you which of the next steps applies to your site.
In your dashboard, open Appearance and review the available footer related screens.
To verify this step, confirm whether your theme uses Widgets (classic footer widgets), Editor (block based footer template parts), or a dedicated Theme Options panel.
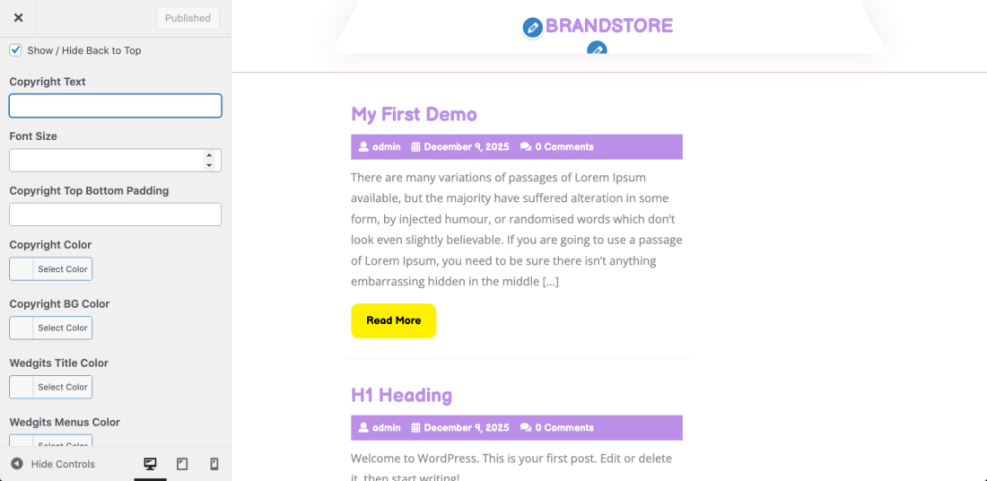
Step 2: Edit footer with the Customizer
Many classic themes, including Jannah, let you edit footer text, columns, and colors using the live Customizer or a theme options panel. This is the safest way to edit footer content because you see changes before publishing.
- From the dashboard, go to Appearance » Customize.
- In the Customizer sidebar, look for sections named Footer, Layout, Bottom Bar, or similar.
- Click the footer related section to open its settings.
- Update the footer text, such as your copyright notice, in the available text fields or controls.
- Adjust the number of footer columns, alignment, and colors if your theme offers these controls.
- Check the live preview on the right side to confirm your footer looks correct.
- Click Publish to save your changes and push them live.
Navigate to Appearance » Customize and open the footer settings panel for your theme.

If you use the Jannah theme, also check Theme Options » Footer inside the dashboard for additional controls like footer layouts, copyright bar text, and social icons.
To verify success, open your site’s homepage in a new browser tab and scroll to the bottom. Confirm that the footer text, layout, and colors match the Customizer preview.
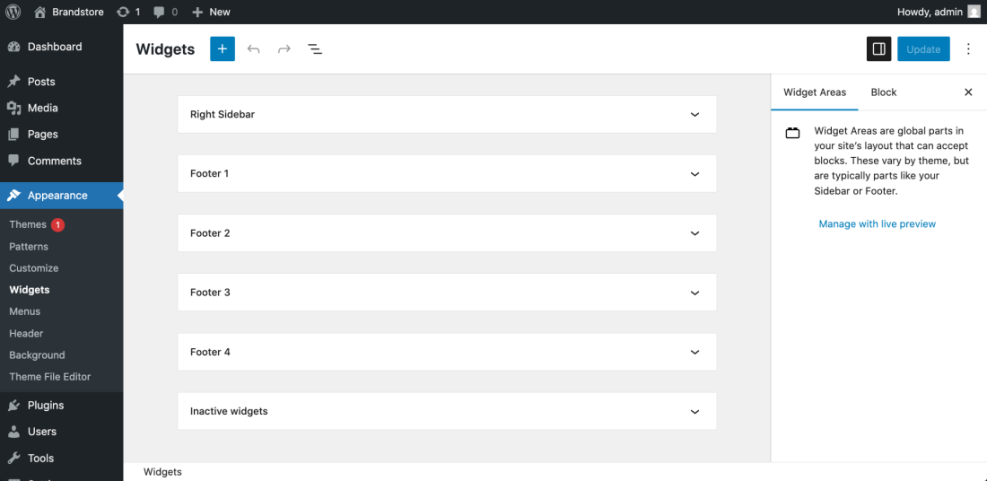
Step 3: Edit footer widgets and menus
On many classic themes, the footer content is powered by widget areas. You can rearrange or change what shows in the footer by editing widgets like Text, Custom HTML, and Navigation Menu.
- In the dashboard, go to Appearance » Widgets.
- Locate any widget areas named Footer, such as Footer 1, Footer 2, or Footer Bottom.
- Click a footer widget area to expand it and see the widgets inside.
- Click a Text or Custom HTML widget to edit footer text or HTML links.
- Update the content and click Save or Update inside the widget.
- To add new items, drag new widgets from the available list into the footer area.
Open Appearance » Widgets to see and edit the widgets used in your footer areas.
After saving your widgets, visit the front end of your site and refresh the page. Scroll to the footer and confirm the text, menus, or icons match your widget changes.
Step 4: Edit footer in the Site Editor
Block themes use the Site Editor to control the entire layout, including the footer template part. This lets you edit footer blocks visually and reuse them across templates.
- In the dashboard, go to Appearance » Editor (sometimes labeled Site Editor).
- In the editor sidebar, click Template Parts or use the navigation panel to locate the Footer template part.
- Select the Footer template part to edit it.
- Click on text blocks to change footer text, and use block toolbar controls to format or align content.
- Use the List View to quickly select widgets like menus, icons, or columns inside the footer.
- When finished, click Save, then confirm saving the footer template part.
Open the Editor, locate the Footer template part, and adjust the blocks that make up your global footer.
To verify, load a few different pages on your site. Because the footer template part is global, your updates should appear on all pages that use the same footer template.
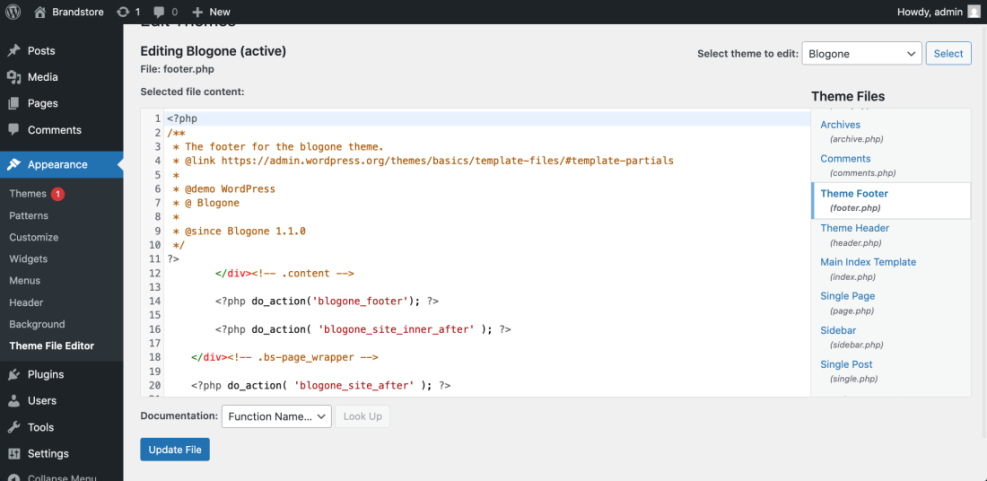
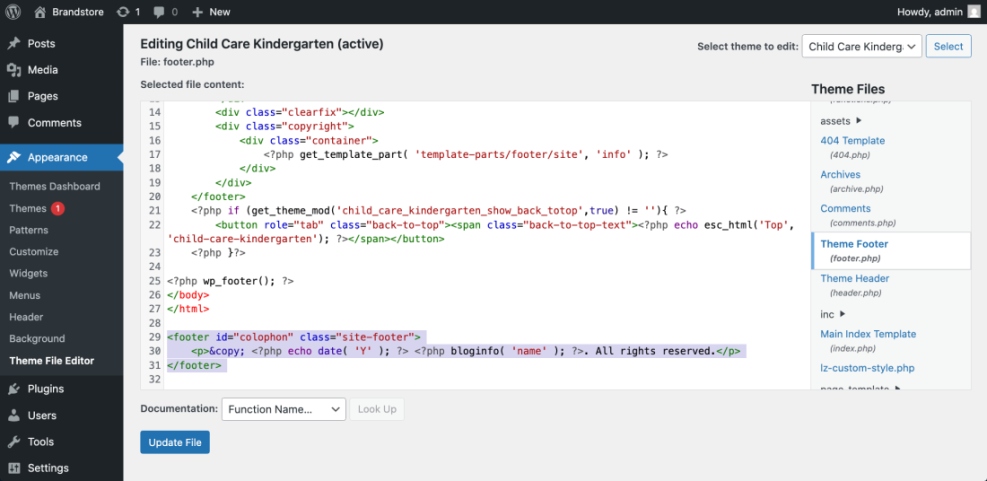
Step 5: Edit footer code safely with a child theme
If your theme does not offer the footer controls you need, you can edit footer code directly. Always do this through a child theme so updates do not overwrite your changes.
- Create or install a child theme if you do not have one already.
- Connect to your site via your host’s file manager or SFTP.
- In your child theme folder, copy footer.php from the parent theme if it does not exist yet.
- Open the child theme footer.php file in a code editor.
- Locate the area that outputs the copyright or footer text.
- Edit only the text or HTML, leaving WordPress functions and PHP structure intact.
- Save the file and upload it back to your child theme folder if editing locally.
Open your child theme footer.php and adjust the footer text carefully without removing core WordPress functions.
For example, you can use this simple PHP snippet to output a dynamic year and site name in your footer:
<footer id="colophon" class="site-footer">
<p>© <?php echo date( 'Y' ); ?> <?php bloginfo( 'name' ); ?>. All rights reserved.</p>
</footer>
If you only need to add scripts, such as analytics code, use a header and footer plugin from the official repository or a Code Snippets plugin instead of editing template files by hand.
After changing code, test your site on both desktop and mobile. If anything breaks, restore the previous version of footer.php from your backup.
Once all footer edits are done, clear any cache layers if you use caching plugins or a CDN. The guide How to clear cache WordPress walks you through safe cache clearing steps.
Conclusion You Are Ready to Go
You now know several safe ways to edit footer in WordPress, whether your site uses the Customizer, widgets, the Site Editor, or a child theme. You can confidently update footer text, menus, and scripts without breaking your layout.
Whenever you make bigger footer changes, work on a staging site first, keep fresh backups, and clear caches after publishing. With this workflow, changing the footer becomes a routine task instead of a risky experiment.
Further Reading
- How to edit WordPress files
- WordPress migration blog guide
- Best WordPress seo plugins and tools
- How to design a website with WordPress
- Beginner guide to WordPress speed optimization