How to Do SEO Yourself in WordPress
A step-by-step DIY SEO workflow (keywords, on-page, technical fixes, and tracking) you can run without hiring an agency.

Doing SEO yourself in WordPress is totally doable—as long as you follow a repeatable process. The biggest mistake DIY site owners make is “random SEO” (installing a plugin, changing a few titles, and hoping Google figures it out).
This guide gives you a practical workflow you can run every week and month: set up your foundation, pick the right keywords, optimize pages/posts, handle key technical SEO items, and track what’s working.
If you’re brand new, start by understanding what SEO means on WordPress so the steps below make sense as a system.
Prerequisites
Before you start, make sure you have access to the WordPress Admin and can install plugins (or already have your SEO plugin in place).
- Administrator access to WordPress
- A Google account (for Search Console)
- One SEO plugin (Yoast SEO or Rank Math—pick one, not both)
- 30–60 minutes for initial setup, then 15–30 minutes weekly
Step 1: Set your SEO foundation in WordPress
This step prevents avoidable issues (duplicate titles, messy URLs, missing metadata) and gives you a clean baseline before you optimize content.
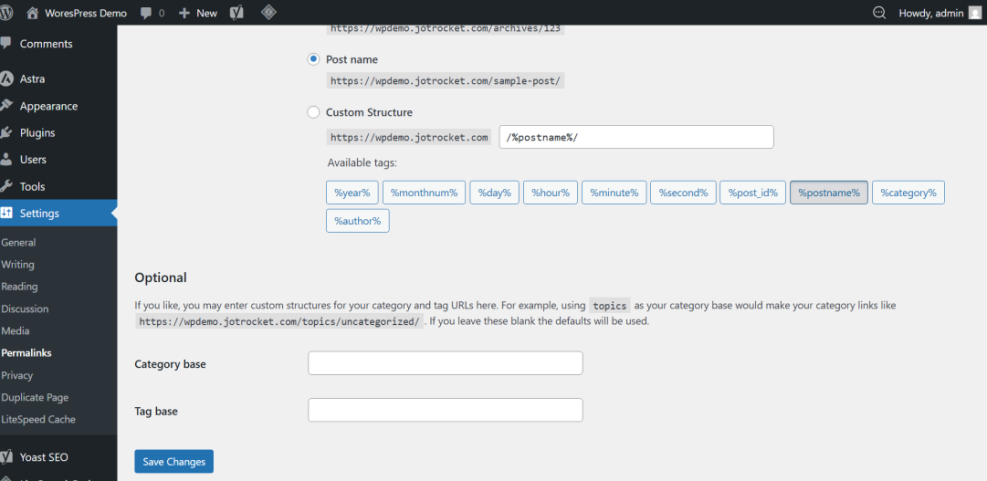
1.) Set clean permalinks
- Go to Settings → Permalinks.
- Select Post name.
- Click Save Changes.
Checkpoint: Your URLs look like /your-post-title/ instead of /?p=123.
2.) Choose ONE SEO plugin and configure basics
- Install and activate Yoast SEO or Rank Math.
- Set your default title template (Homepage, Posts, Pages).
- Enable XML sitemaps in the plugin settings.
Checkpoint: You can edit SEO title and meta description on posts/pages, and the plugin confirms sitemap is enabled.
Step 2: Do keyword research you can actually rank for
DIY SEO wins come from targeting the right searches. If you pick keywords that are too broad, you’ll work hard and see little movement.
1.) Start with “intent” buckets
- Informational: how-to, tutorials, guides
- Comparisons: X vs Y, best tools, alternatives
- Transactional: pricing, services, buy, deals
2.) Build a small keyword list (10–30 targets)
- List your main topics/services/products.
- Expand them with keyword tools and autocomplete suggestions.
- Prefer long-tail terms (more specific phrases) for faster results.
If you need tools, use this breakdown of keyword research tools for SEO to pick one that matches your budget and workflow.
Checkpoint: You have a shortlist where each keyword maps to one clear page/post idea (no duplicates competing with each other).
Step 3: Optimize one page/post at a time (the DIY on-page checklist)
On-page SEO is where most DIY improvements happen. Your goal is to make the page obvious to Google and irresistibly useful to the reader.
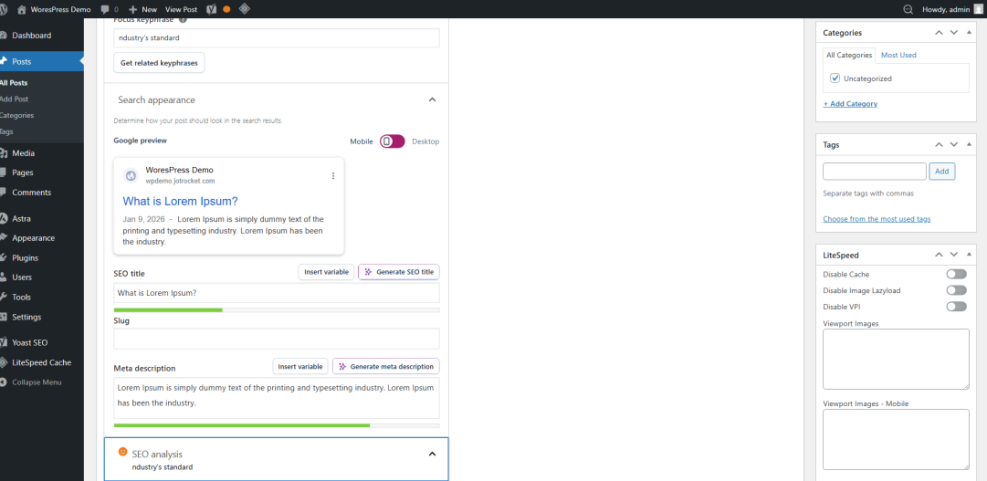
Use this checklist in WordPress (Classic Editor or Block Editor)
- SEO title: Put the keyword near the front, keep it readable.
- Meta description: Summarize benefits + include the keyword naturally.
- URL slug: Short, lowercase, hyphens, no filler words.
- H1: One clear main heading that matches the topic.
- H2s: Break the article into scannable sections with descriptive subtopics.
- First 100 words: Mention the keyword once, naturally.
- Images: Add descriptive alt text (what’s in the image, not keyword stuffing).
- Internal links: Add 1–2 relevant internal links (don’t overdo it).
- External proof: When appropriate, cite a reputable source (official docs, standards, research).
Checkpoint: Your SEO plugin indicator should show “good” or “okay” for basics, but prioritize clarity and usefulness over chasing a perfect score.
Step 4: Handle the technical SEO essentials (without going full developer)
Technical SEO is about crawlability, indexability, and performance. You don’t need to be a developer—but you do need to verify the basics.
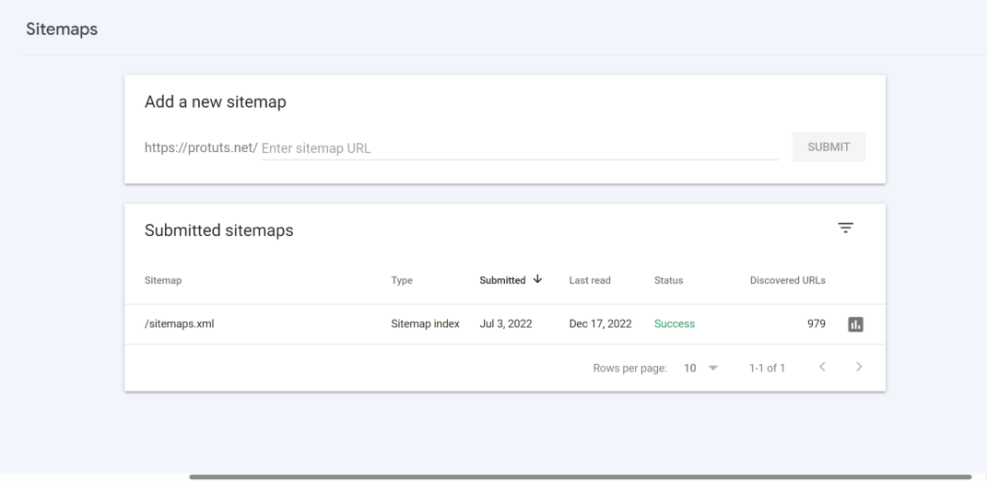
1.) Connect Google Search Console (GSC)
- Create a property for your domain in Google Search Console.
- Verify ownership (DNS is best if you can).
- Submit your sitemap URL from your SEO plugin.
Use this walkthrough to add Google Search Console to WordPress correctly.
Checkpoint: GSC shows your property as verified and your sitemap status is “Success” after processing.
2.) Make sure you’re not blocking Google
- Go to Settings → Reading and confirm Discourage search engines from indexing this site is unchecked.
- If you use a maintenance mode plugin, ensure it doesn’t block indexing long-term.
Checkpoint: Key pages are “Indexed” in GSC’s Page indexing report (not “Blocked” or “Excluded” unexpectedly).
3.) Fix slow load times (SEO and conversions both depend on this)
- Use caching (page cache + browser cache).
- Compress and properly size images.
- Remove unused plugins and heavy features you don’t need.
Step 5: Build authority the safe way (no spam, no shortcuts)
Google still uses “authority” signals (links, mentions, trust). DIY SEO works best when you focus on earning links naturally.
DIY-safe link building ideas
- Create one “linkable” resource: checklist, template, glossary, free tool list.
- Update older posts: expand, refresh, and republish with better structure.
- Answer questions: forums and communities (help first; link only when genuinely relevant).
- Partner mentions: suppliers, vendors, associations, local business directories (if relevant).
Checkpoint: You gain a few relevant mentions/links over time, and your impressions/clicks trend upward in Search Console.
Step 6: Track results and run a simple weekly/monthly SEO routine
SEO is not “set and forget.” Tracking tells you what to fix next and what to double down on.
Weekly (15–30 minutes)
- In GSC, check Performance: top queries, pages, and CTR opportunities.
- Update one existing post: improve intro, add a missing section, clarify headings.
- Fix one technical issue if GSC reports it (404s, excluded pages, etc.).
Monthly (30–60 minutes)
- Pick 1–2 target keywords and publish a focused post/page for each.
- Improve internal linking between related content (avoid stuffing; keep it useful).
- Review site speed and remove unused plugins.
Quarterly (1–2 hours)
- Audit your top 10 pages: refresh content, verify titles/meta, improve UX.
- Check indexing coverage and crawl errors in GSC.
- Look for cannibalization: two pages targeting the same keyword—merge or differentiate.
Checkpoint: Over 8–12 weeks, you should see impressions rise first, then clicks, then more stable rankings for long-tail terms.
Your DIY WordPress SEO Game Plan (Start Today)
You don’t need an agency to improve your WordPress SEO—you need a system. Set a solid foundation, choose realistic keywords, optimize one page at a time, keep technical essentials clean, and track results weekly.
Your next best move: pick one important page or blog post today and run the Step 3 on-page checklist. Then commit to the weekly routine so your progress compounds.
Further Reading
- How to Do On-Page SEO in WordPress
- How to Optimize Images for WordPress
- How to Speed Up a WordPress Site
- How to Edit robots.txt in WordPress