When you decide to delete a WordPress site, you want to be sure you are not losing important content or accidentally breaking your domain, email, or other projects on the same hosting account. Deleting a site is more than just clicking “trash” in the dashboard.
In this guide you will review alternatives to deletion, create a quick backup, remove a WordPress.com site or a self hosted WordPress site step by step, and learn what to do with your domain and hosting so you do not keep paying for services you no longer need.
What You Need Before You Delete a WordPress Site
- Administrator access to your WordPress dashboard.
- Login details for your hosting control panel (for self hosted WordPress).
- Access to your domain registrar account if your domain is registered separately.
- Enough disk space or cloud storage to save a backup copy of your site.
- Any login details for related services such as email hosting or third party backups.
Step 1: Decide If You Really Need to Delete the Site
Sometimes you do not actually need to delete a WordPress site. You might only need to hide it from visitors or search engines. Before you remove anything, decide what outcome you want.
- Ask yourself if you want to:
- Hide the site from the public but still keep the content.
- Stop search engines from indexing the site.
- Completely remove all files, database, and content.
- In your WordPress dashboard, go to Settings » Reading.
- Under Search engine visibility, you can check Discourage search engines from indexing this site if you only want it hidden from search.
- If you use a privacy or coming soon plugin, you can enable maintenance mode to block normal visitors.
Marking the site private or discouraging indexing is a safer option when you are unsure. If you are confident you want to delete the WordPress site completely, move on to the backup step.

Delete vs Hide vs Keep Domain
The table below helps you quickly choose the right action for your situation.
| Goal | Best Action | What Happens | Reversible? |
|---|---|---|---|
| Stop new visitors but keep content | Enable maintenance mode or privacy plugin | Public users see a private/coming soon page, content remains in the database. | Yes, disable maintenance mode to restore access. |
| Hide from Google but keep site | Discourage search engines from indexing | Search engines may slowly remove your pages from results. | Yes, uncheck the setting to allow indexing again. |
| Remove WordPress but keep the domain | Delete files and database only | The domain remains active, ready for a new site or redirect. | No, unless you have backups to restore from. |
| Stop everything and stop paying | Delete the WordPress site and cancel hosting/domain | Site disappears, domain may eventually expire. | No, once domain and hosting are gone they are hard or impossible to recover. |
Step 2: Create a Backup Before Deleting Your WordPress Site
Even if you are sure you want to delete a WordPress site, a backup protects you from last minute regrets, legal requirements, or future reuse of your content.
- From your WordPress dashboard, go to Plugins » Add New Plugin.
- Search for a reputable backup plugin and click Install Now, then Activate.
- Open the backup plugin settings from the left hand menu.
- Choose a backup type that includes files and database.
Most backup plugins give you a Download or Export option so you can store a copy off the server.

- Run a Full Backup job.
- Download the backup file to your computer or a cloud storage account.
- Label the backup with your site name and date so you can identify it later.
Step 3: Delete a WordPress.com Site
If your site is hosted on WordPress.com (you log in at wordpress.com and do not use your own hosting), the deletion steps are different than self hosted WordPress.
- Log in to your WordPress.com account.
- From the main dashboard, select the site you want to delete.
- In the left menu, click Settings.
- Scroll down to the Danger Zone or Site Tools section.
This area usually contains options to delete the WordPress.com site or make it private.
- Click Delete your site permanently or the closest matching option.
- WordPress.com may ask you to confirm the URL and type the site address.
- Read any warnings about losing content or domains linked to the site.
- Confirm deletion when you are sure you no not need the site anymore.
Once you delete a WordPress.com site, it is usually not recoverable. If you only want to hide the site, choose a private or coming soon option instead.
Step 4: Delete a Self Hosted WordPress Site (Files and Database)
For a self hosted installation (you installed WordPress on a hosting account like cPanel, Plesk, or a managed host), deleting the site means removing both the files and the database.
- Log in to your hosting control panel (for example cPanel or another dashboard provided by your host).
- Look for a section named File Manager or similar.
- Open the web root folder for your domain, often named
public_htmlor after your domain. - Locate the folder that contains your WordPress files (you should see folders like
wp-admin,wp-content, andwp-includes). - Select your WordPress folder or all WordPress files.
- Click Delete, making sure you have your backup stored safely first.
- Return to the main hosting control panel and open the Databases section (for example MySQL Databases or phpMyAdmin).
- Identify the database used by your WordPress site. You can confirm the database name in your old
wp-config.phpfile if needed. - Delete the database or drop all its tables from phpMyAdmin.
Removing both the files and database ensures the WordPress site data is gone from your hosting account. Your domain will simply show an error or blank page until you point it somewhere else.
Step 5: Delete WordPress Using a One Click Installer (Alternative)
Many hosts provide a one click installer such as Softaculous, Installatron, or a custom tool. If you originally installed WordPress this way, you can often use the same tool to delete the WordPress site cleanly.
- Log in to your hosting control panel.
- Find the Apps Installer, Softaculous, or similar section.
- Click on WordPress inside the installer.
- Locate your existing installation in the list (the one that matches the domain you want to delete).
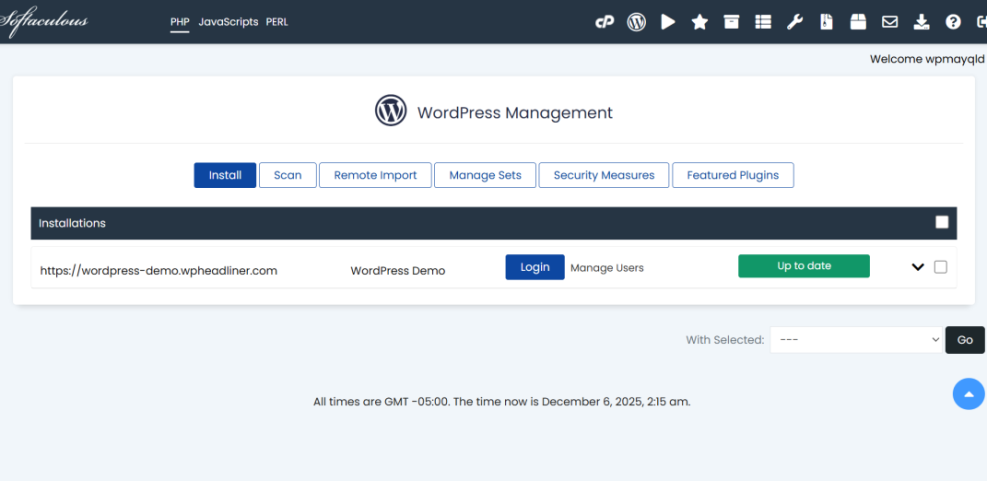
- Click the Remove or Delete icon next to the installation.
- Confirm that the installer will delete both files and database.
- Click Remove Installation and wait for the process to finish.
This approach reduces the risk of leaving orphaned files or database tables behind, and it is often quicker than deleting everything manually.
Step 6: Decide What to Do With Your Domain and Hosting
Deleting a WordPress site does not automatically cancel your domain registration or hosting plan. If you want to stop paying for unused services, you need to clean these up separately.
- Log in to your hosting account and find the section for Services or Hosting Plans.
- If you no longer need the hosting account, look for an option to Cancel or Do not renew at the end of the current billing period.
- Log in to your domain registrar (which might be the same company or a separate one).
- Locate your domain name and decide whether to:
- Let the domain expire at the end of its term.
- Keep the domain for a future project.
- Point or redirect the domain to a different site.
Domain and Hosting Cleanup Options
| Situation | Domain | Hosting | Result |
|---|---|---|---|
| Deleting the WordPress site but starting a new one later | Keep and renew | Keep hosting or move to a better plan | Domain remains yours, ready for a fresh install. |
| Closing everything and not using the domain anymore | Turn off auto renew | Cancel hosting plan | No more charges, domain eventually becomes available to others. |
| Moving content to a different platform | Point DNS to new provider | Cancel old hosting when migration is complete | Visitors see the new site at the same domain. |
Step 7: Check What Visitors and Search Engines See Now
After you delete a WordPress site, it is worth checking how your domain behaves and what visitors see. This helps you avoid confusing errors or leftover pages in search results.
- Open your domain in a browser to see what appears:
- A blank page or 404 error if nothing is installed.
- A hosting placeholder page.
- A new site if you already installed something else.
- If you see a hosting placeholder you do not like, consider setting up a simple holding page or redirect.
- Search for your old site name in Google and note that some results may still show for a while.
- If you have access to Search Console, you can monitor how quickly URLs disappear from the index.
Search engines will gradually update their results as they crawl your domain and find that the old pages are gone.
Step 8: Review and Store Your Backups Safely
Once your site is deleted and hosting or domains are updated, make sure your backups are stored somewhere safe in case you ever need old content, legal records, or inspiration for a future project.
- Locate the backup file you downloaded earlier.
- Save at least one copy to cloud storage or an external drive.
- Label the backup folder clearly with the domain and deletion date.
- Note any important credentials or configuration details in a secure password manager.
- Optionally, export key posts or pages to simple text or PDF files for future reference.
With your backups safely stored and your domain and hosting cleaned up, you have fully completed the process to delete a WordPress site without leaving loose ends.
Conclusion You Can Delete a WordPress Site Safely
By following these steps you learned how to review alternatives, back up your content, delete a WordPress.com or self hosted WordPress site, and clean up domains and hosting afterwards. Taking a careful approach prevents surprise bills, broken email setups, and permanent data loss.
Whether you are closing an old project or preparing to rebuild from scratch, use this checklist each time you delete a WordPress site so you know exactly what will happen and how to undo things if you change your mind.
Further Reading
- Exporting Content from WordPress
- Restoring Your Database from Backup
- Beginner Guide to WordPress Backups
- Beginner checklist optimizing WordPress blog posts
- Complete Guide to WordPress Security Basics