
A sitemap is a special file that lists the important URLs on your WordPress site so search engines can discover, crawl, and index them more reliably. If you do not have a sitemap, new posts and pages can take longer to appear in search results — or be missed entirely.
In this guide, you will learn how to create a WordPress sitemap using the built-in core feature and popular SEO plugins like Yoast. You will also see how to submit your sitemap to Google Search Console and how to keep it healthy over time.
If you are brand new to optimization, it also helps to see where sitemaps fit in your wider SEO strategy. After this tutorial, you can dive deeper with our complete beginner’s guide to WordPress SEO to connect all the pieces.
Prerequisites
Before you create a sitemap, make sure the basics are in place so the process is smooth and errors are easy to troubleshoot.
- Administrator access to your WordPress dashboard.
- A relatively up-to-date WordPress version (5.5 or higher is ideal for core sitemaps).
- Permission to install and configure plugins (Yoast SEO, Rank Math, etc.), if you plan to use a plugin-based sitemap.
- Access to your Google account and Google Search Console (or the ability to create one).
Step 1: Know Your WordPress Sitemap Options
WordPress can generate a sitemap in a few different ways. Understanding your options helps you avoid duplicate sitemaps and pick the one that works best for your site.
Typically, you will use one of these approaches:
- WordPress core sitemap: WordPress 5.5+ automatically creates a sitemap at
/wp-sitemap.xmlas long as it is not disabled by code or a plugin. - SEO plugin sitemap: Plugins such as Yoast SEO, All in One SEO, and Rank Math include powerful XML sitemap modules (usually at URLs like
/sitemap_index.xml). - Standalone sitemap plugin: Tools like “XML Sitemaps” focus only on generating sitemaps, with fewer extra SEO features.
Step 2: Enable the Default WordPress Sitemap
If your site runs on a reasonably recent WordPress version and no plugin has disabled core sitemaps, you may already have a working sitemap.
- Log in to your WordPress dashboard as an administrator.
- Go to Settings → Reading.
- Scroll down and confirm that “Search engine visibility” is unchecked. If this box is checked, WordPress tells search engines not to index your site.
- In a new browser tab, visit
https://yourdomain.com/wp-sitemap.xml(replaceyourdomain.comwith your real domain).
You should see a simple XML page that lists sitemap indexes for posts, pages, and other content types. That means the core sitemap feature is working.
/wp-sitemap.xml, visit Settings → Permalinks and click Save Changes once to flush rewrite rules. If that does not help, a plugin may be disabling the core sitemap, and you can switch to a plugin-based solution instead. Step 3: Create a Sitemap with an SEO Plugin
Most WordPress sites use an SEO plugin to control titles, meta descriptions, and sitemaps at the same time. Here we will use Yoast SEO as an example, but the process is similar for other plugins.
- Install and activate Yoast SEO:
- Go to Plugins → Add New in your dashboard.
- Search for “Yoast SEO”.
- Click Install Now, then Activate.
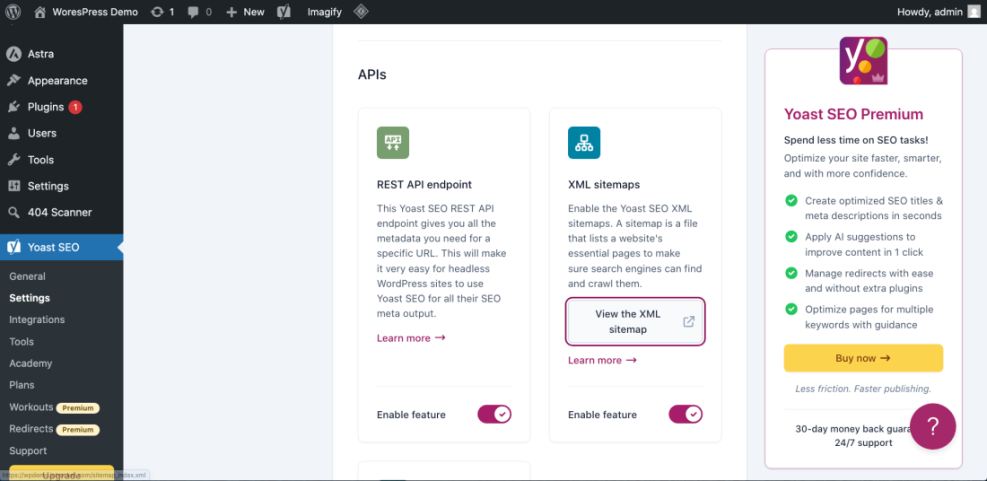
- In the left-hand sidebar, click SEO → General, then open the Features tab.
- Find the XML sitemaps feature and make sure it is set to On.
- Click the small question mark icon next to “XML sitemaps” and use the link labeled “See the XML sitemap” to open it in a new tab.
- Confirm that the URL (often
/sitemap_index.xml) loads correctly and lists your sitemap indexes.
/wp-sitemap.xml file. Yoast automatically handles your content types and is usually easier to control. For a complete configuration walkthrough, check our Yoast SEO setup guide once the sitemap itself is working. If you prefer a different SEO plugin (such as Rank Math or All in One SEO), look for a similar “Sitemap” or “XML Sitemaps” setting. The key steps are the same: enable the feature, open the sitemap URL, and confirm it loads without errors.
Step 4: Submit Your Sitemap to Google Search Console
Creating a sitemap is only the first half of the job. You also want to tell Google exactly where your sitemap lives so it can be crawled and monitored for errors.
- Open Google Search Console in your browser and log in with your Google account.
- Select the correct property for your site (for example, the domain property covering
yourdomain.com). - In the left-hand menu, click Sitemaps.
- Under “Add a new sitemap”, type only the path part of your sitemap URL:
- If you use the core sitemap, enter
wp-sitemap.xml. - If you use Yoast or another plugin, enter
sitemap_index.xml(or whatever path the plugin shows).
- If you use the core sitemap, enter
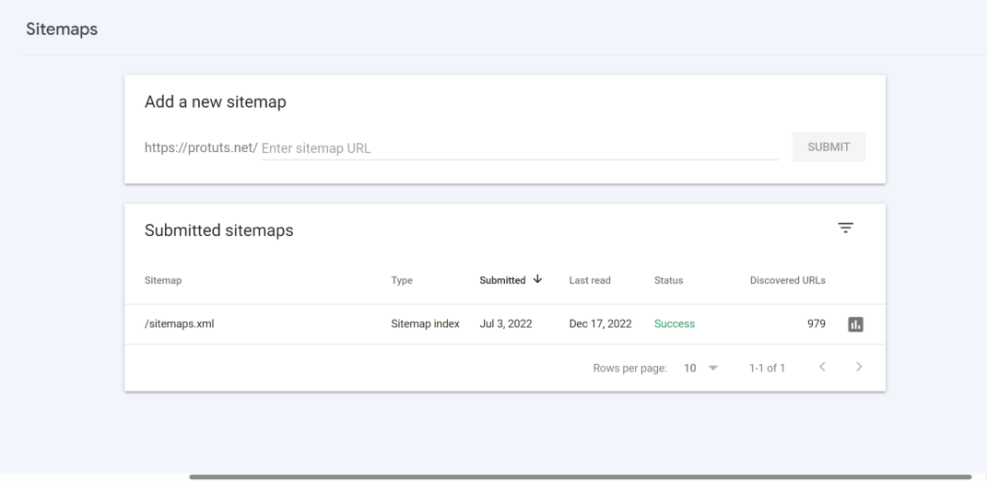
- Click Submit and wait for Google to process the sitemap. You should see a status such as “Success” once it has been fetched.
If you have not connected your site to Search Console yet, follow our guide to adding Google Search Console to WordPress first, then return here to submit your sitemap.
sitemap_index.xml). Google will discover all the child sitemaps (posts, pages, categories, etc.) automatically. Step 5: Test and Maintain Your Sitemap
Once your sitemap is live and submitted, you need to keep an eye on it, especially when you change themes, install new plugins, or add custom post types.
Check sitemap coverage in Search Console
- In Google Search Console, open the Sitemaps page again.
- Click your sitemap in the list to see more details.
- Review the “Discovered URLs” chart and the Index coverage report to confirm that key pages are being indexed.
If you notice that important URLs are excluded or you see many “Submitted URL marked ‘noindex’” warnings, check your SEO plugin settings and any per-page “noindex” options.
Keep your sitemap clean
- Exclude thin content such as tag archives or low-value attachment pages if they do not help users.
- Exclude private or membership-only pages that should not appear in search results.
- Remove test content and draft-like pages from the sitemap by setting them to noindex when appropriate.
Check robots.txt for sitemap references (optional)
If you manage your robots.txt file manually or via an SEO plugin, you can add a direct reference to your sitemap so crawlers discover it faster.
Sitemap: https://yourdomain.com/sitemap_index.xmlReplace yourdomain.com and the path to match your actual sitemap URL. Run a quick test by visiting https://yourdomain.com/robots.txt in your browser to confirm the line is present.
Turn Your WordPress Sitemap into an SEO Asset
At this point, you have chosen a sitemap method (core or plugin), confirmed that the XML file loads correctly, and submitted it to Google Search Console. Your new content should now be discovered faster, and crawling issues will be easier to spot.
Remember that a sitemap is not a ranking trick; it is an indexing tool. Combine a clean, accurate sitemap with solid on-page optimization, internal linking, and fast performance, and you give your WordPress site the best chance to perform well in search results.
Set a recurring reminder to check your sitemap and index coverage after major site changes, and you will stay ahead of most technical SEO problems before they impact your traffic.
Further Reading
- How to Add Meta Tags in WordPress
- How to Add Schema Markup in WordPress
- How to Add Keywords in WordPress Without Hurting Your SEO
- What Is SEO on WordPress?
Frequently Asked Questions
Do I need a plugin to create a WordPress sitemap?
/wp-sitemap.xml automatically. However, many site owners prefer to use an SEO plugin because it gives more control over which content types are included, lets you exclude low-value pages, and combines sitemap management with titles, meta descriptions, and other SEO settings in one place.