If you want to Build a Website without touching code, WordPress lets you launch a professional online presence in an afternoon. Instead of paying a developer for every small change, you can control your own site and update pages whenever you need.
In this step by step tutorial, you will Build a Website on WordPress from scratch. You will choose hosting, install WordPress, pick a theme, create essential pages, add key plugins (including a CDN option), and finally launch a complete WordPress website you can confidently share with visitors.
How to Build a Website on WordPress: Quick Steps
What Do You Need Before You Start?
Before you Build a Website on WordPress, you need a clear idea of your site’s purpose, a hosting account, a domain name, and 1–3 hours of focused time. Basic computer skills like copying passwords and clicking through setup wizards are enough for this guide.
Fast Setup Overview
Most beginners can Build a Website on WordPress by following these simple steps:
- Pick reliable WordPress hosting and register a domain.
- Use the host’s one-click installer to set up WordPress.
- Log in, choose a lightweight theme, and customize your branding.
- Create core pages like Home, About, Services, Blog, and Contact.
- Install key plugins for SEO, forms, backups, caching, and CDN.
- Test your site on desktop and mobile, then launch publicly.
After this quick overview, the rest of the guide walks you through each step in more detail so you can comfortably Build a Website that looks professional and loads quickly.
What You Need Before You Build a Website
You will move faster if you prepare a few basics before you start clicking around WordPress:
- A clear idea of why you want to Build a Website (blog, portfolio, business site, or shop).
- Twenty to sixty minutes of focused time for initial setup.
- A credit card or payment method for hosting and domain registration.
- Access to your email inbox for confirmation links and login details.
- Basic computer skills like installing apps, copying passwords, and using a browser.
Step 1: Plan Your WordPress Website
Clarify Your Goal and Audience
Planning your structure before you Build a Website helps you avoid redesigning everything later. A simple checklist of goals and pages keeps your Build a Website project focused and easier to complete.
- Write down your primary goal such as “get service inquiries” or “grow an email list”.
- Decide who your main visitors are and what they need to do on your site.
- List 4–6 core pages such as Home, About, Services or Shop, Blog, and Contact.
- Note one key action for each page such as “click call button” or “submit contact form”.
- Choose a simple, descriptive site name that matches your brand or idea.
Sketch a Simple Sitemap
When you Build a Website layout on paper first, it is easier to see gaps and avoid clutter. Sketch a tiny sitemap or outline of these pages in a notes app or notebook.
Step 2: Choose Hosting and a Domain
Pick a Beginner-Friendly WordPress Host
To put your new WordPress website online, you need a hosting account where your files live. Self-hosted WordPress (WordPress.org) gives you full control and works with most business tools.
- Open your preferred hosting provider in your browser.
- Look for a plan labeled as WordPress or Managed WordPress with one-click install.
- Compare features like free SSL, backups, support, and data center location.
- Choose a plan that fits your current traffic and budget, knowing you can upgrade later.
Register a Domain Name
Your domain is the address people type to reach your site.
- Search for a short, memorable domain that reflects how you want to Build a Website brand (for example, yourname.com or cityservice.com).
- Prefer .com when possible, but local TLDs such as .co.uk or .com.au can also work well.
- Complete checkout and confirm any verification emails from your registrar or host.
Step 3: Install WordPress and Log In
Run the One-Click Installer
Once your host creates the account, you are ready to install WordPress and start to Build a Website that visitors can see.
- Log in to your hosting control panel using the credentials sent by email.
- Look for a WordPress, One-Click Install, or Website section.
- Choose your domain from the dropdown and click the button to install WordPress.
- Let the wizard generate a strong password or create your own unique login details.
Access Your WordPress Dashboard
After installation finishes, you will receive a confirmation with your login URL.
- Open the welcome email from your host and find the WordPress admin URL, username, and password.
- Visit https://yourdomain.com/wp-admin (replace yourdomain.com with your domain).
- Enter your username and password, then click Log In.
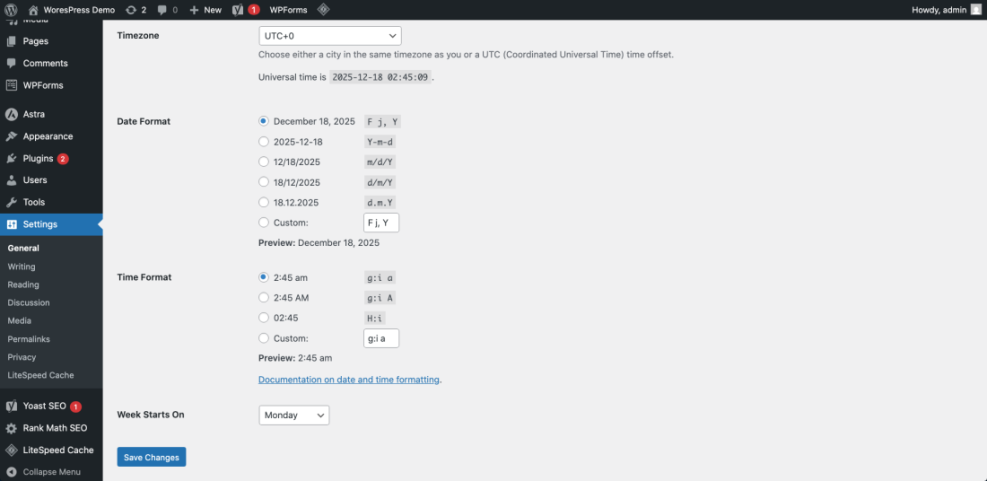
- In the left menu, go to Settings » General and check your Site Title and Tagline.
- Set your Timezone, Date Format, and Time Format, then click Save Changes.
Step 4: Choose and Customize a Theme
Install a Lightweight, Flexible Theme
Your theme controls how your WordPress website looks. Choosing a lightweight, well-supported theme helps you Build a Website that loads quickly and is easy to maintain.
- In your WordPress dashboard, go to Appearance » Themes.
- Click Add New to browse the free WordPress.org theme directory.
- Use the search box and filters to find a theme suited for blogs, services, shops, or portfolios.
- Hover over a theme preview and click Install, then click Activate.
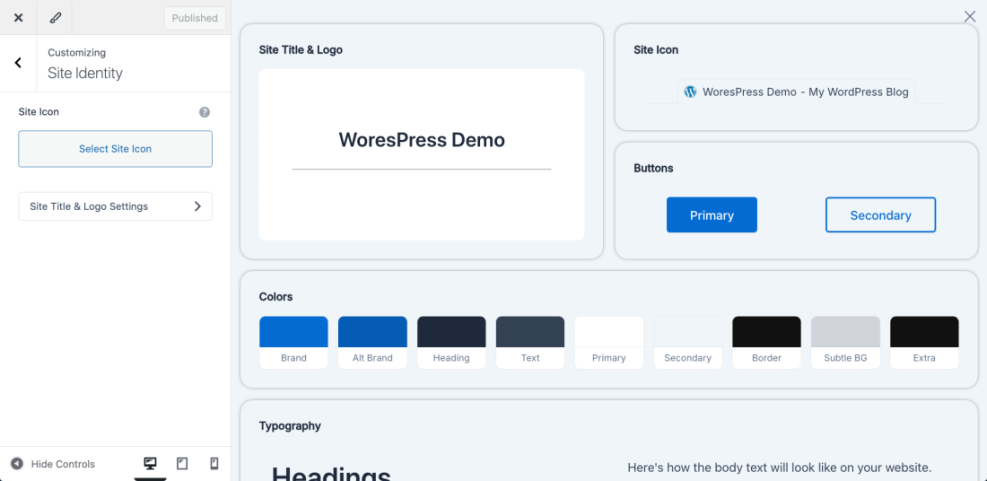
Customize Branding, Colors, and Typography
Small design tweaks go a long way when you Build a Website for the first time.
- Go to Appearance » Customize or your theme’s Theme Options panel.
- Upload your logo or use a simple text logo with your site name.
- Choose 1–2 main brand colors and a readable font for body text.
- Adjust header, footer, and sidebar layout as needed.
Step 5: Create Essential Pages and Navigation
Create Your Core Pages
Now you will Build a Website structure by turning your plan into real content. Start with a few essential pages so visitors always know where to go.
- Go to Pages » Add New.
- Create a Home page with a short hero message, what you offer, and one clear call to action.
- Create an About page that explains who you are and why people should trust you.
- Create Services or Products pages that describe what you sell and how to buy or contact you.
- Create a Blog page to list your latest posts, even if you will publish later.
- Create a Contact page with a form, email address, and any relevant details like opening hours.
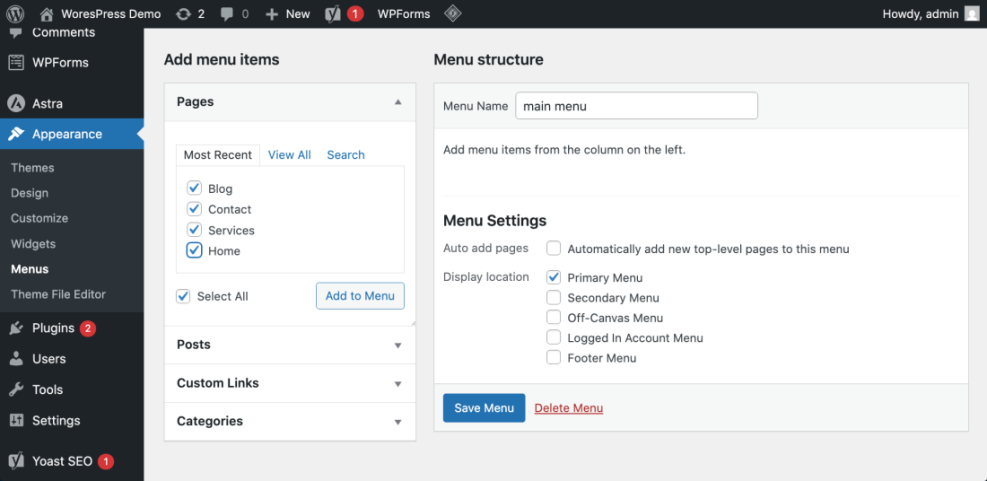
Set a Static Homepage and Build Your Menu
A good menu makes your Build a Website effort actually usable.
- Go to Settings » Reading and set Your homepage displays to A static page.
- Select your new Home page as the homepage and your Blog page as the posts page.
- Next, visit Appearance » Menus.
- Enter a name like Main Menu and click Create Menu.
- Add your core pages to the menu, drag them into your preferred order, and assign the menu to the Primary location.
Step 6: Add Key Plugins, SEO, and CDN
Install Essential WordPress Plugins
Plugins add new features to your WordPress Website and help you Build a Website that is secure, visible, and easy to manage.
- Go to Plugins » Add New.
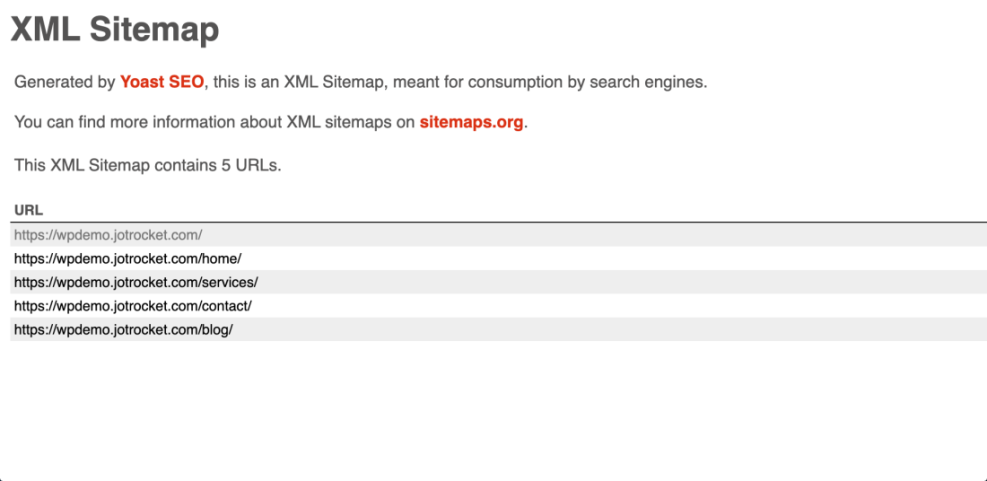
- Install an SEO plugin so you can edit titles, meta descriptions, and sitemaps.
- Install a contact form plugin to collect inquiries from your Contact page.
- Install a backup plugin so you can restore your site if something breaks.
- Install a caching or performance plugin to improve speed.
Compare Simple CDN Options for Speed
To make the site you Build a Website with feel faster worldwide, you can add a Content Delivery Network (CDN). Here is a compact comparison of common approaches you might use for a WordPress site:
| CDN Type | Best For | WordPress Setup Method | Notes |
|---|---|---|---|
| Reverse Proxy CDN (Cloudflare style) | Blogs needing extra security and caching | Change DNS to point through CDN | Can cache HTML, protect against attacks |
| Image and File CDN (Jetpack style) | Simple image offload and optimization | Install plugin and toggle CDN feature | Very easy, but less control over rules |
| Traditional Pull CDN | Serving static assets from a cdn domain | Use plugin to rewrite asset URLs | Fine control over cache and file paths |
| Host Built-In CDN | Managed hosting with one-click tools | Enable in hosting panel | Tight integration, low setup effort |
This table helps you match your budget and skills to a CDN style. Start with the simplest option your host or caching plugin provides, then move to more advanced setups only if you need extra control.
Step 7: Test, Launch, and Improve
Test Your New WordPress Website
Before you officially Build a Website launch, test it like a visitor would.
- Open your site in an incognito or private browser window.
- Click every menu link and button to confirm nothing is broken.
- Submit your contact form with a test message and confirm it arrives in your inbox.
- View the site on a phone or tablet and check that text is readable and buttons are easy to tap.
- Run a speed test with tools like PageSpeed Insights or GTmetrix to spot major issues.
Launch Publicly and Keep Iterating
Once everything looks good:
- Remove any “coming soon” or maintenance mode plugin.
- Share your URL on social media, in your email signature, and on business cards.
- Install analytics (such as Google Analytics or another tool) so you can track traffic and behavior.
- Plan a simple publishing schedule so your new Build a Website project grows with fresh content.
Conclusion: You Just Built a Website on WordPress
You started with a blank idea and finished with a live, fully working WordPress website. Along the way, you learned how to choose hosting, install WordPress, pick a theme, create essential pages, add key plugins, and connect simple performance tools like a CDN.
From here, the best way to make your Build a Website project pay off is to keep publishing helpful content, improve speed and security, and refine your design based on how visitors actually use the site. The great thing about WordPress is that you can keep improving without rebuilding everything from scratch.
More WordPress Guides for Beginners
You can combine this Build a Website guide with other resources to strengthen your skills:
- How to choose the best WordPress hosting
- How to install a WordPress theme
- How to choose WordPress theme
- Beginner WordPress security best practices guide
- Install WordPress step by step