How to Add Meta Description in WordPress
Beginner guide to better snippets and higher click through rates
Learning how to add a Meta Description in WordPress helps search engines and visitors understand your content before they click. Instead of letting Google grab random text, you can control the short summary that appears in search results.
In this guide you will install or configure an SEO plugin, add meta descriptions to posts, pages, and your homepage, and optionally set up a simple code method if you prefer not to use a plugin.
What You Need to Start
- Access to your WordPress dashboard with a Administrator account.
- A recent backup or a staging site that you can safely test on.
- Optionally, a WordPress SEO plugin such as Yoast SEO, Rank Math, or All in One SEO.
- Basic familiarity with opening and editing a post or page in WordPress.
Step 1: Understand Meta Description in WordPress
Before you start editing settings, understand what a meta description does so you can write better ones. A clear description improves click through rate even if your ranking does not change.
- Open a new browser tab and search for your brand or site name on Google.
- Look at how your own pages and competitors appear under the blue title link.
- Identify which snippets look clear and inviting and which look cut off or confusing.
- Write down a few phrases that make you want to click so you can copy the style later.
This example search results page shows where the title and meta description appear under each result.
Once you see how important this text is, you are ready to configure WordPress so you can control those descriptions yourself.
Step 2: Install a WordPress SEO Plugin
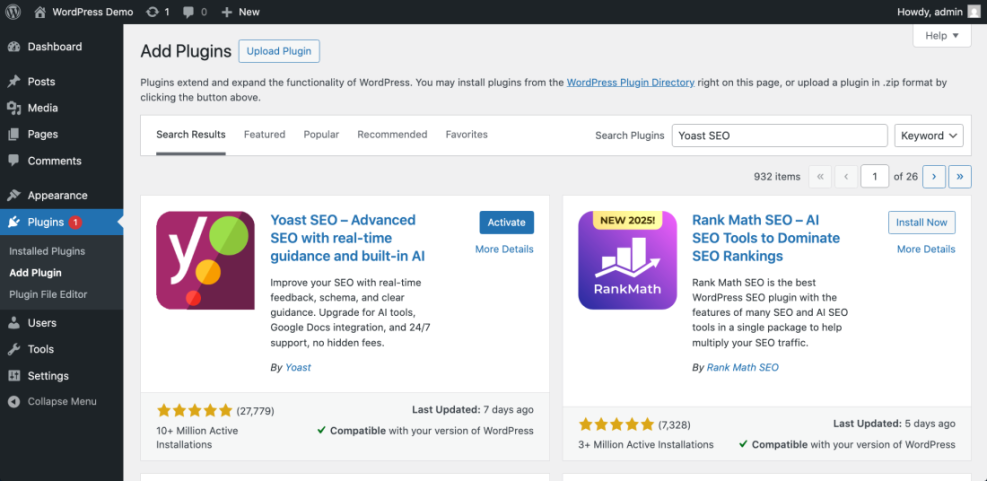
The easiest way to manage meta descriptions in WordPress is with an SEO plugin. This example uses Yoast SEO, but Rank Math or All in One SEO follow a very similar process.
- Log in to your WordPress dashboard at yourdomain.com/wp-admin.
- In the left menu, go to Plugins » Add New.
- In the search box, type Yoast SEO.
- Click Install Now next to the Yoast SEO plugin.
- After installation finishes, click Activate.
- Follow the basic setup wizard if it appears, choosing options that match your site type.
This screen shows the Add Plugins page after searching for Yoast SEO and the Install Now and Activate buttons.
If you want more guidance, you can also follow the full tutorial in How to install a plugin in WordPress.
Step 3: Add Meta Description to Posts and Pages
Now that the plugin is installed, you can edit the meta description for individual posts and pages. You will do this inside the editor for each piece of content.
- In the left menu, go to Posts » All Posts or Pages » All Pages.
- Hover over the item you want to edit and click Edit.
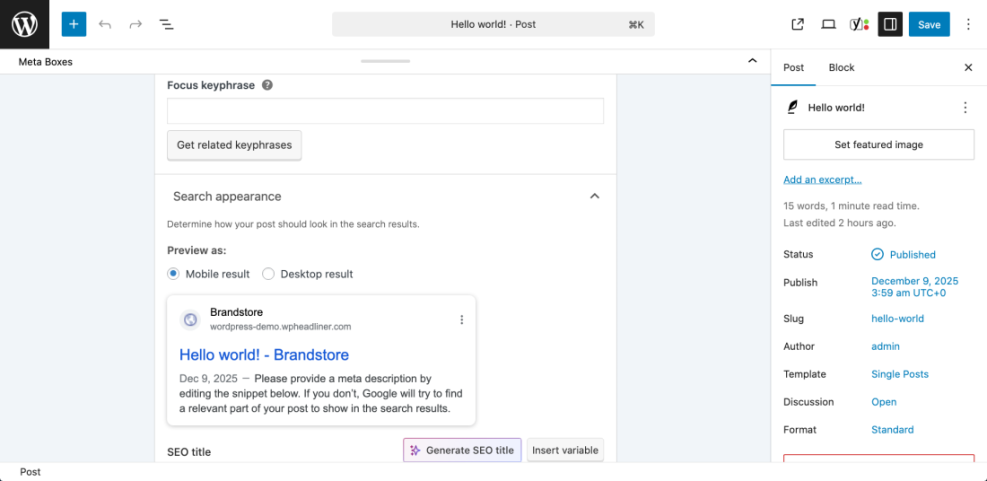
- Scroll down below the main content area until you see the Yoast SEO meta box.
- Make sure you are on the SEO tab, then locate the Meta description field.
- Type a concise summary of the page that includes your main keyword and a benefit to the reader.
- Watch the feedback bar under the field. Keep typing until it shows an optimal length, then stop.
- Click Update or Publish to save your changes.
This view shows the post editor with the Yoast SEO snippet preview and Meta description field expanded under the content.
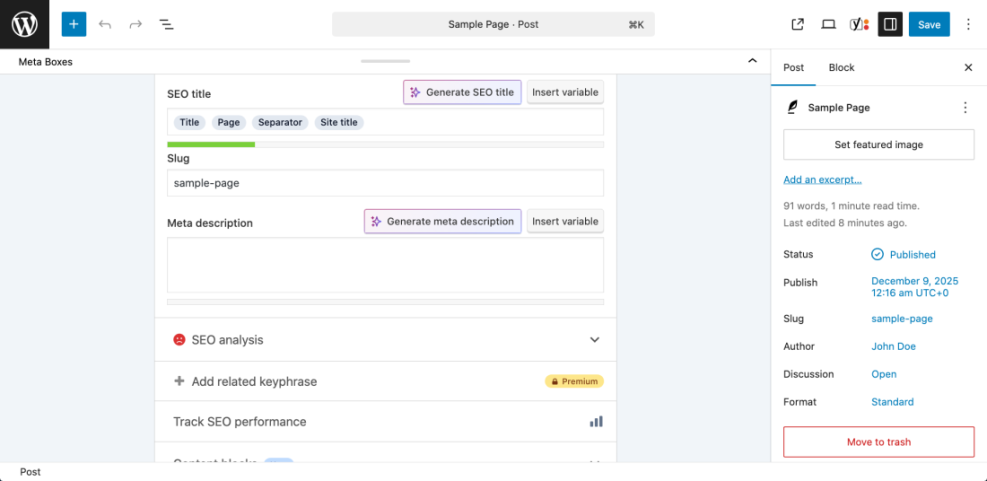
To verify success, click Preview in the snippet area and confirm that the title and description look complete and not cut off.
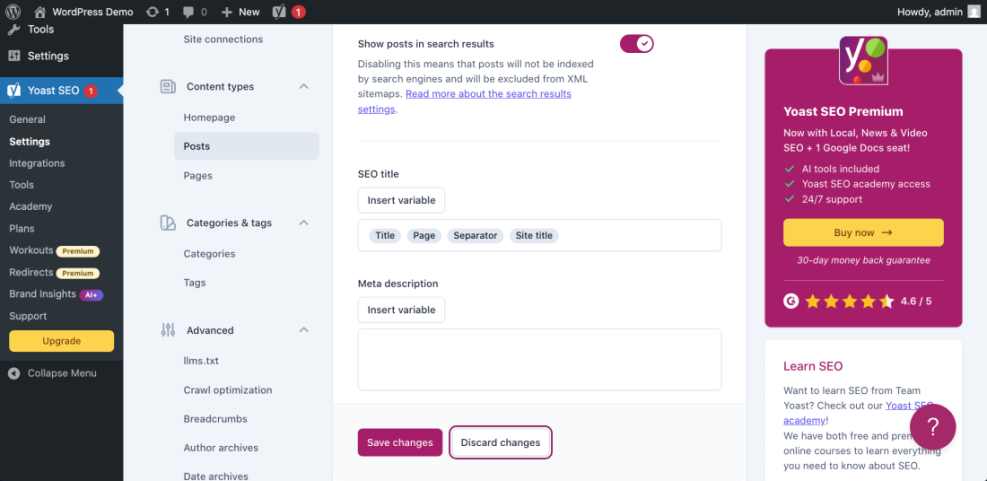
Step 4: Set Meta Description for Homepage and Archives
Your homepage and archive pages (like category lists) often get a lot of impressions in search results. Set custom meta descriptions here so visitors know what your site is about.
- In the left menu, go to Yoast SEO » Settings (or Search Appearance in some versions).
- Under Content types, find the section labeled Homepage or similar.
- In the Meta description box, enter a short description that summarizes your entire site.
- If you use a static page as your homepage, click the link to edit that page and set the meta description directly on the page instead.
- Scroll down and click Save changes.
This settings screen shows the Homepage meta description field inside the Yoast SEO settings panel.

Repeat a similar process for Categories and Tags under the relevant Yoast settings sections so archive pages also get meaningful descriptions.
Step 5: Configure Default Meta Description Templates
If you publish often, manually writing every single meta description can be slow. Yoast lets you set templates that use variables for titles, excerpts, and more.
- From the WordPress dashboard, go to Yoast SEO » Settings.
- Open the Content types section and click Posts.
- Find the Meta description template field.
- Use variables such as Excerpt or Title (often inserted via an Insert variable button) combined with a short call to action.
- Repeat for Pages, and any custom post types such as Products if you run WooCommerce.
- Click Save changes when you are done.
This example shows the Yoast template editor with variables inserted in the Meta description field for posts.
After saving, create or edit a test post and confirm the generated meta description looks sensible. You can still override it per post when needed.
Step 6: Add Meta Description Without a Plugin
If you prefer not to use an SEO plugin, you can still add a meta description using a custom field and a small code snippet. Always work on a child theme or a custom functionality plugin so future updates do not erase your changes.
- Open a page or post in the WordPress editor where you want to control the description.
- In the top right, click the three dot Options menu and choose Preferences.
- Under the Panels section, enable Custom fields, then close the panel.
- Scroll down to the new Custom Fields box, click Enter new, set the Name to meta_description, and paste your desired text into Value.
- Click Add Custom Field, then click Update to save the post.
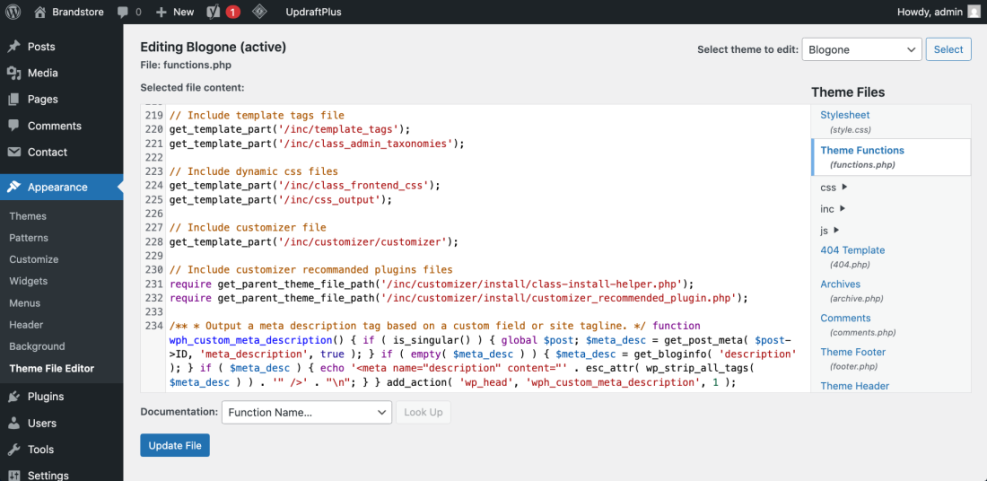
- Next, in the WordPress dashboard, go to Appearance » Theme File Editor.
- On the right, select your functions.php file (or better, the functions file of your child theme).
- Paste the following code at the bottom of the file, just above any closing PHP comment:
 * Output a meta description tag based on a custom field or site tagline.
 */
function wph_custom_meta_description() {
    if ( is_singular() ) {
        global $post;
        $meta_desc = get_post_meta( $post->ID, 'meta_description', true );
    }

    if ( empty( $meta_desc ) ) {
        $meta_desc = get_bloginfo( 'description' );
    }

    if ( $meta_desc ) {
        echo '<meta name="description" content="' . esc_attr( wp_strip_all_tags( $meta_desc ) ) . '" />' . "n";
    }
}
add_action( 'wp_head', 'wph_custom_meta_description', 1 );
WordPress also documents meta tags and header output in the official Meta Tags in WordPress guide.
This editor view shows the functions.php file with the meta description function pasted near the end.
To verify the code is working, open any updated post on the front end, right-click, choose View page source, and confirm you see a <meta name="description"> tag with your text.
Step 7: Test and Improve Your Meta Descriptions
Once you have meta descriptions in place, test them regularly and refine them based on performance. Small wording changes can lead to more clicks without changing your rankings.
- Open a few key pages and use View page source in your browser to confirm the correct description tag appears.
- Wait for Google to recrawl your pages, then search for your main keywords and check how the snippets look in the results.
- Update any descriptions that are too generic, misleading, or cut off mid sentence.
- Use your analytics tools to monitor click through rate for important pages over time.
- When you find high performing snippets, reuse the style and structure on similar pages.
This sample search results view highlights a before and after comparison where a rewritten description increases click appeal.
For a deeper onpage strategy beyond meta descriptions, review the full WordPress seo complete beginners guide and WordPress seo complete beginners guide.
Conclusion You Are Ready to Go
You have learned how to add a Meta Description in WordPress using an SEO plugin and a lightweight custom code option. You can now control how your posts, pages, and homepage appear in search results instead of relying on random snippets.
Keep refining your descriptions as you publish new content, and combine them with solid titles and onpage optimization. Over time this will improve click through rates and help more of the right visitors choose your site.
Further Reading
- WordPress seo complete beginners guide
- How to do on page seo in WordPress
- Yoast seo setup guide
- WordPress migration checklist for blogs
- Is WordPress good for seo