Learning how to add an internal link in WordPress helps readers and search engines move through your content more easily. When you place internal links correctly, you guide visitors to related posts, highlight important pages, and make it easier for Google to understand your site structure.
Think of each internal link as a signpost that points readers toward the next best article, keeping them engaged and moving deeper into your site.
In this tutorial you will add internal links using both the WordPress block editor and the Classic Editor, place helpful links in menus and widgets, and quickly test everything on the front end so your navigation feels natural and polished.
This guide will walk you step by step through how to add an internal link in WordPress so you can strengthen your site structure every time you publish.
What You Need to Start Adding Internal Links in WordPress
- Administrator or Editor access to your WordPress dashboard.
- At least two published posts or pages you want to connect with internal links.
- Either the default block editor or the Classic Editor plugin active.
- A modern web browser and a stable internet connection.
- Optional backup or staging site if you prefer to test changes before going live.
Step 1: Understand How Internal Links Help Your Site
Before you start clicking, understand what a good internal link does. It connects related content, passes authority to important pages, and keeps visitors onsite longer.
- Log in to your WordPress dashboard by visiting /wp-admin on your domain and entering your username and password.
- In the left menu, hover over Posts and click All Posts to see your existing content.
- Scan your titles and note any cornerstone or “must read” articles you frequently want to promote.
- Decide which related posts you want to link together, such as guides and checklists on the same topic.
After you review your content, you will know exactly which pages deserve more internal links.
From the All Posts screen you can quickly see which posts get linked most often and where you can improve.
Step 2: Open the Post or Page to Add an Internal Link
Now open the content where you want to place your first internal link so you can work directly inside the editor.
- From the WordPress dashboard, hover over Posts and click All Posts.
- Find the post where you want to add an internal link and hover over its title.
- Click Edit to open the post in the block editor, or Edit (Classic) if your site uses the Classic Editor.
- Scroll through the content and identify the sentence where a link to another post would be genuinely helpful to the reader.
Opening the post this way ensures you are editing the latest version and avoids creating duplicate drafts.
Step 3: Add an Internal Link in the Block Editor
If your site uses the modern block editor, you can add an internal link directly inside any text block using the built in link tool.
- Inside your post, click inside the paragraph where you want to add the internal link.
- Select the exact words you want to turn into the link, such as a descriptive phrase that matches the target post.
- In the small toolbar that appears above the text, click the Link icon that looks like a chain.
Click the Link icon in the block toolbar to open the link box.
- In the link box that appears, start typing the title of the internal page you want to link to.
- Wait for WordPress to show a dropdown list of matching posts and pages from your site.
- Click the correct post or page in the dropdown to insert its URL automatically.
- Click the small Apply arrow or press Enter to confirm the link.
Use the link suggestions to quickly find internal posts without copying and pasting URLs.
- Optional step, click the Link icon again, then the small Advanced settings arrow to review link options.
- Make sure the option Open in new tab is off for most internal links, so visitors stay in the same browsing flow.
- Click Update in the upper right corner to save your changes.
To verify your internal link works, click Preview in the top right, open the post in a new tab, and click the linked text to confirm it loads the correct internal page.
For more background on link behavior in the block editor, check the official WordPress documentation at WordPress.org Adding Links.
Step 4: Add an Internal Link in the Classic Editor
If you use the Classic Editor plugin or an older workflow, the process is slightly different but still very quick.
- In your WordPress dashboard, go to Posts and click All Posts.
- Hover over the post you want to edit and click Edit to open the Classic Editor.
- In the visual editor, select the anchor text you want to use for your internal link.
- Click the Insert/edit link button (chain icon) in the formatting toolbar above the editor.
Use the Insert/edit link button to open the link options window.
- In the small link box, click Or link to existing content to expand the list of posts and pages.
- Use the search box to type part of the title of the internal post you want to link to.
- Click the correct post in the list. WordPress will automatically fill the URL and Title fields.
- Leave Open link in a new tab unchecked for typical internal links.
- Click Add Link to insert the internal link into your content.
- Click Update on the right side of the screen to save your post.
If you prefer working directly with HTML, you can add the link manually in the Text tab.
<a href="https://example.com/sample-post/">Sample Post</a>After updating, click View Post from the admin bar and test the link on the front end to confirm it opens the right page.
Step 5: Add Internal Links in Menus and Widgets
Internal links do not only live inside paragraphs. Adding important internal links to menus and widgets helps visitors find high value pages from any part of the site.
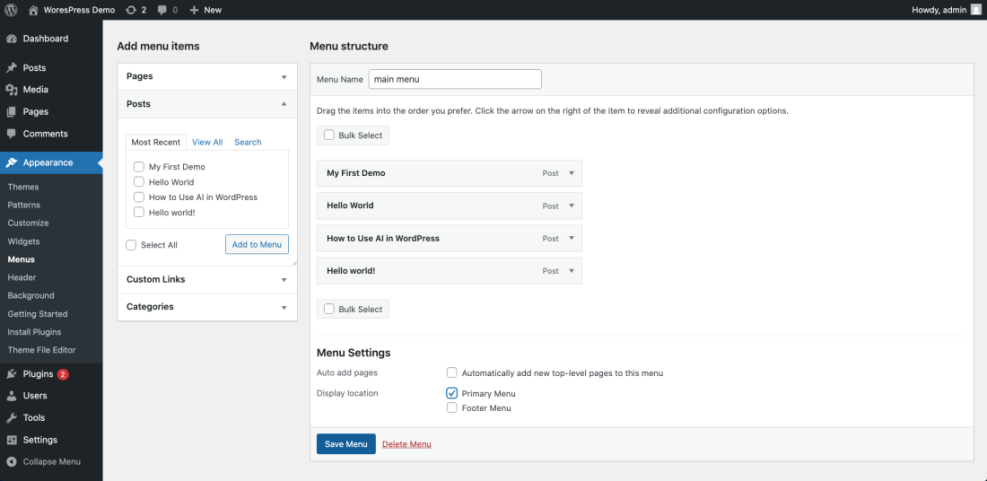
- In the WordPress dashboard, hover over Appearance and click Menus.
- Select the menu you want to edit from the dropdown and click Select.
- On the left side, open the Pages or Posts panel and check the boxes for the internal pages you want to add.
- Click Add to Menu to place them into your navigation structure.
- Drag and drop the new menu items into the correct order or below other items to create dropdowns.
- Click Save Menu when finished.
Use the Menus screen to place your most important internal pages where visitors will see them first.
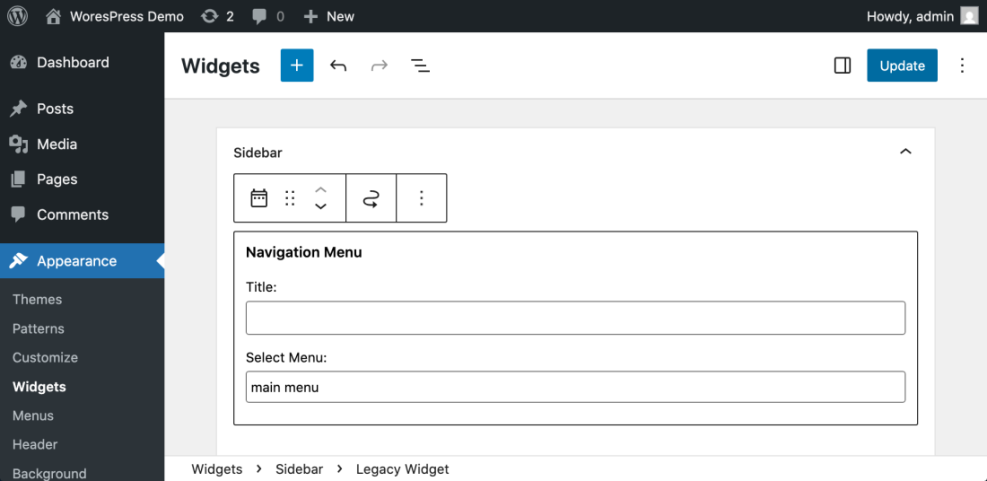
- To add internal links with widgets, go to Appearance then Widgets or Customize then Widgets depending on your theme.
- Add a Navigation Menu or Pages widget to your sidebar or footer area.
- Select the menu or page list that contains your key internal links.
- Click Save and then view your site to see the new internal links in the sidebar or footer.
Check a few front end pages to ensure the new menu and widget links look good on desktop and mobile.
Common Internal Link Types in WordPress
The table below gives you a quick overview of the most common internal link types you will use around your WordPress site and how they are typically added.
| Internal Link Type | Best For | WordPress Setup Method | Notes |
|---|---|---|---|
| In-Content Contextual Link | Guiding readers to related posts while they are reading | Select text in the editor and use the Link tool | Most powerful type of internal link for SEO and user experience because it appears right where the topic is mentioned. |
| Primary Navigation Menu Link | Highlighting your most important pages (home, blog, categories) | Go to Appearance » Menus and add pages or custom links | Great for cornerstone content and categories you want every visitor to find quickly. |
| Sidebar or Widget Link | Featuring popular posts, series, or category hubs | Use Appearance » Widgets to add a Navigation Menu or Text widget | Works well for “Most read” or “Start here” sections that stay visible on many pages. |
| Footer / Utility Link | Linking to policies, about page, or resource hubs | Add a footer menu in Appearance » Menus and assign it to the footer location | Low maintenance way to keep important but less frequently visited pages available everywhere. |
Step 6: Review and Maintain Your Internal Links
Adding a single internal link is a good start, but reviewing your posts regularly keeps your internal linking structure healthy as you publish more content.
- Open your newly edited post on the front end in a new browser tab.
- Click every internal link you added and confirm each one loads the correct page with no 404 errors.
- Use an incognito or private window to see the page as a new visitor and check whether the links feel natural and helpful.
- From your dashboard, open a few related posts and add links back to this new article to create two way connections.
- Schedule a quick review every month to update older posts with links to your newest, most important guides.
As you maintain internal links over time, your site becomes easier to navigate, and your most valuable content receives consistent internal support.
Conclusion You Are Ready to Use Internal Links in WordPress
By following these steps you learned how to add an internal link in WordPress using both the block editor and Classic Editor, place key links inside menus and widgets, and double check everything on the front end. Each new internal link you add gives readers a clearer path through your content and helps search engines understand which pages matter most.
Whenever you publish a new article, look for at least one natural place to add an internal link so every post supports the rest of your content library.
Make internal linking part of your regular publishing checklist so every new post strengthens your existing content instead of standing alone.
Further Reading on Internal Linking
- Internal linking WordPress beginners
- Internal linking strategies WordPress
- WordPress migration checklist for blogs
- Internal linking WordPress beginners
- Internal linking WordPress beginners