How Do You Remove a WordPress Site from Cpanel
Step-by-step guide to deleting a WordPress install safely using your cPanel hosting account.
Maybe you no longer need a site, you’re cleaning up a cluttered hosting account, or you’ve already moved to a new platform. Simply deleting posts from the WordPress dashboard is not enough — the files and database still live on your server, and that can create confusion and even security risk.
On most shared hosting, your account can host multiple websites and email accounts. If you remove the wrong folder or database from cPanel, you could break other sites or lose important data. Understanding how WordPress sits inside your hosting stack, as explained in WordPress hosting explained, makes this process much safer.
In this tutorial, you’ll learn how to safely remove a WordPress site from cPanel: first by checking what you actually want to delete, then using any available app installer, and finally cleaning up files, databases, and domains manually without harming anything else on your hosting account.
Prerequisites
Before you delete anything in cPanel, pause and prepare. Removing a WordPress site is a destructive action — there’s no recycle bin for your database once it’s gone.
Make sure you have:
- cPanel login details from your hosting provider.
- The exact domain or subdomain you want to remove (for example,
example.comorblog.example.com). - A complete backup of your WordPress files and database. You can follow this guide on how to back up a WordPress site if you haven’t done this yet.
- 15–30 minutes of uninterrupted time so you can complete the process in one go.
- Access to your domain registrar (optional) if you plan to repoint or remove the domain entirely.
Step 1: Map Your WordPress Installation in cPanel
The most important step is to be 100% sure which files and database belong to the WordPress site you want to remove. This prevents you from deleting the wrong site or shared resources.
- Log in to your hosting account and open the cPanel dashboard.
- In cPanel, go to Domains or Addon Domains. Look for the domain or subdomain you want to remove and note its Document Root (for example,
/public_html/or/public_html/blog/). - In cPanel, click File Manager.
- In File Manager, open the document root folder you noted. You should see common WordPress files and folders like
wp-admin,wp-content,wp-includes, and files such aswp-config.phpandindex.php. This confirms you’re looking at the correct site.
/public_html/. If you see folders like example2.com alongside WordPress files, be extra careful to delete only the site you actually want to remove. Step 2: Remove the Site Using Softaculous or Your App Installer
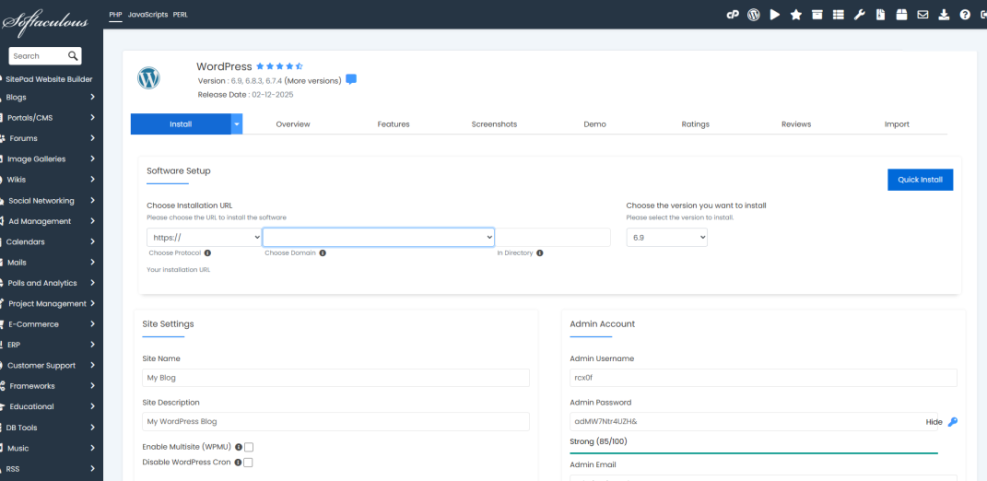
Many hosts provide an automatic installer like Softaculous, Installatron, or Site Software. If your WordPress site was installed with one of these tools, the easiest and safest way to remove it is to use the same tool to uninstall it.
- From the cPanel home screen, open Softaculous Apps Installer (or a similar “App Installer” icon).
- Click on the WordPress icon, then look for a tab or link labeled Installations, All Installations, or similar.
- Find the entry that matches the domain and directory of the site you want to remove. Double-check the URL and installation path.
- Click the Remove or Uninstall icon (often a red X or trash can).
- When prompted, select options to delete the files, database, and database user for this installation, then confirm.
Step 3: Manually Delete WordPress Files in cPanel
If there is no app installer, or if it didn’t fully remove the site, you can safely delete the WordPress files directly in File Manager.
- Return to File Manager in cPanel.
- Open the document root folder for the site (for example,
/public_html/or/public_html/blog/). - Select the WordPress files and folders:
- Folders:
wp-admin,wp-content,wp-includes - Files:
wp-config.php,index.php,wp-settings.php, and other WordPress core files in that directory
- Folders:
- Click the Delete button in the toolbar.
- When asked, you can leave the “Skip the trash” option unchecked if you want a temporary safety net, or check it to delete files permanently right away.
public_html folder if other sites or apps live inside it. Only remove the WordPress files and folders that belong to the site you are decommissioning. Step 4: Remove the WordPress Database and User
Even after the files are gone, the WordPress database still contains all your posts, pages, users, and settings. If you’re certain you no longer need this data (and you have a backup), you can remove the database and its user from cPanel.
First, confirm which database your site uses:
- In File Manager, open the document root folder for your site.
- Right-click
wp-config.phpand choose View or Edit. - Find these lines to identify the database name and user:
define( 'DB_NAME', 'example_db' );
define( 'DB_USER', 'example_user' );
define( 'DB_PASSWORD', 'example_password' );
Now remove the database and user:
- In cPanel, go to MySQL Databases (or MariaDB Databases on some hosts).
- Under Current Databases, locate the database name from
DB_NAME. Make sure it isn’t shared with any other site or application. - Click Delete (or a similar option) next to that database to remove it.
- Under Current Users, find the user from
DB_USER. If no other database uses this user, remove it as well.
Step 5: Clean Up Domains, Redirects, and SSL
With the files and database gone, the site itself is removed. However, your domain, subdomain, and SSL certificates may still be configured inside cPanel. Cleaning these up avoids confusion later.
- Remove an addon domain: In cPanel, go to Domains or Addon Domains, find the domain, and use the option to remove or delete it. This stops it from pointing to a document root in your hosting account.
- Remove a subdomain: Go to Subdomains, select the subdomain, and remove it. This only affects the routing on the server — your main domain remains untouched.
- Check redirects: In cPanel, open Redirects and delete any redirects that pointed to the old WordPress URLs.
- Update DNS or hosting for migrated sites: If you used this site as part of a move, such as when you move your WordPress site to a new host, make sure the domain’s DNS now points to the new server.
- Review SSL certificates: In SSL/TLS or your security section, remove any certificates that are no longer needed, or reassign them to new sites as supported by your host.
Step 6: Confirm the Site Has Been Removed
Finally, check that nothing still loads from the old WordPress install and that visitors see the expected result.
- Open your browser in an incognito/private window.
- Visit the domain or subdomain you removed.
- Confirm one of the following:
- A generic hosting page from your provider (no WordPress content).
- A 404 or “site not found” message.
- Your new site, if you repointed the domain elsewhere.
- Try going directly to
/wp-adminon that domain (for example,https://example.com/wp-admin). You should see an error or a different site — not the old WordPress login screen.
index.html “Coming soon” page in the document root so visitors aren’t confused by a blank or error page. Clear Out Old WordPress Sites Without Breaking Your Hosting
Removing a WordPress site from cPanel is more than just hitting “Delete.” By mapping the installation, backing it up, and carefully removing files, databases, and domains, you keep your hosting account clean without risking other projects that share the same server.
Now that you’ve safely removed your old site, you can reuse the domain for a new project, consolidate sites on fewer servers, or simply reduce clutter and security risk in your hosting account. The key is to move slowly, double-check what you’re deleting, and always keep a good backup history in case you ever change your mind.
Further Reading
- WordPress Disaster Recovery Walkthrough
- WordPress Hosting Backups
- Beginner Guide to WordPress Backup and Restore Strategies
- How to Delete a WordPress Account
- WordPress Security: Complete Overview