A WordPress popup is one of the easiest ways to capture more leads, promote offers, and highlight important messages on your site. In this guide, you’ll learn exactly how to add a popup on WordPress step by step, even if you’re a beginner.
We’ll walk through choosing a WordPress popup plugin, creating your first popup, connecting it to your email list, setting smart display rules, and even adding a lightweight code-based popup if you prefer more control.
What You Need to Start With a WordPress Popup
- Access to your WordPress admin dashboard (https://yourdomain.com/wp-admin).
- A user account with the Administrator role.
- A stable backup in place, using a plugin from your existing Backup Strategy.
- An email marketing service account (optional but recommended) such as Mailchimp, ConvertKit, or similar.
- Your popup goal defined, for example “grow newsletter list” or “promote a limited discount”.
Step 1: Plan the Purpose of Your WordPress Popup
Before you install anything, clarify why you want a popup. Clear goals lead to better design, more targeted triggers, and higher conversion rates.
- Write down one main goal such as “collect emails”, “promote a webinar”, or “recover abandoning visitors at checkout”.
- Decide what you will offer in the popup, such as a discount code, free guide, or simple contact form.
- List the pages where the popup makes sense, for example only Blog posts or just the Checkout page.
- Choose how often visitors should see it, for example once per day or once per week.
Take a minute to finalize this list. You will use it when configuring your popup plugin and display rules.
Step 2: Install a WordPress Popup Plugin
The easiest way to add a popup on WordPress is by using a dedicated popup plugin from the official plugin directory. In this example, you will install a popular free plugin so you can follow along step by step.
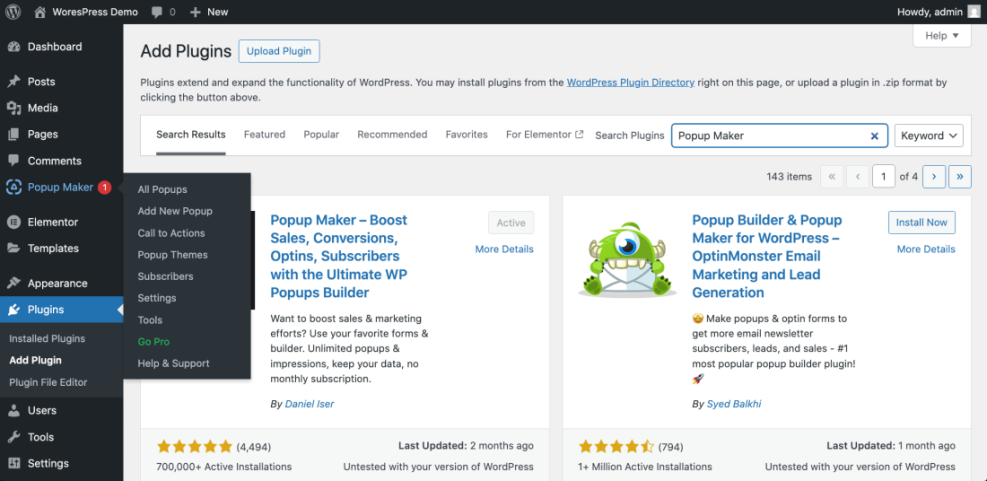
- Log in to your WordPress admin dashboard at /wp-admin.
- In the left menu, go to Plugins » Add New.
- In the search box in the top right, type popup.
- Find a well rated plugin such as Popup Builder or Popup Maker with many active installs and recent updates.
- Click Install Now on your chosen popup plugin.
- When installation finishes, click Activate.
- Confirm that a new menu item appears in the left sidebar, for example Popup Builder or Popup Maker.
Step 3: Create Your First WordPress Popup
Now you will create the actual popup window and design the content visitors will see. Most popup plugins offer a drag and drop builder or integrate with the block editor, so you can edit the popup like a small page.
- In the left admin menu, click your popup plugin menu, for example Popup Builder or Popup Maker.
- Click Add New or Create Popup to start a new popup.
- Enter a descriptive name in the Title field such as “Newsletter signup popup”. This is for internal use only.
- Choose a template if your plugin offers them (for example a simple email signup or discount popup template).
- In the content editor, add a clear heading such as “Get weekly WordPress tips”, a short benefit focused paragraph, and your form or call to action button.
- Use text formatting options to bold the main benefit and keep the popup body copy short for better readability.
- Click Save, Update, or Publish inside the popup editor to store your changes.
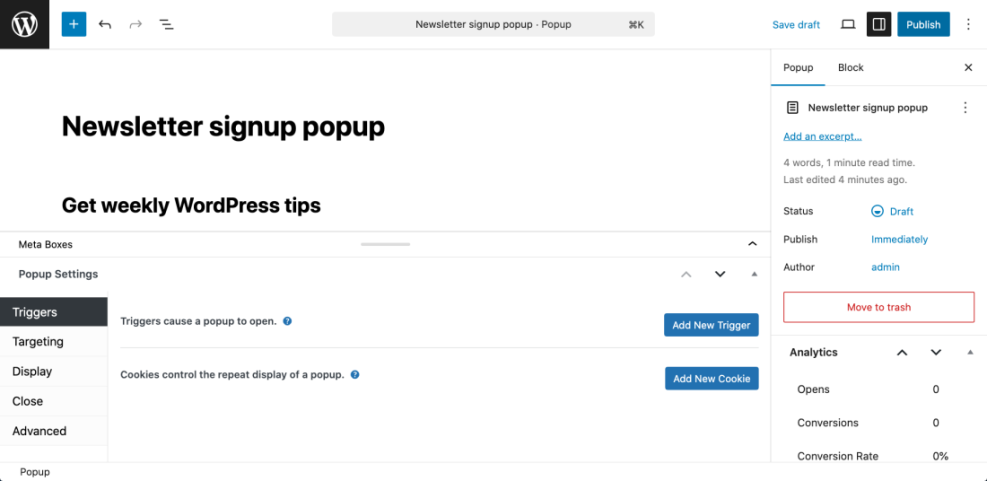
To verify this step, look at the popup list in your plugin screen and confirm your new popup appears with the correct title and status set to draft or published as expected.
Step 4: Connect the WordPress Popup to Your Email List
To get real value from your popup, you should connect it to an email marketing service. Many popup plugins integrate directly with popular email tools, or you can embed a form from your existing form plugin.
- Open your popup editor again from the plugin menu.
- Look for a Integrations, Email Provider, or Form tab in the popup settings.
- If your plugin supports direct integrations, select your email service (for example Mailchimp or ConvertKit), paste your API key, and click Connect.
- Choose the email list or audience where new subscribers from this WordPress popup should be added.
- If your plugin does not support direct email integrations, select the option to embed a form and paste a shortcode from your form plugin, for example a newsletter form created with WPForms or another contact form plugin.
- Click Save or Update to store your integration settings.
Visit your email tool dashboard and confirm that a test submission from the popup appears in the correct list with the right tags or groups.
Step 5: Control When and Where the WordPress Popup Appears
Display rules and triggers determine when visitors see your popup. Getting this right is the difference between a helpful prompt and an annoying interruption.
- In your popup plugin, open the popup you created and locate the Display Rules, Targeting, or Triggers tab.
- Choose where the WordPress popup appears, such as Entire Site, Posts only, or specific pages like Checkout or Pricing.
- Set the trigger to match your goal, for example:
- Time delay of 5–10 seconds after page load.
- Scroll depth of 50% of the page.
- Exit intent when the visitor moves the mouse toward the browser bar (desktop).
- Configure frequency so users do not see the same popup too often. Set a cookie or session rule such as “Show once per day” or “Hide after close for 7 days”.
- If your plugin allows it, disable aggressive popups on small screens or use a smaller slide in layout for mobile visitors.
- Click Save or Update to apply your display rules.
To verify success, open your site in an incognito window, visit a target page, and confirm the popup appears only when your trigger conditions are met.
Step 6: Add a Simple Manual WordPress Popup With Code
If you prefer not to rely entirely on plugins, you can add a lightweight popup using HTML, CSS, and JavaScript. The safest way to do this is through a code snippet manager plugin so you do not edit theme files directly.
- Install and activate a code snippets plugin such as WPCode from Plugins » Add New.
- In the left menu, go to Code Snippets » Add Snippet and choose a custom HTML or JavaScript snippet type.
- Paste the example code below, which creates a basic popup that appears a few seconds after page load.
- Set the snippet location to load in the Site wide footer or equivalent option.
- Click Save and then Activate the snippet.
- Visit your site in an incognito window and wait a few seconds to confirm the manual popup appears and closes correctly.
<style>
  #simple-popup-overlay {
    position: fixed;
    inset: 0;
    background: rgba(0,0,0,0.6);
    display: none;
    align-items: center;
    justify-content: center;
    z-index: 9999;
  }
  #simple-popup {
    background: #ffffff;
    max-width: 420px;
    width: 90%;
    padding: 24px;
    border-radius: 8px;
    box-shadow: 0 10px 30px rgba(0,0,0,0.25);
  }
  #simple-popup h2 {
    margin-top: 0;
  }
  #simple-popup button {
    cursor: pointer;
  }
</style>

<div id="simple-popup-overlay">
  <div id="simple-popup">
    <h2>Get weekly WordPress tips</h2>
    <p>Join our email list for practical tutorials and checklists.</p>
    <form id="simple-popup-form">
      <input type="email" name="email" placeholder="Enter your email" required />
      <button type="submit">Sign up</button>
    </form>
    <button id="simple-popup-close">No thanks</button>
  </div>
</div>

<script>
  document.addEventListener('DOMContentLoaded', function () {
    var overlay = document.getElementById('simple-popup-overlay');
    var closeBtn = document.getElementById('simple-popup-close');
    var form = document.getElementById('simple-popup-form');

    function showPopup() {
      overlay.style.display = 'flex';
    }

    function hidePopup() {
      overlay.style.display = 'none';
      document.cookie = 'simple_popup_closed=1;path=/;max-age=' + 60 * 60 * 24 * 7;
    }

    if (document.cookie.indexOf('simple_popup_closed=1') === -1) {
      setTimeout(showPopup, 8000); // show after 8 seconds
    }

    closeBtn.addEventListener('click', function (e) {
      e.preventDefault();
      hidePopup();
    });

    form.addEventListener('submit', function () {
      hidePopup();
    });
  });
</script>
This manual popup does not send email addresses anywhere by itself. Connect the form to your email system or replace it with a shortcode from your existing form plugin if you need full list management.
Maintenance Methods for Managing a WordPress Site and Popups
There is more than one way to handle ongoing WordPress maintenance tasks, including keeping your WordPress popups healthy and secure. Each method fits slightly different skills, budgets, and site types. The table below compares the main methods so you can quickly choose the one that feels easiest and safest for your site.
| Method | Where You Use It | Main Purpose |
|---|---|---|
| DIY Manual Maintenance | WordPress dashboard and hosting control panel | Maximum control over updates, backups, and checks for small or low-risk sites. |
| Managed Hosting Tools | Your host’s control panel or custom dashboard | Simplify routine maintenance with one-click updates, built-in backups, and basic security. |
| Maintenance & Security Plugins | Plugins section inside the WordPress dashboard | Automate repetitive work like backups, database cleanup, image optimization, security scans, and monitoring your popup plugin. |
| WP-CLI and Developer Tools | SSH terminal with WP-CLI and deployment tools | Scriptable, fast maintenance for developers managing multiple or complex sites. |
| Professional WordPress Care Plan | External provider, freelancer, or agency | Hands-off maintenance with proactive monitoring, fixes, and expert support. |
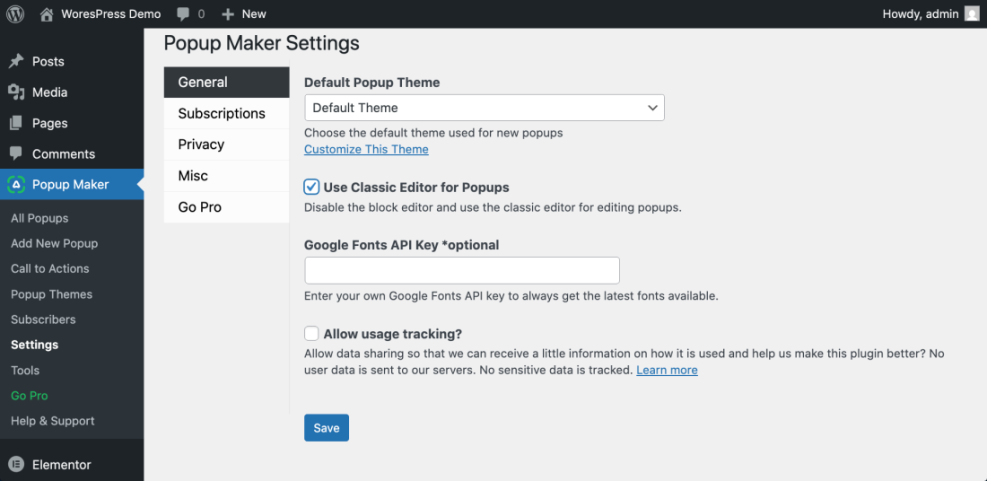
Using the WordPress Dashboard to Manage Popups
Your WordPress dashboard is the control center for your popup plugin. From here you can create new WordPress popups, edit existing popup forms, adjust display rules, and check basic conversion stats. Make a habit of reviewing your popup settings whenever you log in so your site-wide popups stay aligned with your current campaigns.
Conclusion You Are Ready to Use WordPress Popups
By now, you have learned how to add a popup on WordPress in a safe, structured way. Along the way, you planned your popup goal, installed a dedicated WordPress popup plugin, created and designed your first popup, connected it to your email list, and configured smart display rules so visitors see it at the right time.
Finally, this guide also showed you how to build a lightweight code based WordPress popup for situations where you want more control. From here, you can refine your copy, test different offers, and measure conversions to keep improving results over time.
Further Reading on WordPress Popups and Lead Generation
- Best contact form plugins for WordPress
- WordPress seo complete beginners guide
- WordPress seo complete beginners guide
- How to protect your WordPress admin area using
- WordPress speed optimization new bloggers