Schema in WordPress helps search engines understand your content so they can show rich results instead of plain blue links. Without structured data, Google has to guess what your pages are about, which often means lower visibility and fewer clicks.
In this tutorial you will learn how to add Schema in WordPress using a schema friendly SEO plugin and simple JSON LD code. You will configure global site schema, add schema to individual posts and pages, validate everything with Google’s tools, and keep your structured data clean over time.
What You Need to Start
- A self hosted WordPress site with Administrator access.
- Access to your WordPress Dashboard and the ability to edit posts and pages.
- Permission to install or configure plugins such as Yoast SEO or Rank Math SEO.
- A recent full backup or a safe staging site to test changes before going live.
- A Google account so you can use Google Search Console and testing tools later.
Step 1: Decide How You Will Add Schema in WordPress
Before changing settings, decide whether you want schema handled mostly by a plugin, entirely by custom code, or a hybrid. Most WordPress sites use a plugin for standard types like Article and Organization and reserve custom JSON LD for special cases like FAQ or HowTo blocks.
First, check if schema already exists on your site so you avoid duplicated and conflicting markup.
- Log in to your WordPress Dashboard.
- Go to Posts » All Posts and click Edit on any recently published article.
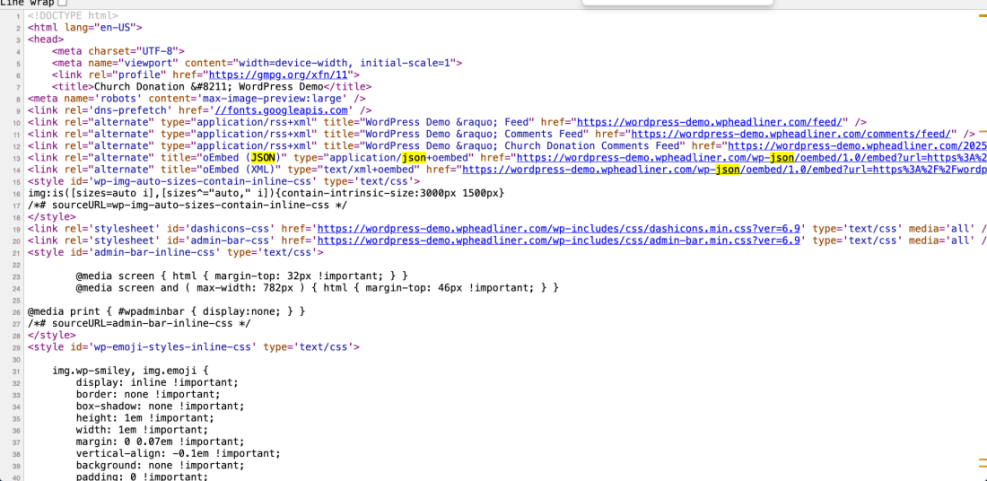
- In your browser, open the page on the front end and view the source with Ctrl + U (Windows) or ⌘ + Option + U (Mac).
- Use the browser find feature and search for @context or application/ld+json to see if JSON LD schema is already present.
Step 2: Install and Configure a Schema Friendly SEO Plugin
The easiest way to manage Schema in WordPress is to use a modern SEO plugin that outputs JSON LD automatically. Plugins like Rank Math SEO, Yoast SEO, and All in One SEO can handle most common schema types with just a few clicks.
If you already use one of these plugins, you can skip installation and move straight to configuring global schema in the next step.
- In your WordPress Dashboard, go to Plugins » Add New.
- In the search box, type Rank Math SEO or Yoast SEO.
- Click Install Now next to your chosen plugin, then click Activate.
- When the setup screen appears, click Start Wizard or Configuration wizard and follow the prompts to set your site type, logo, and basic SEO settings.
Step 3: Configure Global Schema for Your Site
Global schema in WordPress describes your site as a whole, such as whether it represents a person or an organization, which logo is official, and which social profiles belong to you. Your SEO plugin uses this information to output Organization, Website, and related schema on every page.
Configure these settings once and they will apply automatically sitewide.
- In the WordPress Dashboard, open your SEO plugin settings. For Rank Math, go to Rank Math » Titles & Meta. For Yoast, go to SEO » Search Appearance.
- Look for the section labeled Site identity, Organization, Site representation, or Knowledge Graph depending on your plugin.
- Select whether your site represents a Person or an Organization.
- Fill in the Name, upload your Logo, and add your main Website URL and important social profile URLs.
- Scroll to the bottom and click Save Changes.

Step 4: Add Schema to Individual Posts and Pages
Pick the Right Schema Type in WordPress
Next, configure Schema in WordPress for individual posts and pages. For most blogs, you will use Article or BlogPosting schema on posts. Product pages, local business pages, courses, and other content types may use more specific schema if your plugin supports them.
Fill In Schema Fields in the SEO Meta Box
The exact screen layout differs between plugins, but the workflow is very similar.
- In your Dashboard, go to Posts » All Posts and click Edit on a key article you want to optimize.
- Scroll below the content editor until you see your SEO plugin meta box.
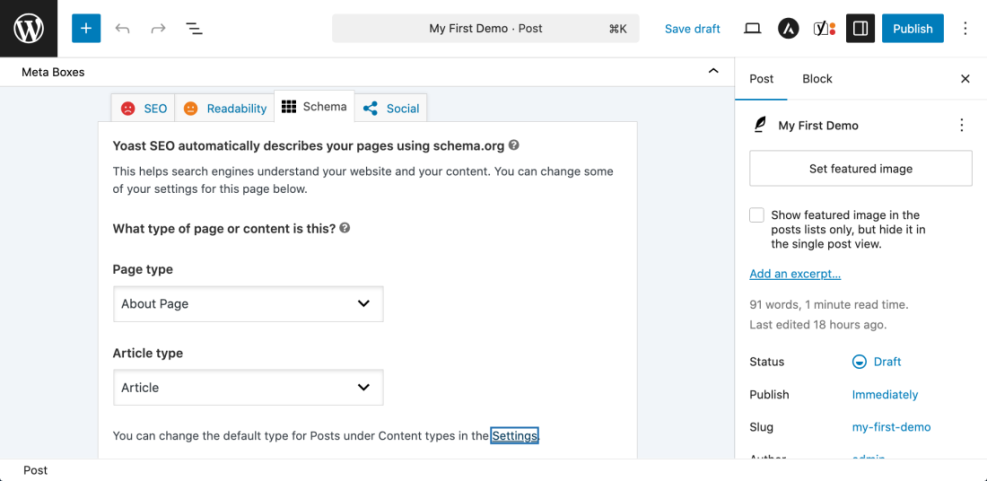
- Open the Schema, Schema Markup, or Structured Data tab inside the meta box.
- Use the Schema Type dropdown to select the most accurate type, such as Article, BlogPosting, Product, or Local Business.
- Fill in all required fields such as Headline, Article Type, Author, Publish date, and Image if they are not filled automatically.
- Click Update to save the post.
Step 5: Add Custom JSON LD Schema Manually
Sometimes you need schema that your SEO plugin does not support directly, such as a highly customized FAQ section or a special type from the Schema.org library. In those cases you can inject your own JSON LD manually while still keeping everything manageable.
The safest no code method is to use a snippet manager plugin so you do not edit core theme files. The example below adds an FAQPage schema block to single posts.
- Install and activate a snippet plugin such as Code Snippets, or make sure you have a safe child theme if you prefer editing functions.php.
- In the WordPress Dashboard, go to Snippets » Add New.
- Give the snippet a descriptive Title such as “FAQ Schema for Blog Posts”.
- Paste your JSON LD or PHP snippet into the code area, following your plugin’s instructions.
- Set the snippet to run on the Front end only, then click Save Changes and Activate.

Step 6: Test and Monitor Your Schema
Adding schema is only half the job. You also need to validate it and check that Google can read it without errors. Google’s structured data testing tools make this easy and should be part of your routine whenever you create or change important templates.
Run a Rich Results Test
Use the steps below to test any page where you have added or edited schema.
- Open the page you just updated and copy its full URL from your browser address bar.
- In a new tab, open Google’s structured data testing tool such as the Rich Results Test.
- Paste your URL into the Test URL field and click Test URL or the equivalent button.
- Wait for the test to finish, then review the list of detected Rich result types and any Errors or Warnings.
- Return to WordPress, adjust your plugin settings or JSON LD code to fix issues, and retest until the schema is valid.
Fix Errors and Monitor in Search Console
Step 7: Maintain Clean Schema Over Time
Schema in WordPress is not a one time setup. As you install new plugins, change themes, or redesign templates, extra markup can creep in and conflict with your current setup. A light maintenance routine keeps your structured data clean and your pages eligible for rich results.
- When you change your theme or SEO plugin, immediately test a few key templates with the Rich Results Test to catch new issues.
- Every few months, spot check representative pages for each content type to confirm the schema type and fields still match the visible content.
- Remove old schema plugins once your main SEO plugin covers the needed types to avoid duplication.
- Document your schema approach so your team knows which plugin or snippet controls which schema types.
Maintenance Methods for Managing a WordPress Site
There is more than one way to handle ongoing WordPress maintenance tasks and keep your Schema in WordPress healthy. Each method fits slightly different skills, budgets, and site types. The table below compares the main methods so you can quickly choose the one that feels easiest and safest for your site.
| Method | Where You Use It | Main Purpose |
|---|---|---|
| DIY Manual Maintenance | WordPress dashboard and hosting control panel | Maximum control over updates, backups, schema checks, and other tasks for small or low-risk sites. |
| Managed Hosting Tools | Your host’s control panel or custom dashboard | Simplify routine maintenance with one-click updates, built-in backups, and basic security. |
| Maintenance & Security Plugins | Plugins section inside the WordPress dashboard | Automate repetitive work like backups, database cleanup, image optimization, and security scans. |
| WP-CLI and Developer Tools | SSH terminal with WP-CLI and deployment tools | Scriptable, fast maintenance for developers managing multiple or complex sites. |
| Professional WordPress Care Plan | External provider, freelancer, or agency | Hands-off maintenance with proactive monitoring, fixes, and expert support. |
Conclusion You Are Ready to Go
You have learned how to add Schema in WordPress with a practical, repeatable workflow. You checked your current setup, installed and configured a schema friendly SEO plugin, added schema to individual posts and pages, and used custom JSON LD for special cases like FAQ sections.
By validating everything with Google’s testing tools and building a simple maintenance routine, you give your site the best chance to earn rich results while keeping your structured data clean as your content grows. You can now apply this process across new posts, landing pages, and key site templates with confidence.
Further Reading
- How to add schema markup in WordPress
- WordPress seo complete beginners guide
- Is WordPress good for seo
- WordPress seo complete beginners guide
- WordPress seo complete beginners guide