If your WordPress site feels slow, throws strange errors, or your hosting dashboard is nagging you about “outdated PHP”, it is time to upgrade. PHP is the programming language that runs WordPress, and newer versions are faster, more secure, and better supported by modern plugins and themes.
This step-by-step tutorial shows you how to update PHP in WordPress without breaking your site. Along the way, you will check your current version, test compatibility, create a full backup, upgrade via your hosting panel, and learn what to do if something goes wrong.
What You Need Before Updating PHP
- Login details for your hosting control panel (cPanel, Plesk, or custom dashboard).
- Login to your WordPress admin (yourdomain.com/wp-admin).
- Basic familiarity with installing and updating plugins.
- A few minutes when your site gets lower traffic, in case you need to troubleshoot.
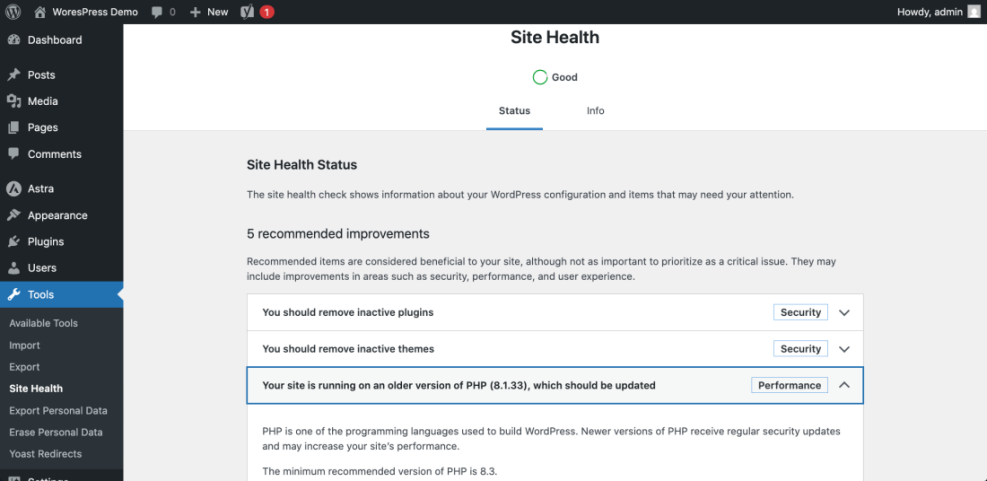
Step 1: Check Your Current PHP and WordPress Versions
Start by seeing what you are working with so you know how big the jump will be.
- Log in to your WordPress Dashboard.
- Go to Tools » Site Health and click the Info tab.
- Scroll down to Server to see your current PHP version.
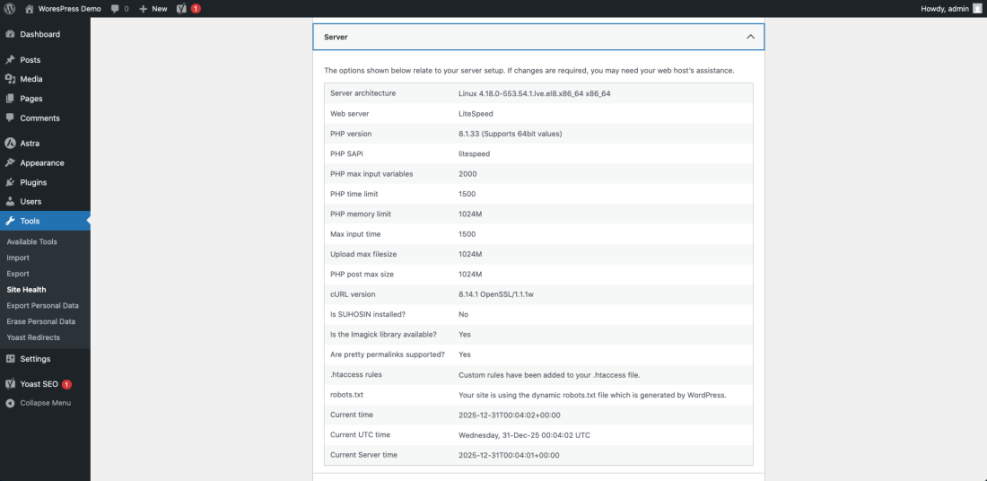
Write a quick note like: “WordPress 6.x running on PHP 7.4” so you can refer back to it later.
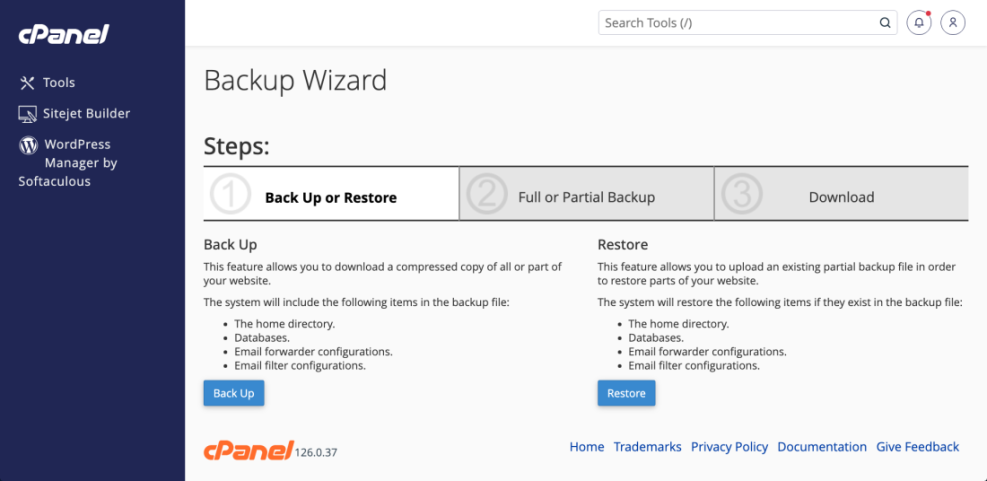
Step 2: Make a Full Backup (Files + Database)
Updating PHP is usually safe, but a broken plugin or theme can result in a white screen or fatal error. A complete backup lets you restore your site quickly if anything goes wrong.
- Choose a backup method:
- A reliable backup plugin (for example, a dedicated WordPress backup plugin).
- Or, hosting-level backup in your control panel (often called Backup, Snapshots, or Restore Points).
- Run a full backup that includes:
- All WordPress files (wp-content, plugins, themes, uploads).
- The entire WordPress database.
- Either download the backup or confirm that your host keeps it for at least a few days.
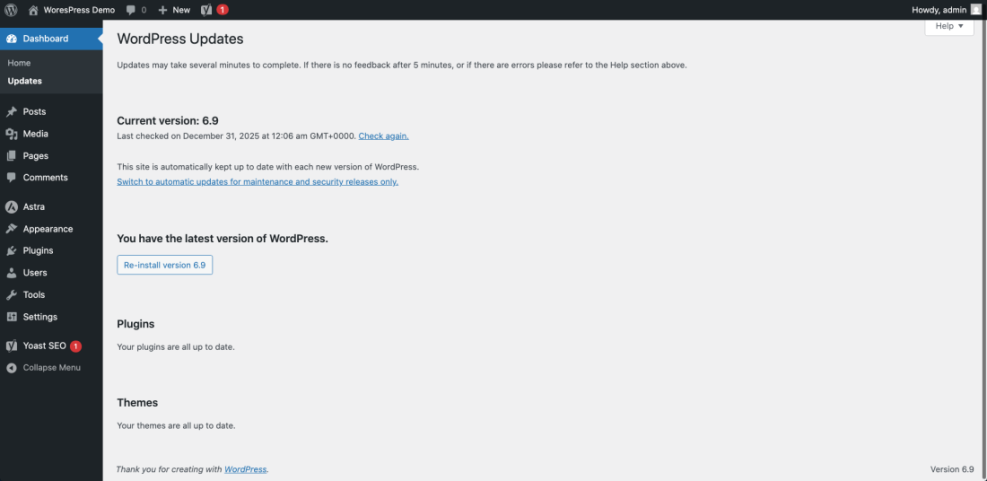
Step 3: Update WordPress, Themes, and Plugins First
Newer PHP versions expect your site’s code to be reasonably up to date. Old plugins are a common cause of problems after upgrading.
- In your dashboard, go to Dashboard » Updates.
- Update WordPress core if a new version is available.
- Bring all installed plugins up to date so they match modern PHP requirements.
- Remove any plugins or themes you no longer use, because inactive but outdated code can still cause conflicts.
Step 4: Test PHP Compatibility (Optional but Recommended)
You can lower the risk further by scanning your site for PHP compatibility problems.
- Install a PHP compatibility checking plugin from Plugins » Add New (search for “PHP compatibility”).
- Run a scan for your current theme and all active plugins.
- Review the results:
- Passed: Safe to use with newer PHP versions.
- Warnings: Check plugin/theme docs or support before upgrading.
- Errors: Strongly consider replacing that plugin/theme.
Step 5: Choose How You Will Update PHP
Most WordPress site owners do not change PHP inside WordPress itself. Instead, the change happens in your hosting account, where you can switch server versions.
Common Ways to Change PHP Version for WordPress
| Method | Where You Use It | When to Use It |
|---|---|---|
| cPanel MultiPHP / Select PHP Version | Hosting cPanel » MultiPHP Manager or Select PHP Version | Most shared hosting accounts. Easy drop-down to change PHP per domain. |
| Managed WordPress Dashboard | Host’s custom panel » site settings » PHP version | Popular managed hosts that give a simple toggle for recommended PHP versions. |
| Plesk PHP Settings | Plesk » Domains » your domain » PHP Settings | VPS or some shared hosting using Plesk; more detailed control per subscription. |
| CLI / SSH (advanced) | Server shell (SSH) » update PHP packages + web server config | Developers and sysadmins managing VPS/dedicated servers who need full control. |
| Ask Your Host’s Support | Support ticket or live chat | Useful when you are unsure which version to choose or do not see the option in your panel. |
Step 6: Update PHP via Your Hosting Panel
The exact screens vary, but the process is similar across most hosts. You can follow this generic flow and adapt it to your provider.
Method A: cPanel (MultiPHP Manager / Select PHP Version)
- Log in to your hosting cPanel.
- Look for MultiPHP Manager or Select PHP Version.
- Select your domain that runs WordPress.
- Choose a newer PHP version from the drop-down (stick to a stable version your host marks as “recommended”).
- Click Apply or Save.
Method B: Managed WordPress Hosting Dashboard
- Sign in to your hosting account dashboard.
- Open your site’s Manage or Settings page.
- Locate an option such as PHP Version, Runtime, or Environment.
- Select the recommended newer version and confirm the change.
Method C: Ask Support to Do It
- Open a support ticket or start a live chat with your host.
- Explain that you want to update PHP for your domain and that you have a recent backup.
- Ask them to move you to the latest stable PHP version supported by your hosting plan.
Step 7: Test Your WordPress Site After the Update
Once your host switches PHP, your site might still load perfectly—or reveal problems that were hidden before. Take a few minutes to test everything important.
- Open your site’s homepage in an incognito/private window.
- Click through key pages: blog, shop, contact form, login, and any custom templates.
- Log in to wp-admin and navigate to:
- Posts » Add New
- Pages » Add New
- Any critical plugin screens (forms, ecommerce, bookings).
- Return to Tools » Site Health and confirm the new PHP version under Server.
Step 8: What to Do If Updating PHP Breaks Your Site
If you see a white screen, fatal error, or critical error email after updating PHP, do not panic. Work through this checklist instead of making random changes.
1. Roll Back PHP Version (Quick Fix)
- Return to your hosting panel and change PHP back to the previous version you noted earlier.
- Save and reload your site so you can confirm it comes back online; when that happens, you are dealing with a compatibility issue, not a total disaster.
2. Identify the Problem Plugin or Theme
- In WordPress, deactivate all plugins temporarily.
- Switch to a default theme like Twenty Twenty-Four.
- Update PHP again to the newer version.
- Reactivate plugins one by one, testing the site after each activation.
- As soon as the error returns, you have found the plugin or theme causing issues.
3. Use Error Logs
- Check your hosting control panel for Error Logs or a general Logs menu.
- Scan the log for lines mentioning
PHP Fatal error, a plugin folder, or a theme folder. - Share the relevant error message with your developer or the plugin/theme support team so they can pinpoint the issue.
4. Restore from Backup (Last Resort)
- If the site is badly broken and you cannot fix it quickly, restore your backup.
- After everything is back online, clone the site to staging and debug PHP issues there without pressure.
Step 9: Build PHP Updates into Your Maintenance Routine
PHP updates are not a “one-time” job. New versions arrive regularly and old ones reach end-of-life, which means no more security patches.
- Set a recurring reminder every 3–6 months to:
- Check your PHP version in Site Health.
- Review your host’s recommended version in their documentation.
- Update WordPress core, plugins, themes, and renew backups.
- When you see notices in Site Health about outdated PHP, schedule a small maintenance window to upgrade.
- Maintain a short maintenance checklist that includes backups, update order, and testing steps.
Conclusion: Updating PHP in WordPress the Safe Way
Updating PHP in WordPress does not have to be scary. By checking your current versions, backing up your site, updating plugins and themes, testing compatibility, and using your host’s tools to switch PHP, you can upgrade with confidence.
Once you have a clear process and rollback plan, it becomes much easier to keep your site running on a fast, secure, and modern PHP version without constant worry. Bookmark this checklist and repeat it every time your host or Site Health recommends a newer PHP version.
Further Reading
- WordPress Site Health Screen
- Official WordPress Requirements
- Beginner guide to WordPress speed optimization
- WordPress migration checklist for blogs