If you want to learn How to Design WordPress Website that looks professional and is easy to use, you need more than a nice theme. You need a simple process that takes you from planning and structure to layout, branding, and launch.
In this guide, you’ll learn how to Design WordPress Website step by step — from defining your goals and choosing a theme, to building pages with the block editor or a page builder, and polishing your design for mobile and speed.
What You Need Before You Design a WordPress Website
- A working WordPress installation (on a live host or local environment).
- Administrator access to your WordPress dashboard.
- A domain name and basic branding idea (name, logo concept, colors).
- A rough content outline: main pages, key services, or blog categories.
- Optional: A few example sites you like for design inspiration.
Step 1: Plan Your WordPress Website Structure and Goals
Before you design anything in WordPress, decide what you want the site to do and how visitors will move through it.
- Define the main goal: Is it to get leads, sell products, build an audience, or showcase a portfolio?
- List your key pages: Common examples are Home, About, Services, Blog, Contact, and Shop.
- Map a simple menu: Keep your main navigation to 5–7 items so it’s easy to scan.
- Sketch a basic layout: On paper or in a tool, sketch where the header, hero, content blocks, and footer will go.
- Note calls to action (CTAs): Decide what you want visitors to click on each page.
This planning step makes it much easier to design WordPress website layouts that feel intentional instead of random.
Step 2: Choose the Right Theme to Design Your WordPress Website
Your theme controls the overall look, layout options, and typography. Picking a flexible, lightweight theme gives you more design freedom and better performance.
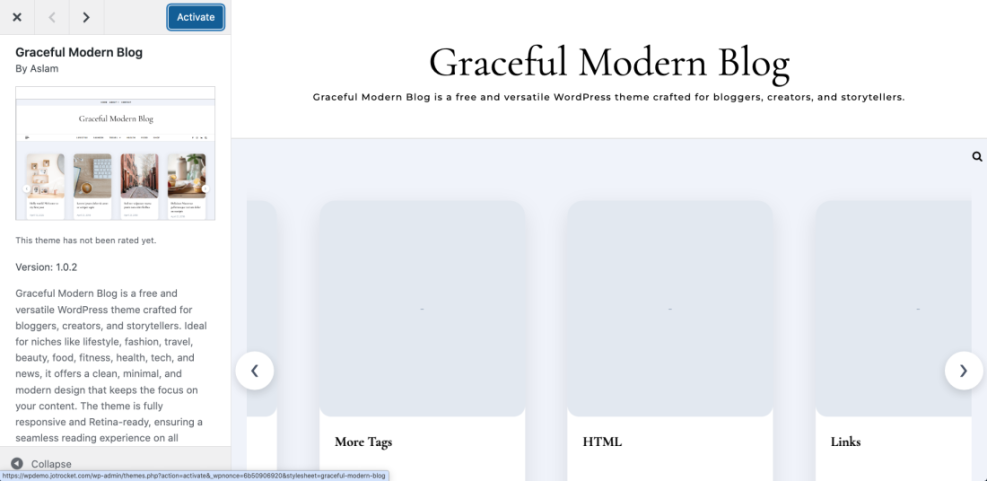
- In your dashboard, go to Appearance » Themes » Add New.
- Search for modern, well-reviewed themes that support the block editor or your chosen page builder.
- Preview a few themes that match your niche (blog, business, portfolio, shop, etc.).
- Check that the theme has:
- Responsive design (looks good on mobile, tablet, desktop).
- Typography and color controls.
- Starter templates or demo sites you can import.
- Recent updates and active support.
- Click Install and then Activate your chosen theme.
Step 3: Decide How You Will Design Pages in WordPress
You can design your WordPress website using the built-in block editor (Gutenberg), a page builder plugin, or a mix of both.
- Choose your main tool:
- Block editor (Gutenberg): Great for most blogs and business sites, fast and built into WordPress.
- Page builder plugin: Ideal if you want pixel-perfect control or complex layouts.
- Install your chosen page builder plugin if you decide to use one.
- Test creating one simple page with your chosen tool so you understand how sections, rows, and blocks work.
- Stick to this tool as you design a WordPress website page by page for consistency.
Once you choose your main tool, you’ll use it consistently as you design your WordPress website.
Step 4: Set Up Branding: Colors, Fonts, and Global Styles
Consistent branding makes your design feel professional. Set your global styles so every new page you design in WordPress starts with the right look.
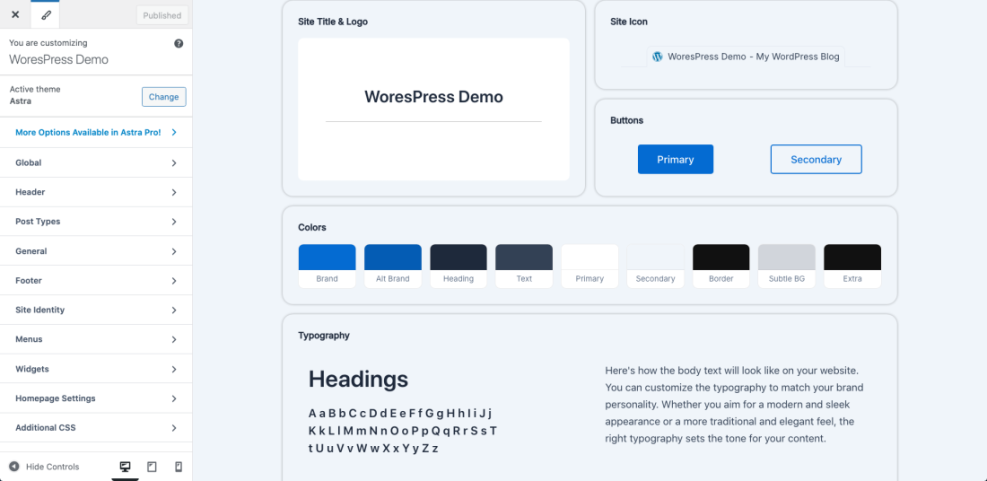
- Go to Appearance » Customize (or Appearance » Editor for block themes).
- Upload your logo and set your site title and tagline.
- Choose a color palette:
- 1 primary brand color (buttons, links, highlights).
- 1–2 accent colors.
- Neutral background and text colors for readability.
- Pick fonts:
- One font for headings (bold, clear).
- One font for body text (simple, easy to read).
- Configure button styles, link styles, and default spacing if your theme allows.
Step 5: Design Your WordPress Homepage Layout
Your homepage is usually the most visited page, so it’s a great place to start. It should clearly show what you do, who it’s for, and what visitors should do next.
- In your dashboard, go to Pages » Add New and create a page called Home.
- Go to Settings » Reading and set “Your homepage displays” to A static page, then choose your new Home page.
- Edit the Home page with the block editor or your chosen page builder.
- Add these common homepage sections:
- Hero section: Clear headline, short text, and a primary button.
- Benefits or features: 3–6 key points with icons.
- Social proof: Testimonials, logos, or reviews.
- Services or products: Cards linking to deeper pages.
- CTA section: Contact, signup, or shop now button.
- Keep sections simple with plenty of white space for a clean design.
As you build, remember the goal: a user-friendly, scannable layout. That’s the heart of how to Design WordPress Website that actually converts.
Step 6: Design Core Inner Pages in WordPress
Once your homepage looks good, design the rest of your core pages using the same styles and structure patterns.
Designing the About Page
- Start with a strong headline that explains who you are and what you stand for.
- Add a short story or background, plus photos or team images.
- Include trust elements (certifications, press mentions, results).
- End with a call to action: contact you, book a call, or read the blog.
Designing Services or Product Pages
- Use clear sections for each service or product.
- Highlight benefits, not just features.
- Add FAQs, pricing (if appropriate), and a strong CTA.
Designing the Blog Page
- Create a blog index that shows posts in a clean grid or list.
- Make sure titles, featured images, and dates are readable.
- Use categories to organize posts into logical groups.
Design each new page so it visually matches your homepage. Consistency is a key principle when you design a WordPress website that feels cohesive.
Step 7: Design Menus, Header, and Footer in WordPress
Your header and footer appear on every page, so they are a big part of your overall design.
- Go to Appearance » Menus (or use your theme’s header/footer builder).
- Create a main menu with your most important 5–7 links.
- Add dropdowns only where necessary to avoid clutter.
- In the header, keep your logo, menu, and main CTA (e.g., “Contact” or “Get a Quote”).
- In the footer, add:
- Secondary navigation (privacy policy, terms, etc.).
- Contact details and social icons.
- Optional newsletter signup or small CTA.
Step 8: Make Your WordPress Website Design Mobile-Friendly
Most visitors will see your WordPress design on a phone first. Always check how your site looks and behaves on smaller screens.
- Open your site on a smartphone and tablet, or use your browser’s device preview.
- Check the header: is the logo readable and the mobile menu easy to tap?
- Verify fonts: body text should be large enough without zooming.
- Ensure buttons are full-width or big enough for thumbs.
- Look out for elements that overlap or get cut off on small screens.
Responsive design is a core part of how to Design WordPress Website that works for all visitors, not just desktop users.
Step 9: Use Images, Icons, and White Space Effectively
Visuals can make or break your design. The right images and spacing make your WordPress site feel modern and focused.
- Use high-quality images that match your brand and content.
- Avoid heavy image files; compress them before uploading.
- Use icons to highlight features or steps instead of long bullet lists.
- Leave enough white space between sections so the design can “breathe.”
- Stay consistent with image ratios (all squares, or all landscape, etc.).
Step 10: Check Usability, Readability, and Basic Performance
Beautiful design is only useful if people can read and use your site comfortably.
- Readability: Check font sizes, line spacing, and contrast between text and background.
- Click paths: Can visitors reach key pages in 1–2 clicks?
- Forms: Test your contact forms, buttons, and CTAs.
- Basic speed: Avoid too many heavy sliders, animations, or huge images.
This isn’t a full speed optimization guide, but these basics help ensure your WordPress website design feels smooth, not sluggish.
Quick Comparison of Ways to Design a WordPress Website
Use this table to choose the best approach depending on how much control and complexity you need for your design.
| Method | Where You Use It | Main Purpose |
|---|---|---|
| Block Editor (Gutenberg) | Default WordPress page and post editor | Quickly design a clean WordPress layout using core blocks with good performance. |
| Page Builder Plugin | Dedicated page builder interface for pages | Create highly customized page designs with drag-and-drop control over each section. |
| Starter Theme Template | Theme’s starter sites or demo imports | Import a ready-made WordPress design and tweak it to match your brand faster. |
| Custom Shortcodes + Blocks | Reusable blocks, Custom HTML blocks | Build reusable design sections (hero, pricing, testimonials) you can drop into any page. |
| Custom Code (HTML/CSS) | Child theme files, Additional CSS | Fine-tune advanced design details and unique layouts beyond what visual tools offer. |
Step 11: Preview, Test, and Launch Your WordPress Design
Before you show your new design to the world, do a final review.
- Use Preview mode to check each page in your theme.
- Click every menu item and button to confirm they work.
- Check the site on at least one desktop, one tablet, and one phone.
- Ask a friend or colleague to navigate your site and give feedback.
- Once everything looks good, publish your changes and clear any caches.
Congratulations — you now know how to Design WordPress Website from planning to launch.
Conclusion: You Know How to Design a WordPress Website that Works
You’ve learned how to go from a blank install to a fully designed WordPress website: planning your structure, choosing a theme, setting global styles, building key pages, and polishing your design for mobile and usability.
If you repeat this process each time you build or redesign a site, you’ll naturally get better at how to Design WordPress Website layouts that look great, are easy to use, and support your goals.