How to Use WordPress to Build a Website
A step-by-step beginner guide to building your first WordPress website
You’ve installed WordPress and logged into the dashboard… now what? It can feel overwhelming to turn that blank installation into a real, working website that customers or readers actually want to use.
This guide shows you how to use WordPress itself to build a complete website, step by step. We’ll assume WordPress is already installed and focus on what to do from your first login through to launch. If you’re still unsure what WordPress is, start with this overview of what WordPress is and how it works, then come back here.
By the end, you’ll know how to plan your site, adjust key settings, choose and customize a theme (including Jannah), create pages with the Block or Classic Editor, build menus, add essential plugins, and safely launch your new WordPress website.
Prerequisites
Before you start building with WordPress, make sure a few basics are in place. This keeps the tutorial focused on using the dashboard rather than hosting setup.
- Domain name and hosting: You should already have a domain and a WordPress-ready hosting plan.
- WordPress installed: Either via your host’s 1-click installer or a manual install.
- Admin login details: Your WordPress username and password for the
/wp-adminarea. - Basic brand assets: Logo file, brand colors, and a rough idea of your fonts.
- Theme choice: Optional but ideal: decide whether you’ll use a theme like Jannah and whether you prefer the Block Editor or Classic Editor.
If you’re still choosing a host, read this guide to picking the right WordPress hosting before going further.
Step 1: Plan Your WordPress Website Structure
It’s tempting to jump straight into design, but a simple plan will save you time and rework. WordPress makes it easy to add pages, but you still need a clear structure.
Think about the main goal of your website: lead generation, blogging, portfolio, or online store. Then list the pages visitors need to achieve that goal.
- Homepage: A clear overview of who you are and what you offer.
- About: Your story, credibility, and why people should trust you.
- Services/Products: What you offer, with clear calls to action.
- Blog or Resources: Optional, but great for SEO and education.
- Contact: Contact form, map, email, and other ways to reach you.
Sketch a simple sitemap: which pages live in the main menu, which are subpages, and what you want people to do on each page (click, call, buy, subscribe).
Step 2: Log In and Configure Basic Settings
Before you start designing, configure a few WordPress settings so your URLs, time zone, and site identity are correct from day one. Changing these later can cause confusion or broken links.
- Log in to your dashboard by visiting
https://yourdomain.com/wp-adminand entering your admin credentials. - Go to Settings → General:
- Set the Site Title and Tagline (you can refine these later).
- Confirm your WordPress Address (URL) and Site Address (URL) match your domain.
- Choose the correct Timezone, Date, and Time formats.
- Go to Settings → Permalinks:
- Select Post name to use clean, SEO-friendly URLs (e.g.,
/about/,/contact/). - Click Save Changes.
- Select Post name to use clean, SEO-friendly URLs (e.g.,
- Later, when your homepage is ready, you’ll return to Settings → Reading to set a static homepage and a posts page.
Checkpoint: Your site title, tagline, time zone, and permalinks are set. Visiting a sample page should show a clean URL like https://yourdomain.com/sample-page/.
Step 3: Choose and Customize Your Theme
Your theme controls the overall look and layout of your site: headers, footers, fonts, colors, and more. A well-chosen theme keeps the site fast and easy to manage.
- In the WordPress dashboard, go to Appearance → Themes.
- Review installed themes. If you’ve installed a premium theme like Jannah, make sure it’s listed here.
- To add a new free theme, click Add New, browse or search, hover over a theme, and click Install → Activate.
Next, customize your active theme:
- Go to Appearance → Customize to open the Customizer (some themes may use their own panel).
- Update Site Identity: logo, site title, tagline, and site icon (favicon).
- Adjust Colors, Typography, and Header/Footer options as your theme allows.
Checkpoint: Your logo appears in the header, colors roughly match your brand, and your site looks coherent even with placeholder content.
Step 4: Create Essential Pages With the Editor
Now you’ll turn your plan into actual pages. WordPress lets you create pages with either the Block Editor (Gutenberg) or the Classic Editor; both save content in the database but have different interfaces.
The basic workflow is the same in both editors: create a page, add content, adjust its URL, and publish it.
- Go to Pages → Add New.
- Enter a clear Title such as “Home”, “About”, or “Contact”.
- Add content:
- Block Editor: Click the + icon to add blocks (Headings, Paragraphs, Images, Buttons, etc.).
- Classic Editor: Use the familiar toolbar to format text, insert images, and add links.
- Check the URL Slug or Permalink and simplify it (e.g.,
/about/,/contact/). - Click Publish (or Update when editing later).
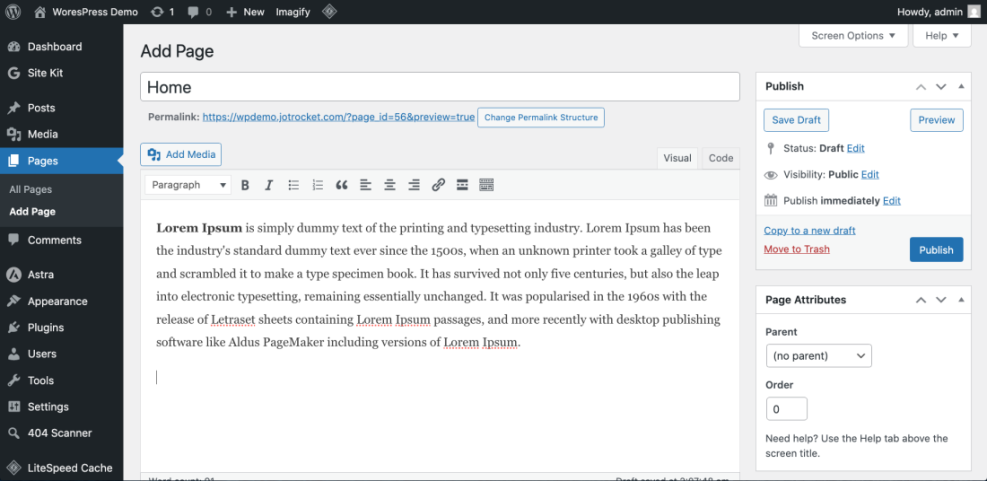
Repeat this for your core pages: Home, About, Services/Products, Blog (if needed), and Contact. Don’t worry about perfection yet; start with clear headings and basic copy.
Once your homepage is ready, go to Settings → Reading, select A static page, choose your new homepage for “Homepage” and your blog page (if any) for “Posts page”, then save.
Step 5: Build Your Navigation Menu
A clear navigation menu helps visitors find your key pages quickly and reduces frustration. WordPress menus connect your pages into a logical structure.
- Go to Appearance → Menus.
- If prompted, enter a Menu Name (e.g., “Main Menu”) and click Create Menu.
- In the left column, select the pages you created (Home, About, Services, Blog, Contact) and click Add to Menu.
- Drag and drop menu items to reorder them. Indent items slightly to make them submenus.
- Under Menu Settings or Display location, check the option for Primary or Main Navigation and save the menu.
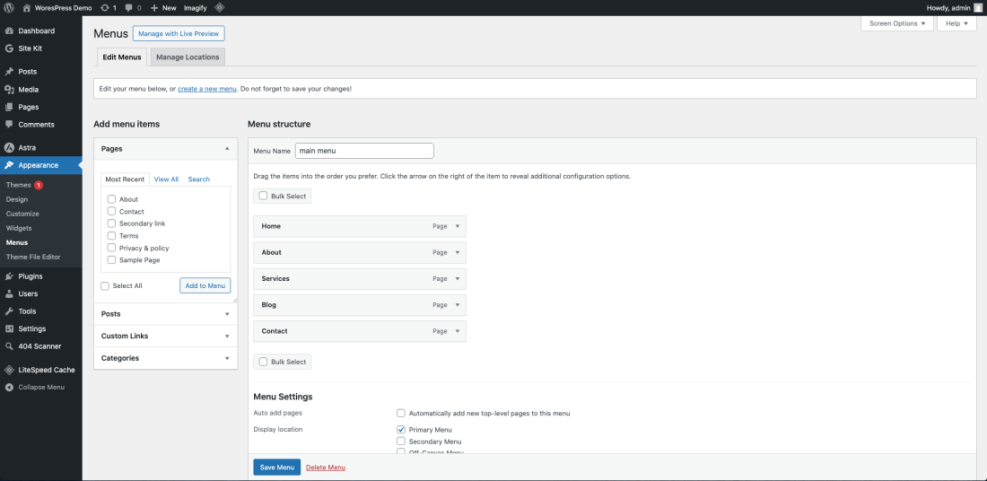
Checkpoint: When you visit the front end of your site, you should see your new menu in the header, with items linking correctly to each page.
For more advanced menu layouts, dropdowns, and multiple menus (header, footer, mobile), see this beginner guide to WordPress menus and navigation.
Step 6: Add Essential Plugins and Features
Plugins extend WordPress so you can add contact forms, SEO tools, caching, security, and more without custom coding. The key is to install only what you need and keep everything updated.
Start with a minimal, essential toolkit:
- Security plugin: Protects against common attacks, brute-force logins, and malware.
- SEO plugin: Helps manage titles, meta descriptions, and sitemaps.
- Caching/performance plugin: Speeds up your site by caching pages and optimizing assets.
- Contact form plugin: Lets visitors send you messages via a form instead of exposing your email.
- Backup plugin: Automates backups to cloud storage so you can recover if something breaks.
- Go to Plugins → Add New.
- Use the search box to find the plugin you want (for example, a popular SEO or contact form plugin).
- Click Install Now, then Activate.
- Configure each plugin via its settings page (often under Settings or its own menu in the sidebar).
Checkpoint: You have a small set of active plugins that cover security, SEO, performance, contact forms, and backups, and no obvious warnings in your dashboard.
Step 7: Review, Launch, and Maintain Your Website
Before you announce your site, you should test it like a visitor would. This helps you catch broken links, layout issues, and slow pages.
- Check all pages: Click through every menu item, button, and footer link to make sure they work and go to the right place.
- Test forms: Submit your contact form with a test message and confirm you receive it.
- View on mobile: Use your phone or browser’s responsive preview to ensure text is readable and buttons are easy to tap.
- Disable “Coming Soon” (if enabled): Turn off any coming soon/maintenance mode plugin when you’re ready to go live.
- Set up basic backups and updates: Ensure your backup plugin runs on a schedule and that you regularly update WordPress core, themes, and plugins.
Checkpoint: Your site looks good on desktop and mobile, all key actions (contact, signup, purchase) work, and basic security and backup measures are in place.
Bringing Your New WordPress Website Online
Using WordPress to build a website is less about technical tricks and more about following a clear sequence: plan your structure, configure core settings, choose a theme, create focused pages, wire everything together with menus, and then enhance it with a few essential plugins.
With those steps done, you now have a solid, maintainable WordPress website that you can keep improving over time. As you grow more comfortable, you can refine your design, publish more content, and explore advanced tools without rebuilding from scratch.
The most important thing is to keep going—update your content regularly, watch how visitors use your site, and make small, consistent improvements. WordPress gives you the flexibility to adapt as your business or project evolves.
Further Reading
- How to Install WordPress
- How to Design a WordPress Website
- Beginner Guide to WordPress Speed Optimization
- How to Secure Your WordPress Website