How to Add HTML Tag to WordPress
Safe ways to insert custom HTML tags in your WordPress posts, pages, and theme files.

Need to paste a verification meta tag, add a custom <div>, or drop in a small script, but WordPress keeps hiding the code? By default, WordPress tries to protect you from broken layouts, which can make adding custom HTML tags feel confusing.
In this guide, you’ll learn several safe ways to add HTML tags in WordPress: inside posts and pages, in your site’s header or footer, and using plugins or simple code. If you’re brand new to the platform, you can also review our WordPress guides and tutorials overview to get comfortable with the basics first.
We’ll walk through each method step by step, show where your HTML should go, and share checkpoints and troubleshooting tips so you don’t accidentally break your layout or lock yourself out of the dashboard.
Prerequisites
Before you start adding HTML tags in WordPress, make sure you have the right access and safety net in place. A tiny typo in code can cause visual issues, so it’s best to prepare first.
- Administrator access: You should be able to log in as an Administrator to edit posts, pages, and theme settings.
- A recent backup: Use your hosting backups or a backup plugin so you can roll back if something goes wrong.
- Know your editor: Confirm whether your site uses the Block Editor (Gutenberg) or the Classic Editor plugin.
- Access to file editing (for advanced methods): cPanel File Manager, SFTP, or at least the built-in Theme File Editor.
- Your HTML snippet: Have the HTML tag ready (for example, Google verification meta tag, analytics snippet, or custom markup).
Step 1: Understand Where HTML Tags Go in WordPress
Not all HTML tags belong in the same place. Before you paste anything, you need to know where it should live in your WordPress site.
Different types of tags typically go in these locations:
- Inside post or page content: Layout and formatting tags such as
<div>,<span>,<strong>,<em>, or custom HTML boxes. - In the <head> section: Meta tags, site verification tags, and some stylesheet links.
- Before the closing </body> tag: Analytics tracking codes and some script tags.
- Inside templates or hooks: Reusable elements that appear across many pages, such as banners or notices.
Step 2: Add HTML Tags Inside Posts and Pages (Block Editor)
If your site uses the Block Editor (Gutenberg), the easiest and safest way to add HTML code is with the Custom HTML block. This keeps your HTML separate from normal text and prevents the editor from stripping it out.
- Log in to your WordPress dashboard and go to Posts → Add New or edit an existing post. You can also do this under Pages.
- In the Block Editor, click the + icon to add a new block.
- Search for Custom HTML and click it to insert the block where you want the tag to appear.
- Paste your HTML tag or snippet into the Custom HTML block.
- Click the Preview button in the block toolbar or use the post preview to see how it renders on the front end.
<div class="highlight-box">
  <h3>Custom HTML Box</h3>
  <p>This section is added using a Custom HTML block.</p>
</div>
Checkpoint: The preview should show your HTML rendered correctly, without raw tags or layout errors. If you see the tags as text, double-check for missing angle brackets or incorrectly nested elements.
Step 3: Add HTML Tags Using the Classic Editor
If your site uses the Classic Editor plugin or you’re on an older setup, you’ll see the two-tab editor with Visual and Text modes. You must use the Text tab to add HTML tags correctly.
- Edit the post or page where you want to add the HTML tag.
- Click the Text tab at the top right of the editor to switch from the Visual editor to the HTML view.
- Place your cursor where you want the tag to appear and paste your HTML snippet.
- Click Update or Publish, then view the page on the front end to check the output.
<p>Regular paragraph text.</p>
<span class="inline-label">NEW</span>
<p>More content below.</p>
Checkpoint: You should see “NEW” styled inline, not raw HTML. If the layout looks broken, return to the Text tab and confirm all opening tags have matching closing tags.
Step 4: Add HTML Tags to Your Theme Header or Footer
Some HTML tags, such as search engine verification meta tags or analytics scripts, need to load on every page of your site. These usually belong in the theme’s <head> or before the closing </body>.
You can add them directly in your theme’s template files, but you must be careful because mistakes can break your site and updates can overwrite changes.
- Take a fresh backup of your site (database and files) before editing theme files.
- In your dashboard, go to Appearance → Theme File Editor.
- On the right side, choose Theme Header (header.php) if you need to add tags inside
<head>, or Theme Footer (footer.php) for scripts near</body>. - Locate the closing tag (for example,
</head>or</body>). - Paste your HTML tag just before the closing tag.
- Click Update File and then view your site to make sure it still loads correctly.
<meta name="google-site-verification" content="YOUR_VERIFICATION_CODE_HERE">
If your main goal is SEO metadata, you may prefer a plugin-based approach instead of editing template files. For a deeper dive into meta SEO tags specifically, see our guide on how to add meta tags in WordPress.
Step 5: Add HTML Tags with a Plugin or functions.php
For site-wide HTML tags, plugins and theme hooks are usually more maintainable than manually editing templates. Non-developers can rely on a header/footer plugin, while advanced users can hook into wp_head or wp_footer via functions.php.
Use a header/footer code plugin (easiest)
- Go to Plugins → Add New in your dashboard.
- Search for terms like header footer code or insert header and choose a well-reviewed plugin.
- Click Install Now, then Activate.
- Open the plugin’s settings page (for example, under Settings or its own menu item).
- Paste your HTML tag into the appropriate box: Header, Body, or Footer, according to the plugin’s instructions.
- Save your changes and test on the front end.
Checkpoint: View your page source; your tag should appear only once in the correct section (head, body, or footer). If it doesn’t appear, double-check you saved the plugin settings and that no caching plugin is serving an old version.
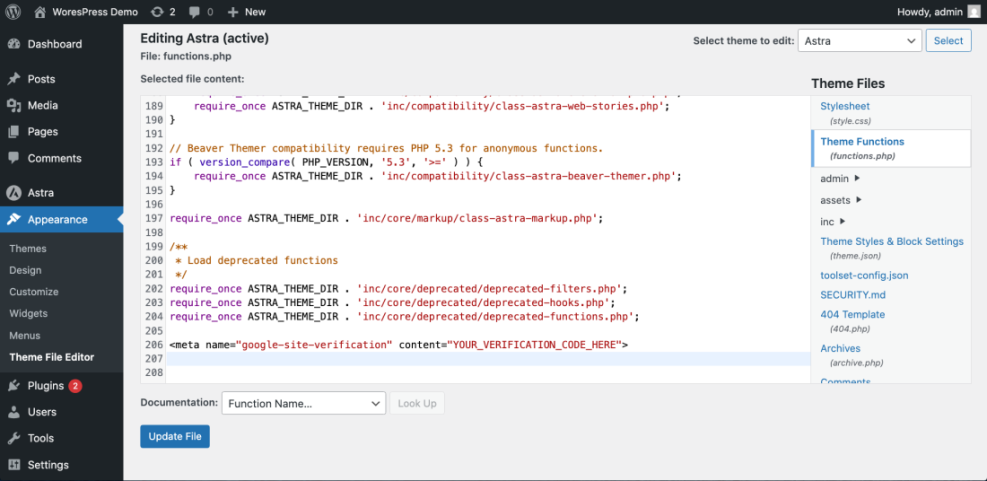
Use functions.php and hooks (advanced)
If you’re comfortable with PHP, you can add HTML tags programmatically via your (child) theme’s functions.php file. This is typically done using the wp_head or wp_footer hooks.
First, make sure you know how to edit theme files safely. If you haven’t done this before, follow a step-by-step tutorial like how to edit WordPress files safely before proceeding.
// Add a custom meta tag to the <head> section.
// Where: functions.php file of your child theme (via Theme File Editor or SFTP).
function wpheadliner_add_custom_meta_tag() {
    echo '<meta name="custom-tag" content="example-value">' . "\n";
}
add_action( 'wp_head', 'wpheadliner_add_custom_meta_tag' );
Checkpoint: After saving functions.php, reload your site. If you see a PHP error, immediately revert from backup or undo the last change via SFTP or your host’s file manager.
Step 6: Test and Validate Your New HTML Tags
After adding an HTML tag, never assume it’s working just because the page loads. Test it thoroughly to avoid invisible SEO or analytics issues.
- View page source: In your browser, right-click and choose View Page Source, then search (Ctrl+F / Cmd+F) for a unique part of your tag (for example,
google-site-verification). - Use Inspect tools: Open your browser’s developer tools and inspect the relevant element to confirm it appears where you expect in the DOM.
- Validate HTML (optional): Use an online HTML validator to make sure no tags are left unclosed or mis-nested.
- Test third-party services: For verification tags (Google Search Console, Pinterest, etc.), click their “Verify” or “Test” buttons to confirm they can read the tag.
- Check multiple pages: If you added the tag via header/footer or hooks, load a few different posts and pages to ensure it’s present site-wide.
Safely Adding HTML Tags Gives You More Control
Once you understand where HTML belongs in WordPress, adding tags becomes a straightforward task instead of a risky guess. You can now insert custom HTML into posts and pages with the Block or Classic Editor, add site-wide tags through your theme header or footer, and use plugins or hooks for clean, maintainable integrations.
Start with the least risky methods—Custom HTML blocks and header/footer plugins—before moving on to theme templates or functions.php. With backups in place and a quick test routine, you’ll be able to implement verification tags, tracking codes, and custom markup confidently, without breaking your layout or losing sleep.
Further Reading
- How to Add Meta Description in WordPress
- How to Add Title Tags in WordPress
- How to Add Schema Markup in WordPress
- How to Edit robots.txt in WordPress
Frequently Asked Questions
Why did my layout break after I added an HTML tag in WordPress?
<div>, <span>, and <p> is properly closed, and remove any stray characters. If you recently edited theme files and see a white screen, restore from backup or undo your last change via SFTP or your host’s file manager. How do I remove or undo an HTML tag I added in WordPress?
header.php or functions.php) and delete the lines you added, then save and retest your site.