How to Put SEO Keywords in WordPress
A practical, repeatable workflow for placing keywords in your WordPress posts and pages without keyword stuffing.

You’ve done your keyword research, but once you open the WordPress editor the big question hits: where exactly should you put those SEO keywords so they actually help you rank? Title, slug, headings, meta description, images… it’s easy to feel unsure or accidentally overdo it.
In this guide you’ll follow a simple checklist for placing SEO keywords in the right spots in WordPress: titles, URLs, meta boxes from your SEO plugin, headings, body content, images, and internal links. By the end, you’ll have a repeatable process you can use on every post or page you publish.
If you’re still getting up to speed on what WordPress SEO actually means, read that overview first, then come back and use this tutorial as your keyword-placement workflow.
Prerequisites
Before you start placing keywords, make sure you have a few basics in place so the steps in this guide match what you see on screen.
- Admin or Editor access to your WordPress dashboard.
- At least one draft post or page you want to optimize.
- An SEO plugin installed (Yoast SEO, Rank Math, or All in One SEO).
- A primary keyword plus 2–3 close variations or related phrases.
Step 1: Choose and Map Your SEO Keywords
Good keyword placement starts with choosing the right keyword for the right page. If you reuse the same focus keyword on lots of posts, you risk keyword cannibalization and weak rankings across all of them.
- Pick one primary keyword for the post (for example, “SEO keywords WordPress”). This is the exact phrase you want that URL to rank for.
- List 2–3 variations and related phrases (for example, “where to put keywords in WordPress”, “keyword placement in WordPress”).
- Assign one primary keyword per URL in a simple spreadsheet or document so you don’t accidentally reuse the same main keyword on different posts.
Step 2: Put Keywords in Your WordPress Title and URL
The page title and URL (slug) are two of the strongest on-page signals for your keyword. In WordPress, both are easy to control, whether you’re using the Block Editor (Gutenberg), Classic Editor, or a theme like Jannah.
- In your WordPress dashboard, go to Posts > All Posts (or Pages > All Pages) and click Edit on the content you want to optimize.
- At the top of the editor, find the main title field. This becomes your H1, so include your primary keyword once, as naturally as possible near the start.
- Under or near the title, look for the Permalink or URL Slug field. Edit it so it’s short, clean, and contains the primary keyword (for example,
seo-keywords-wordpress).
Keep the title readable first and optimized second. Instead of stuffing multiple variations into the title, stick to one main phrase and a benefit, such as “How to Put SEO Keywords in WordPress (Without Keyword Stuffing)”.
Step 3: Add Keywords to SEO Title and Meta Description
Your WordPress title isn’t always the exact text Google shows. Most SEO plugins let you set a separate SEO title and meta description, which are what users see in search results.
- Scroll down (or open the sidebar panel) to find your SEO plugin’s box — for example, the Yoast, Rank Math, or AIOSEO snippet preview.
- In the SEO Title field, include your primary keyword once near the beginning, then add a clear benefit or call to action.
- In the Meta Description field, write 1–2 sentences (under ~155 characters on desktop) that naturally include your primary keyword once and, if it fits, one variation.
Here’s an example pattern you can adapt inside your SEO plugin:
SEO Title: How to Put SEO Keywords in WordPress (Simple Checklist)
Meta Description: Learn how to put SEO keywords in WordPress titles, content, and images so every post is optimized without keyword stuffing.Step 4: Use Keywords Naturally in Headings and Content
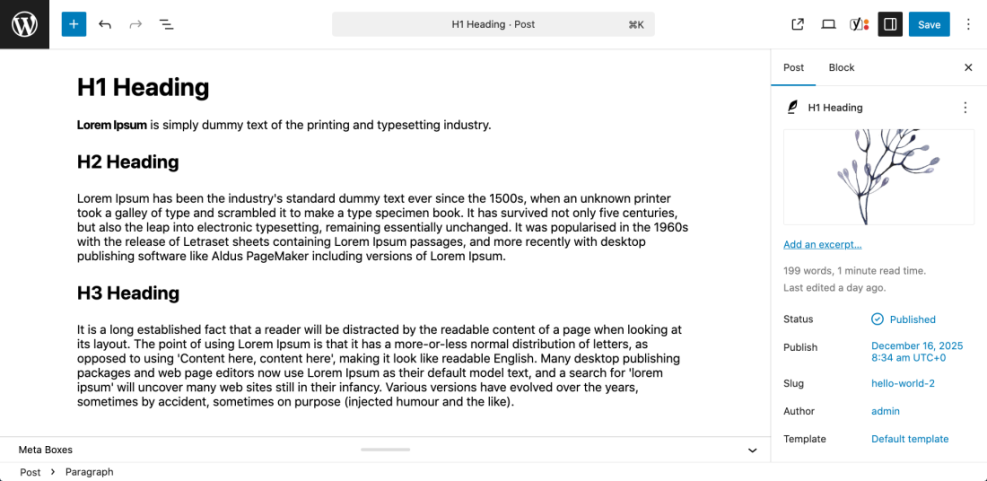
Once the title and meta are optimized, focus on the main content. Google wants to see your primary keyword and related phrases used naturally, especially in early paragraphs and headings.
- First paragraph: Mention your primary keyword once within the first 50–100 words. Make it read like natural language, not a list of phrases.
- Subheadings (H2/H3): Use your primary keyword or close variations in 1–3 important H2s where it fits logically.
- Body text: Sprinkle in synonyms and related phrases where they help clarify meaning. Aim for readability, not a specific “density”.
In the Block Editor, you can convert text into a heading by selecting it, then choosing Heading from the block toolbar and picking the level (H2/H3). In Classic Editor, select the text and choose Heading 2 or Heading 3 from the “Paragraph” dropdown.
Step 5: Put Keywords in Image Alt Text and File Names
Images provide another opportunity to reinforce what the page is about. In WordPress, you can use descriptive file names and alt text to help search engines and screen readers understand your visuals.
- Before upload: Rename your images on your computer with simple, descriptive names, such as
wordpress-keyword-placement-checklist.pnginstead ofIMG_1234.png. - In the editor: Click on an image block and open the settings panel. Fill in the Alt text field with a short description that may include a relevant keyword if it truly describes the image.
- In Media Library: You can also edit the alt text by going to Media > Library, clicking an image, and updating the Alt Text field there.
Good alt text example: “Checklist for placing SEO keywords in WordPress posts”. Bad example: “SEO keywords WordPress SEO keywords WordPress blog post”. The first helps accessibility and context; the second looks like spam.
Step 6: Use Keywords in Internal Links and Anchor Text
Internal links help search engines understand which pages on your site are most important and how topics are related. The clickable text (anchor text) is another subtle place to use relevant keywords.
- Highlight a short, descriptive phrase in your content that matches the topic of the page you want to link to.
- Click the link icon (or press Ctrl+K / Cmd+K) in the editor toolbar.
- Paste or search for the URL you want to link to and hit Enter.
For example, if you have a more in-depth guide about keywords, you might create a link like this: “In our detailed guide on how to add SEO keywords to your WordPress website, we cover keyword strategy across your whole site.”
After you’ve handled keyword placement, it’s smart to zoom out and look at the bigger on-page picture. When you’re ready, check out this step-by-step guide to on-page SEO in WordPress for a fuller optimization checklist that builds on what you’ve learned here.
Step 7: Review Your Keyword Usage Before Publishing
Before you hit Publish (or Update), spend one minute doing a quick keyword placement review. This prevents both accidental stuffing and missed opportunities.
- Does the WordPress title include your primary keyword once, naturally?
- Is the URL slug short, readable, and keyword-focused?
- Is the SEO title in your plugin set and compelling?
- Does the meta description use the keyword once and clearly describe the page?
- Is the keyword (or a close variation) in the first paragraph?
- Do a few H2/H3 headings contain relevant phrases without sounding forced?
- Do your most important images have descriptive file names and alt text?
- Do you have at least a couple of helpful internal links with descriptive anchor text?
Turn Keyword Placement into a WordPress Publishing Habit
Putting SEO keywords in WordPress isn’t about chasing a perfect “density score” in your plugin. It’s about consistently placing the right phrases in the right locations so search engines and readers can immediately see what each page is about.
By mapping a primary keyword to each URL, optimizing your titles and meta, and using keywords naturally in headings, content, images, and internal links, you build a strong on-page foundation. Make this workflow part of your normal publishing routine, and every new post you publish will be better positioned to rank and bring in the traffic you want.
Further Reading
- How to Add Keywords to Your WordPress Website
- Where to Add Keywords in WordPress
- How to Add Keywords in WordPress Without Hurting Your SEO
- Best Keyword Research Tools for SEO
- Internal Linking Strategies for WordPress Beginners