Image Optimization Checklist for WordPress Websites
A practical step-by-step audit to keep your WordPress images fast, sharp, and SEO-friendly.

Bloated, unoptimized images are one of the fastest ways to slow down a WordPress website. They hurt your Core Web Vitals, destroy mobile performance, and quietly drag down your SEO and conversions. The good news: once you put a solid image optimization checklist in place, keeping things fast becomes a repeatable routine instead of a one-time “fire drill.”
In this guide, you’ll follow a practical, step-by-step image optimization checklist designed specifically for WordPress websites. You’ll audit existing images, standardize sizes, set up compression and modern formats, fix alt text, and verify the impact with real performance tests. If you need a deeper conceptual walkthrough, you can also review our companion guide on how to optimize images for WordPress after you complete this checklist.
By the end, you’ll have a clear, reusable process you can run after a redesign, before launching a new site, or as part of your monthly maintenance routine.
Prerequisites
Before you start the checklist, make sure you have the right access and safeguards in place. Many of these steps involve bulk actions that are difficult to undo without a backup.
- Administrator access to your WordPress dashboard.
- Recent full site backup (files + database) via your hosting panel or backup plugin.
- Basic familiarity with the WordPress Media Library and theme settings.
- Optional: SSH access to run WP-CLI commands if you prefer command-line tools.
Step 1: Audit Your Existing Images
Your first task is to understand how bad (or good) things are right now. An image audit shows you which files are largest, which pages are most affected, and where to focus your effort.
- In the WordPress dashboard, go to Media > Library and switch to List view.
- Look for any columns that show file size and dimensions. If your current view doesn’t show them, consider enabling them via Screen Options or using a media-helper plugin.
- Identify images larger than your typical content width (for example, anything over 2000px wide for a blog layout).
- Note any images over 300–400 KB, especially on key landing pages and product pages.
Checkpoint: You should have a short list of “problem” images (oversized or overweight) and the pages they appear on.
Step 2: Standardize Image Sizes in Your Theme
Random image dimensions are a major cause of layout shifts and wasted bandwidth. Standardizing image sizes ensures that WordPress generates the right thumbnails and your theme pulls the best-fit version for each context.
- Check your theme’s main content width (for example under Appearance > Customize > Layout or your theme options panel).
- In the dashboard, go to Settings > Media and review your thumbnail, medium, and large sizes:
- Set large to match or slightly exceed your content width (for example, 1200–1600px).
- Set medium and thumbnail to reasonable, smaller sizes for archives, widgets, and related posts.
- If your theme or builder (e.g., Jannah theme options, page builder, or block patterns) defines custom image sizes, review those settings as well, ensuring they aren’t unnecessarily huge.
- After updating sizes, regenerate thumbnails so new dimensions apply to existing uploads.
If you’re comfortable using WP-CLI via SSH, you can regenerate thumbnails with:
# Run in your WordPress root via SSH
wp media regenerate
Checkpoint: Your media settings now reflect realistic dimensions for your layout, and all existing images have regenerated thumbnails that match those sizes.
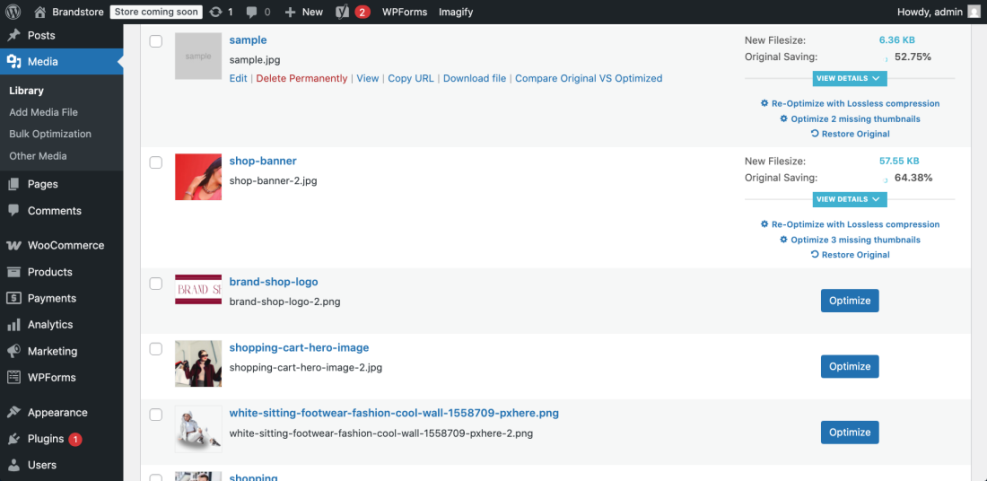
Step 3: Enable Compression and Modern Formats (WebP/AVIF)
Compression is where you unlock the biggest byte savings. The goal is to reduce file size dramatically while keeping images visually acceptable for your audience and niche.
- Choose an image optimization plugin or service that supports:
- Lossy compression (with configurable quality).
- WebP and/or AVIF conversion.
- Bulk optimization for existing images.
- Configure compression levels:
- For photographs, start with JPEG quality around 70–80%.
- Use PNG only when transparency is required; otherwise convert to JPEG or WebP.
- Enable automatic WebP (and AVIF if available) generation and delivery.
- Run a bulk optimization pass on a small subset first (for example, last 1–2 months of uploads) and visually check the results on key pages.
- Once satisfied, run bulk optimization on your full library.
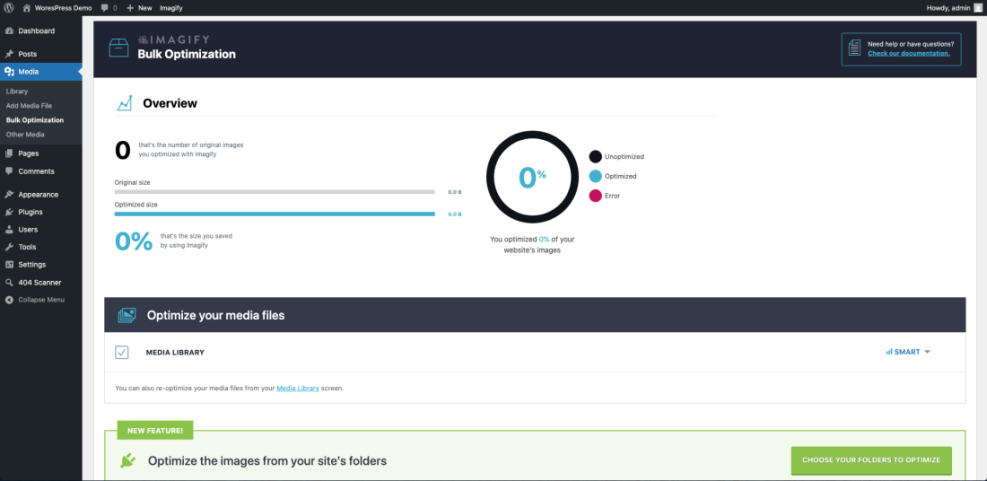
Checkpoint: Your heaviest images now have significantly smaller file sizes, and newly uploaded images are being compressed and converted to modern formats automatically.
If you want a more advanced, workflow-style approach that covers editing, exporting, and uploading habits across your team, see our dedicated WordPress image optimization workflow guide.
Step 4: Implement Lazy Loading and Placeholder Techniques
Lazy loading prevents off-screen images from loading until the user scrolls near them. This reduces initial page weight and speeds up the first meaningful paint, especially on long posts and image-heavy galleries.
- Check if your WordPress version and theme already use native lazy loading:
- Open a page in your browser, right-click, and choose View Source.
- Search for
loading="lazy"attributes on<img>tags.
- If native lazy loading is missing or incomplete, enable it via your performance or image plugin.
- Exclude critical above-the-fold images (like your hero banner or logo) from lazy loading to avoid delaying the Largest Contentful Paint (LCP).
- Optionally enable low-quality image placeholders (LQIP) or blurred placeholders for a smoother perceived loading experience.
Checkpoint: Only above-the-fold images load immediately; all others load as you scroll. LCP should be driven by a well-optimized, non-lazy-loaded image.
Step 5: Fix Alt Text, Filenames, and Captions
Image optimization isn’t only about speed; it’s also about accessibility and SEO. Well-written alt text and filenames help search engines understand your visuals and assist users relying on screen readers.
- In Media > Library, click each important image and review:
- Filename (e.g.,
red-running-shoes-side-view.jpginstead ofIMG_0123.jpg). - Alt text – short, descriptive, and natural language.
- Caption – used when you want on-page visible description.
- Filename (e.g.,
- Update alt text to describe the image’s content and purpose on the page:
- Aim for 8–12 words.
- Avoid keyword stuffing; include your target keyword only when it makes sense.
- For new uploads, name files correctly before uploading so WordPress doesn’t have to deal with cryptic camera filenames.
Checkpoint: Your key images (hero images, product images, blog post visuals) have clean, descriptive filenames and alt text that match the surrounding content.
Step 6: Offload and Serve Images via CDN (Optional)
A Content Delivery Network (CDN) shortens the distance between your images and your visitors by serving files from edge locations around the world. Many CDNs now include extra image optimization features like on-the-fly resizing and format conversion.
- Choose a CDN or speed-enhancing service that supports image delivery (for example, a CDN integrated with your host or a dedicated performance provider).
- Install and configure the provider’s WordPress plugin or connect via DNS as documented by the service.
- Enable any available image features such as:
- Automatic WebP/AVIF serving based on browser support.
- On-the-fly resizing for different devices.
- Smart cropping for thumbnails.
- Verify that your image URLs are being rewritten to the CDN domain on the front end.
Checkpoint: When you inspect your page source, image URLs should load from the CDN domain rather than directly from your origin server.
Step 7: Test and Re-Test with Core Web Vitals Tools
Now that your checklist is implemented, you need to confirm that it actually improved performance. This is where Core Web Vitals tools and waterfall charts give you hard data.
- Run your most important pages through:
- Google PageSpeed Insights (mobile + desktop).
- WebPageTest.org or a similar tool with filmstrips and waterfalls.
- Focus on image-related metrics and opportunities:
- Largest Contentful Paint (LCP) – is the LCP element an image, and is it optimized?
- Cumulative Layout Shift (CLS) – are there layout jumps caused by images without dimensions?
- “Serve images in next-gen formats” or “Properly size images” warnings.
- Compare before/after scores where possible, and note improvements in load time and image-specific recommendations.
- Repeat tests whenever you launch a new design, switch themes, or add a new plugin that affects images.
Checkpoint: Image-related warnings should be significantly reduced or eliminated, and your LCP and CLS scores should meet recommended thresholds.
For a broader look at performance beyond images, cross-check your results against the full WordPress speed optimization checklist so that caching, hosting, and code optimization are also in good shape.
Lock In a Repeatable Image Optimization Routine
Images will always be a major part of your WordPress website, but they don’t have to be a major performance problem. By auditing your library, standardizing sizes, enabling smart compression and lazy loading, tightening up metadata, and verifying the results with Core Web Vitals tools, you turn image optimization into a straightforward, repeatable process.
Make this checklist part of your regular maintenance routine: run it after redesigns, theme changes, and before big campaigns. Over time, you’ll spend less effort firefighting slow pages and more time creating the kind of visual content that actually converts.
Further Reading
- WordPress Performance Checklist for Bloggers
- Beginner Guide to WordPress Speed Optimization
- Beginner Guide to WordPress Speed and Core Web Vitals


