Step By Step Guide to WordPress Caching Plugins
Learn how to choose, install, configure, test, and troubleshoot a WordPress caching plugin without breaking your site layout or admin experience.
A slow WordPress site can frustrate visitors, reduce conversions, and make routine editing feel painful. Caching plugins help solve this by storing ready-made versions of pages, files, and database results so WordPress does not have to rebuild everything from scratch on every visit.
In this step-by-step guide, you will learn how to choose a caching plugin, configure the essential settings, test your site safely, and fix common caching problems. If you are still learning the basics of speed work, start with this broader beginner guide to WordPress speed optimization before applying the plugin-specific steps below.
The goal is not to turn on every option. The goal is to enable the right caching features in the right order so your site becomes faster without broken layouts, missing styles, checkout issues, or outdated content.
Prerequisites
Before you install or reconfigure a caching plugin, prepare your site so you can recover quickly if a setting causes problems. Caching touches front-end output, CSS, JavaScript, logged-in behavior, and sometimes database or server-level features.
- Administrator access: You need access to the WordPress dashboard using an administrator account.
- A recent backup: Create a full backup of files and database before changing performance settings.
- One caching plugin only: Avoid running multiple full-page caching plugins at the same time.
- A test checklist: Prepare a list of pages to check, including homepage, blog posts, contact forms, login pages, and checkout pages if you use WooCommerce.
- Baseline speed results: Run a speed test before making changes so you can compare results afterward.
Step 1: Choose the Right Caching Plugin
The first step is choosing a caching plugin that matches your hosting setup, skill level, and site type. A simple brochure site can usually use basic page caching and browser caching. A WooCommerce store, membership site, or LMS needs more careful rules for carts, accounts, dashboards, and logged-in users.
If you need help installing a plugin from the dashboard, follow this separate guide on how to install a plugin in WordPress before continuing.
What to look for in a caching plugin
- Page caching: Stores static HTML versions of pages for faster repeat delivery.
- Browser caching: Helps repeat visitors reuse static files like images, CSS, and JavaScript.
- Minification: Reduces file size for CSS, JavaScript, and HTML, though it should be tested carefully.
- Cache exclusion rules: Lets you exclude cart, checkout, account, admin, and dynamic pages.
- CDN support: Helps serve static assets from a content delivery network if your site uses one.
- Clear cache controls: Makes it easy to purge cache after editing pages, themes, plugins, or menus.
Checkpoint: By the end of this step, you should have selected one primary caching plugin and confirmed that it supports the features your site needs.
Troubleshooting: If your host already includes server-level caching, check your hosting dashboard or support documentation before adding another plugin. Some managed WordPress hosts recommend a specific plugin or restrict certain caching tools.
Step 2: Install and Activate the Plugin Safely
Once you choose a plugin, install it during a low-traffic period if possible. Caching settings can change how your pages are served, so you want enough time to test the front end before visitors or customers are affected.
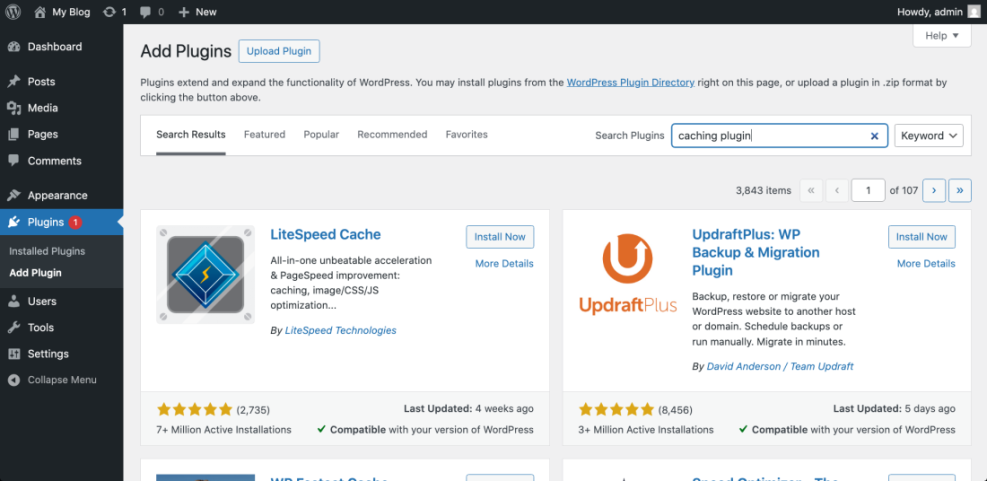
- Log in to your WordPress dashboard.
- Go to Plugins > Add New.
- Search for your chosen caching plugin by name.
- Click Install Now.
After activation, do not enable every optimization immediately. Start with basic page caching first, test your site, and then add more advanced options one at a time.
Checkpoint: The plugin should appear under Plugins > Installed Plugins, and you should be able to open its settings screen without errors.
Troubleshooting: If activation triggers a fatal error, access your hosting file manager or FTP, open wp-content/plugins/, and rename the plugin folder to disable it. Then reload your WordPress admin area and contact your host or plugin support before trying again.
Step 3: Enable Page Caching First
Page caching is usually the most important setting because it creates static versions of your pages. Instead of running WordPress, the theme, plugins, and database queries on every visit, the server can deliver a prebuilt page to many visitors.
In your caching plugin settings, look for options named Page Cache, Cache System, Enable Caching, or Cache Delivery. Turn on the basic page cache option first, then save your changes.
- Open your caching plugin settings.
- Find the main page cache option.
- Enable page caching for public visitors.
- Keep logged-in user caching disabled unless you understand the consequences.
- Save the settings.
- Open your homepage in an incognito or private browser window.
Checkpoint: Your public pages should still load normally, and the plugin may show a cache status message, cache file count, or successful cache notice.
Troubleshooting: If the homepage looks outdated after editing, use the plugin’s clear cache or purge cache button. For a deeper walkthrough, see this guide on how to clear cache in WordPress.
Step 4: Exclude Dynamic and Sensitive Pages
Cache exclusions prevent dynamic pages from showing the wrong content to the wrong visitor. This is especially important for WooCommerce stores, membership sites, course websites, directories, booking sites, and any site with personalized dashboards.
Look for settings named Exclude URLs, Never Cache URLs, Rejected URLs, or Advanced Rules. Add one URL pattern per line if your plugin supports pattern-based exclusions.
Common pages to exclude
/cart//checkout//my-account//wp-admin//wp-login.php- Membership dashboard pages
- Course progress pages
- Booking confirmation pages
If your plugin supports cookies or query string exclusions, review those settings too. Cart fragments, preview links, search filters, and tracking URLs may need special handling depending on your site.
Checkpoint: Cart, checkout, account, login, and other dynamic pages should remain uncached or excluded according to the plugin’s status indicators.
Troubleshooting: If customers see an empty cart, another customer’s cart state, stale account information, or broken checkout behavior, disable page caching temporarily and review your exclusions before re-enabling it.
Step 5: Optimize CSS and JavaScript Carefully
Many caching plugins include file optimization features such as minifying CSS, combining CSS, deferring JavaScript, delaying JavaScript, and removing unused CSS. These can improve performance, but they can also break menus, sliders, forms, sticky headers, popups, and page builder layouts.
Turn on one asset optimization setting at a time. After each change, test important pages on desktop and mobile before enabling the next option.
- Enable CSS minification and save.
- Check the homepage, blog post, contact page, and any landing page.
- Enable JavaScript minification only if the site still works correctly.
- Test menus, forms, sliders, popups, tabs, accordions, and checkout functions.
- Try defer or delay JavaScript only after basic minification is stable.
Checkpoint: Your pages should visually match the original layout, interactive elements should work, and speed tests should show smaller or better-optimized files.
Troubleshooting: If styling disappears, disable CSS combine or critical CSS options first. If buttons, menus, forms, or sliders stop working, disable JavaScript delay or defer settings and retest.
Step 6: Configure Browser Caching and GZIP
Browser caching tells a visitor’s browser how long it can keep static files before requesting them again. GZIP or Brotli compression reduces the size of text-based files transferred from the server to the browser.
In your plugin settings, look for Browser Cache, Static File Cache, Compression, GZIP, or Brotli. Many plugins can write these rules automatically, but some hosts handle them at the server level.
- Images: Usually safe to cache longer because filenames often change when images are replaced.
- CSS and JavaScript: Can be cached longer if your plugin adds versioning or cache-busting query strings.
- HTML: Should be controlled by the page cache rather than long browser cache rules.
- Compression: Enable GZIP or Brotli if your host has not already enabled it.
Checkpoint: Your speed test should show fewer warnings about static asset caching and compression.
Troubleshooting: If the plugin says it cannot write rules to .htaccess or server config files, check file permissions or ask your host to enable browser caching and compression at the server level.
Step 7: Connect a CDN if Your Site Needs One
A content delivery network can serve images, CSS, JavaScript, and other static files from locations closer to visitors. This is useful when your audience is spread across different regions or when your site has heavy media files.
If your caching plugin includes CDN settings, you may see fields for a CDN URL, pull zone URL, Cloudflare integration, or asset rewriting. Enter the CDN details provided by your CDN service, then save and test your front end.
- Create or confirm your CDN configuration with your CDN provider.
- Copy the CDN URL or integration details.
- Open your caching plugin’s CDN settings.
- Paste the CDN URL or connect the service account if supported.
- Enable CDN rewriting for static files only.
- Save settings and test images, CSS, fonts, and scripts.
Checkpoint: Static assets should load correctly, and your browser developer tools may show files loading from the CDN hostname.
Troubleshooting: If fonts disappear, icons show as boxes, or images fail to load, check HTTPS settings, CORS rules, mixed content warnings, and whether the CDN has finished pulling assets from your origin server.
Step 8: Test Speed and Real User Behavior
After configuration, test both performance scores and real user behavior. A better score is useful, but it does not matter if the site layout breaks, forms fail, or logged-in users see stale content.
- Open your homepage in an incognito window.
- Check a blog post, category page, landing page, and contact form.
- Test mobile navigation and sticky elements.
- If you run WooCommerce, add a product to the cart and start checkout.
- Run a speed test and compare it with your original baseline.
- Clear cache, reload the same pages, and confirm fresh content appears.
Also test while logged in as an administrator. Some plugins show admin toolbar shortcuts for clearing cache, preloading cache, or purging individual pages.
Checkpoint: Your site should load faster, remain visually stable, and still allow normal editing, form submission, cart use, and login behavior.
Troubleshooting: If speed does not improve, your bottleneck may be hosting, images, third-party scripts, plugin bloat, database load, or theme performance rather than page caching alone.
Step 9: Maintain Cache Settings After Updates
Caching is not a one-time task. Theme updates, plugin updates, design changes, new tracking scripts, and hosting changes can all affect how your cache behaves. Build cache testing into your maintenance workflow.
- Clear cache after major page edits.
- Clear cache after theme or plugin updates.
- Retest checkout, forms, menus, and popups after optimization changes.
- Review exclusions when adding membership, LMS, booking, or ecommerce features.
- Document your working settings so you can restore them if troubleshooting is needed.
You can also enable cache preloading if your plugin supports it. Preloading rebuilds cached pages before visitors request them, which can make the first visit after a purge faster.
Checkpoint: You should have a repeatable maintenance routine for clearing, rebuilding, and testing cache after important site changes.
Troubleshooting: If your site repeatedly shows stale content, check whether your hosting cache, CDN cache, object cache, and plugin cache all need to be purged together.
Step 10: Clear Cache with WP-CLI When Needed
Some advanced users and developers prefer clearing cache from the command line. This is useful during deployments, plugin updates, staging pushes, or maintenance scripts.
Run WP-CLI commands in your site’s SSH terminal from the WordPress root directory, usually the folder that contains wp-config.php. The exact cache command depends on your plugin, but you can always start by checking available WP-CLI commands:
wp helpMany caching plugins register their own WP-CLI commands. You can search the plugin documentation or run command discovery from SSH:
wp cacheSome sites also use object caching, which may support flushing through WP-CLI:
wp cache flushCheckpoint: You should know whether your caching plugin supports WP-CLI and which command safely clears or rebuilds cache on your site.
Troubleshooting: If WP-CLI returns a permission error, confirm you are using the correct hosting user and running the command from the correct WordPress installation directory.
Your WordPress Cache Is Ready for Real Visitors
A well-configured caching plugin can make WordPress feel significantly faster for visitors while reducing server strain. The safest workflow is simple: choose one plugin, enable page caching first, exclude dynamic pages, optimize assets carefully, test everything, and document your final settings.
Remember that caching is only one part of performance. Images, hosting, database queries, plugin quality, theme code, third-party scripts, and CDN setup all contribute to speed. Treat caching as the foundation, then continue improving the rest of your performance stack over time.
Further Reading
- Best WordPress Caching Plugins
- Complete WordPress Caching Setup Guide
- How to Use CDN in WordPress
- Redis Object Cache WordPress Beginner Guide
- WordPress Speed Optimization Checklist