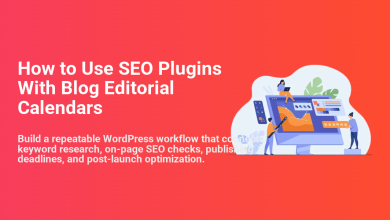
How to Install a WordPress SEO Plugin Step by Step
A beginner-friendly walkthrough for choosing, installing, activating, and checking your first WordPress SEO plugin.
Installing a WordPress SEO plugin is one of the fastest ways to improve how your site handles titles, meta descriptions, XML sitemaps, schema basics, and search appearance settings. The plugin will not magically rank every page, but it gives you the tools to optimize your content more consistently.
In this step-by-step tutorial, you will install an SEO plugin from the WordPress dashboard, activate it safely, run the first-time setup, and confirm that important features are working. If you are still learning the bigger picture, start with this overview of what WordPress SEO means before configuring plugin settings.
This guide is written for beginners using the normal WordPress admin area, so you do not need FTP, cPanel, or code access unless your site has a permissions issue.
Prerequisites
Before installing an SEO plugin, make sure you can access your WordPress dashboard and that your site is ready for a plugin change. A few minutes of preparation can prevent setup problems later.
- Administrator access: You need an account with permission to install plugins.
- A working WordPress site: Confirm that the dashboard loads normally before making changes.
- A recent backup: Create one before installing any new plugin, especially on a live business site.
- Only one main SEO plugin: Do not run multiple full SEO plugins at the same time because their meta tags and sitemap features can conflict.
Step 1: Choose the Right SEO Plugin
The first step is deciding which plugin you want to install. Popular options include Yoast SEO, Rank Math, All in One SEO, and SEOPress. Your best choice depends on your comfort level, feature needs, and whether you prefer a simpler setup or more advanced controls.
For most beginners, a well-supported plugin with a guided setup wizard is the safest option. If you are comparing tools first, review this guide to the best WordPress SEO plugins and tools before installing one.
- Yoast SEO: Beginner-friendly and widely used for titles, descriptions, readability checks, breadcrumbs, and sitemaps.
- Rank Math: Feature-rich with many controls for schema, redirects, and keyword tracking options.
- All in One SEO: Simple interface with strong sitewide SEO settings.
- SEOPress: Lightweight option with many technical SEO settings.
Checkpoint: You should know which SEO plugin you plan to install and whether you are using the free or premium version.
Step 2: Open the WordPress Plugin Installer
Log in to your WordPress dashboard and go to Plugins > Add New Plugin. This screen lets you search the official WordPress plugin directory and install free plugins directly from your admin area.
- Open your WordPress login page.
- Enter your admin username and password.
- In the left sidebar, click Plugins.
- Click Add New Plugin.
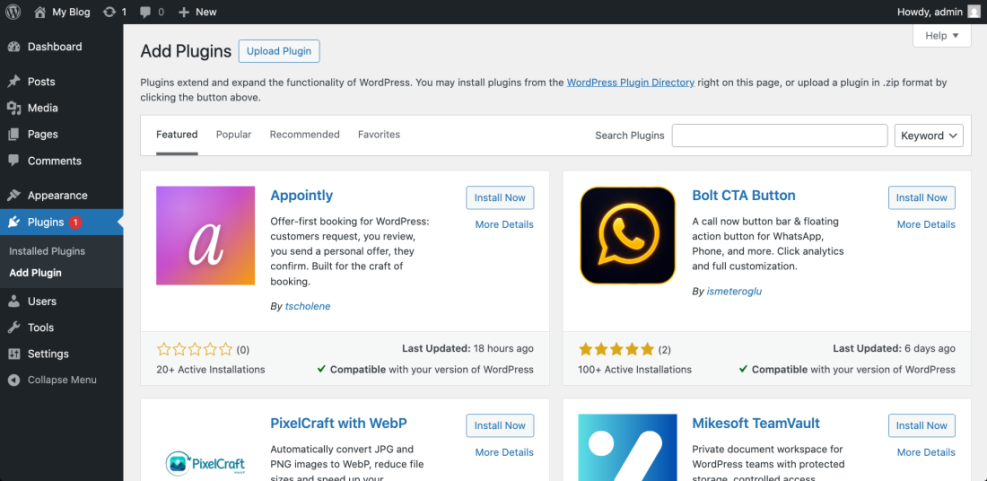
Checkpoint: You should see the plugin search screen with a search box near the top right or upper area of the page.
Troubleshooting: If you do not see the Plugins menu, your account may not have administrator permissions, or your site may be on a WordPress.com plan that limits plugin installation.
Step 3: Search for and Install the SEO Plugin
Use the plugin search field to find your chosen SEO plugin. Search by the exact plugin name, then confirm the author, rating, active installations, and compatibility information before clicking install.
- In the search field, type the plugin name, such as Yoast SEO or Rank Math SEO.
- Review the search results carefully.
- Find the correct plugin card.
- Click Install Now.
- Wait until the button changes from Install Now to Activate.
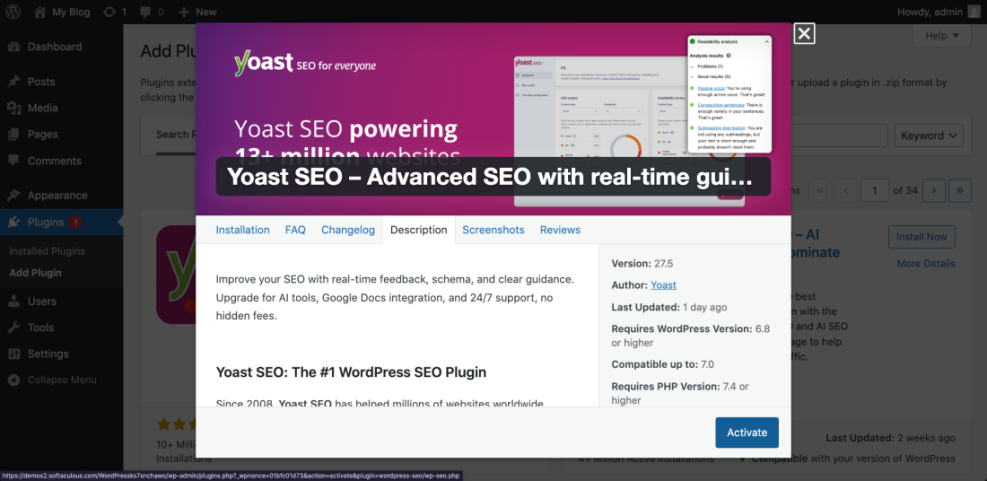
Checkpoint: The plugin should now be installed, and the button should show Activate.
Troubleshooting: If installation fails, check whether your hosting account has enough disk space, whether your file permissions are correct, and whether your WordPress version is compatible with the plugin.
Step 4: Activate the SEO Plugin
Installing a plugin only adds its files to your site. You must activate it before WordPress starts using its SEO features.
- Click the Activate button on the plugin card.
- Wait for WordPress to redirect you or show a success message.
- Look for the plugin’s new menu item in the WordPress sidebar.
Checkpoint: You should see a new SEO-related menu in your dashboard, such as Yoast SEO, Rank Math SEO, or All in One SEO.
Troubleshooting: If the site shows an error after activation, use your hosting file manager or recovery mode email to deactivate the plugin. Then check for conflicts with outdated themes, PHP versions, or another SEO plugin.
Step 5: Run the First-Time Setup Wizard
Most WordPress SEO plugins include a setup wizard that configures the most important sitewide settings. This is where you identify your site type, organization details, search appearance preferences, and sitemap features.
- Click the SEO plugin menu in the WordPress sidebar.
- Open the setup wizard or configuration wizard.
- Select whether your site represents a person or organization.
- Add your site name, logo, and social profile details if requested.
- Enable XML sitemaps if the plugin asks.
- Save or finish the wizard.
If you chose Yoast, follow the plugin’s guided configuration and then use this Yoast SEO setup guide for a deeper walkthrough of its main settings.
Checkpoint: The setup wizard should show a completion message or return you to the plugin dashboard with no urgent setup warnings.
Step 6: Configure Basic SEO Settings
After the setup wizard, review the basic settings that affect how your pages appear in search results. These settings help your site send clearer signals to search engines.
- Title templates: Check how the plugin formats post titles, page titles, and archive titles.
- Meta descriptions: Make sure the plugin allows custom descriptions for posts and pages.
- XML sitemap: Confirm that sitemap functionality is enabled.
- Search appearance: Review whether posts, pages, categories, and tags should appear in search results.
- Social previews: Add default images or metadata for social sharing when available.
Checkpoint: Your plugin should have sitewide defaults in place, while still allowing custom SEO titles and descriptions on individual posts and pages.
Troubleshooting: If your SEO title or meta description does not appear on the front end, clear your site cache and browser cache, then check that another plugin or theme is not outputting duplicate meta tags.
Step 7: Test the Plugin on a Page or Post
Now open an existing post or page and confirm that the SEO plugin adds an optimization panel in the editor. This is where you will usually set the SEO title, slug, meta description, focus keyword, and social preview information.
- Go to Posts > All Posts or Pages > All Pages.
- Open a published or draft item.
- Scroll until you find the SEO plugin panel.
- Add or review the SEO title and meta description.
- Update or save the page.
Checkpoint: The editor should show SEO fields, analysis results, or preview tools from your plugin.
Troubleshooting: If you cannot find the SEO panel, open the editor preferences and make sure the plugin panel is enabled. Also confirm that the plugin is active under Plugins > Installed Plugins.
Step 8: Verify the Sitemap and Front-End Output
Your SEO plugin should generate an XML sitemap and output clean metadata on the front end. These checks help confirm that the installation is actually affecting your site.
- Open the SEO plugin’s sitemap settings and copy the sitemap URL.
- Visit the sitemap URL in a new browser tab.
- Open one public page on your site.
- Right-click and choose View Page Source.
- Search the source for your SEO title, meta description, and canonical URL.
Checkpoint: Your sitemap should load without a 404 error, and your page source should include the SEO metadata created by the plugin.
Troubleshooting: If the sitemap returns a 404 error, go to Settings > Permalinks and click Save Changes without changing anything. This refreshes rewrite rules and often fixes sitemap URL issues.
Step 9: Avoid Common SEO Plugin Mistakes
Once the plugin is installed, avoid changing every setting at once. Many SEO problems come from over-optimization, duplicate plugin features, or accidentally noindexing important content.
- Do not run two main SEO plugins together: Choose one primary plugin for metadata and sitemaps.
- Do not noindex key pages by accident: Check posts, pages, products, and category settings carefully.
- Do not keyword-stuff titles: Write natural titles that match search intent.
- Do not ignore caching: Clear cache after changing SEO titles, descriptions, or sitemap settings.
- Do not rely only on plugin scores: Use SEO analysis as guidance, not as a perfect ranking formula.
Your SEO Plugin Is Installed and Ready to Use
You have now chosen an SEO plugin, installed it from the WordPress dashboard, activated it, completed the first-time setup, and verified that the basic SEO features work. That gives your site a stronger foundation for search titles, descriptions, sitemaps, and page-level optimization.
Your next step is to optimize your most important posts and pages one at a time. Start with pages that already receive traffic or support business goals, then improve titles, descriptions, headings, internal links, and content quality.
Further Reading
- How to Do SEO for a WordPress Website
- How to Add a Meta Description in WordPress
- How to Create a Sitemap in WordPress
- How to Add Google Search Console to WordPress