Choose Reliable WordPress Hosting Performance and Security Tips
A practical step-by-step guide to selecting WordPress hosting that keeps your site fast, stable, protected, and ready to grow.
Choosing WordPress hosting is one of the most important decisions you make for your website. A weak host can slow down pages, create downtime, expose security gaps, and make simple maintenance tasks harder than they need to be.
In this guide, you will learn how to evaluate hosting for performance, security, backups, support, scalability, and long-term reliability. By the end, you will have a clear checklist you can use before buying a new plan or moving an existing WordPress site.
If you are still comparing basic hosting options, start with this overview of how to choose the best WordPress hosting so you understand the main plan types before applying the deeper performance and security checks below.
Prerequisites
Before you compare hosting providers, gather a few details about your site. These numbers help you avoid paying for the wrong plan or choosing a server that cannot handle your traffic.
- Your current monthly visits and expected growth.
- Your website type, such as blog, business site, membership site, or WooCommerce store.
- Your average page size, number of plugins, and theme complexity.
- Your backup, staging, email, CDN, and security requirements.
- Your budget for hosting, premium plugins, migration, and maintenance.
Step 1: Choose the Right Hosting Type for Your WordPress Site
The first step is to decide which type of hosting fits your site. Shared hosting can work for small personal websites, but business sites usually benefit from managed WordPress hosting, cloud hosting, or a properly configured VPS.
Look for a plan that clearly supports WordPress, provides enough server resources, and includes tools that reduce manual work. Managed WordPress hosting is often the best fit when you want automatic updates, optimized caching, staging, backups, and WordPress-aware support.
- List your site type and traffic level.
- Compare shared, managed WordPress, VPS, and cloud plans.
- Check whether the host limits visits, storage, PHP workers, CPU, RAM, or database size.
- Confirm whether the plan includes staging, backups, malware scanning, SSL, and CDN access.
Checkpoint: You should be able to explain why the hosting type matches your site’s traffic, technical skill level, and maintenance needs.
Troubleshooting: If every plan looks the same, compare resource limits instead of marketing labels. A “WordPress optimized” plan is only useful if it provides real server capacity, reliable support, and WordPress-specific tooling.
Step 2: Review Server Performance Features Before You Buy
Hosting performance affects page speed, Core Web Vitals, conversions, and the user experience. A good WordPress host should provide modern server software, fast storage, enough PHP workers, and built-in caching options.
Look for current PHP support, HTTP/2 or HTTP/3, server-level caching, object cache support, SSD or NVMe storage, and data center locations close to your audience. You can also strengthen your setup later by following a complete WordPress speed optimization workflow.
- PHP version: Choose a host that supports current stable PHP versions and makes upgrades easy.
- Server caching: Prefer server-level page caching over relying only on plugins.
- Object cache: Redis or Memcached support helps database-heavy sites.
- Storage: NVMe storage is preferable for faster file and database operations.
- Data center location: Pick a region close to your main visitors or use a CDN.
Checkpoint: The host should publish clear performance features and give you access to PHP settings, caching controls, and basic resource usage data.
Troubleshooting: If your site is still slow after moving hosts, test plugin load, image size, database bloat, theme weight, and third-party scripts. Hosting matters, but it cannot fully overcome an overloaded WordPress build.
Step 3: Verify the Host’s Security Protections
Security should be part of the hosting platform, not just an afterthought added with plugins. Your host should help protect the server, WordPress files, database, login page, and traffic between visitors and your site.
At minimum, confirm that the host includes free SSL certificates, malware scanning, firewalls, account isolation, secure file permissions, DDoS protection, and automatic security patches. You should also harden WordPress itself with strong passwords, least-privilege user roles, two-factor authentication, and a clear update process.
- Free SSL certificates with auto-renewal.
- Web application firewall or equivalent traffic filtering.
- Malware scanning and cleanup options.
- Secure SFTP or SSH access instead of plain FTP.
- Two-factor authentication for the hosting dashboard.
- Isolated accounts so another customer cannot affect your site on shared infrastructure.
Checkpoint: You should know exactly what the host secures, what WordPress security tasks remain your responsibility, and how incidents are handled.
Troubleshooting: If a host advertises “secure hosting” but provides no details, ask support for specifics about firewalls, malware scans, patching, account isolation, and restore procedures before purchasing.
Step 4: Confirm Backup and Restore Options
Backups are only useful if they are recent, complete, stored safely, and easy to restore. A reliable WordPress host should provide automated backups and let you restore files and the database without opening a complicated support ticket.
Check backup frequency, retention period, offsite storage, manual backup options, and whether staging restores are available. For a deeper security-focused workflow, review how to secure a WordPress website beyond hosting-level protections.
- Confirm whether backups run daily, hourly, or only on demand.
- Check how many backup copies the host stores.
- Ask whether backups include both files and the database.
- Test whether you can restore to staging before restoring production.
- Verify whether backups are stored separately from the live server.
Checkpoint: You should be able to create a manual backup and understand the exact restore path before a real emergency happens.
Troubleshooting: If the host only offers one-click backup creation but no clear restore process, use an additional WordPress backup plugin or external backup service as a safety layer.
Step 5: Test Support Quality Before Committing
Support quality becomes critical when your site is down, slow, infected, or stuck during migration. A reliable host should offer fast responses from support staff who understand WordPress, not only general server terminology.
Before buying, contact support with a practical WordPress question. Ask about PHP versions, staging, caching conflicts, malware cleanup, backup restores, and migration support. Their answers will reveal whether the host can help during real problems.
- Live chat or ticket response speed.
- WordPress-specific knowledge.
- Clear escalation process for urgent outages.
- Migration assistance for existing sites.
- Transparent support scope and paid cleanup policies.
Checkpoint: You should receive specific answers, not vague replies like “our servers are optimized.”
Troubleshooting: If support avoids direct answers before you buy, expect slower and less helpful support after you become a customer.
Step 6: Check Scalability and Resource Limits
Your hosting plan should handle normal traffic and occasional spikes. This is especially important for product launches, seasonal promotions, viral posts, course enrollments, and WooCommerce checkout activity.
Review traffic limits, CPU policies, RAM, storage, bandwidth, PHP workers, database size, and upgrade paths. A strong host makes it easy to scale without forcing a rushed migration during a busy period.
- Traffic spikes: Ask what happens if you exceed normal visits.
- PHP workers: More workers help logged-in, checkout, and membership activity.
- Storage growth: Confirm limits for media-heavy websites.
- Upgrade path: Make sure you can move to a stronger plan without downtime.
- Usage reporting: Look for dashboards that show CPU, memory, bandwidth, and database activity.
Checkpoint: You should know the plan’s limits and the next upgrade option before your site needs it.
Troubleshooting: If your site hits resource limits often, do not immediately upgrade. First audit plugins, cache rules, database queries, cron jobs, bots, and uncached pages.
Step 7: Plan the Migration and Post-Launch Checks
If you are moving an existing WordPress site, plan the migration before changing DNS. A careful migration protects SEO, prevents data loss, and reduces downtime.
- Create a full backup of the current site.
- Set up the new hosting account and temporary domain or staging URL.
- Migrate files and database to the new host.
- Test login, forms, checkout, search, menus, media, and key templates.
- Check SSL, redirects, permalinks, caching, and email sending.
- Point DNS to the new host after testing is complete.
Run WP-CLI checks from your SSH terminal if your host supports command-line access:
wp core version
wp plugin list --status=active
wp theme list
wp option get siteurl
wp option get home
Checkpoint: Your site should load over HTTPS, admin login should work, key pages should display correctly, and no important forms or checkout flows should fail.
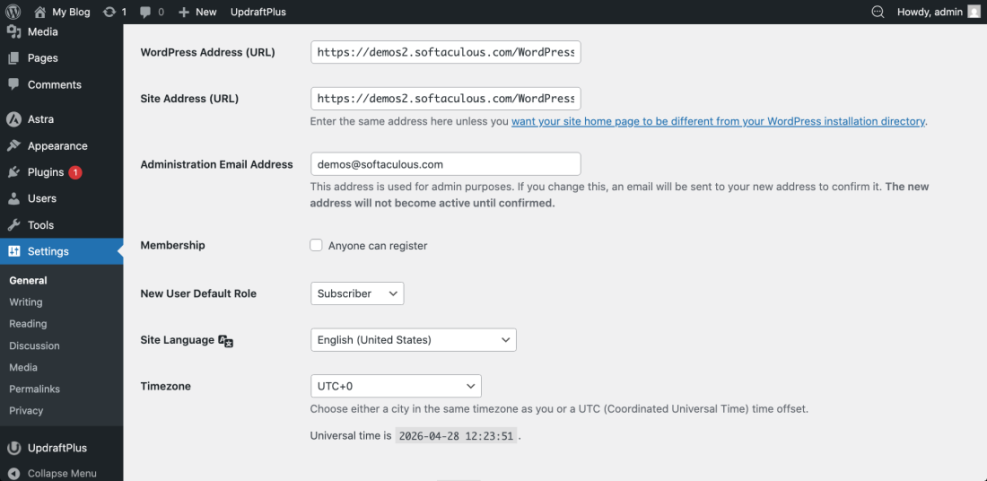
Troubleshooting: If the site redirects incorrectly after migration, check the WordPress Address and Site Address under Settings > General, then review redirects, SSL settings, and cache rules.
Step 8: Use a Final Hosting Decision Checklist
Before you purchase or renew, compare your top hosting options using one final checklist. This prevents decisions based only on introductory pricing or brand recognition.
- The plan matches your traffic, site type, and growth expectations.
- The host supports modern PHP, server caching, SSL, and CDN integration.
- Backups are automatic, restorable, and stored safely.
- Security features include firewall protection, malware scanning, and secure access.
- Support can answer real WordPress questions clearly.
- Resource limits are transparent.
- Scaling to a stronger plan is straightforward.
- The renewal price fits your long-term budget.
Checkpoint: You should have one preferred host and a clear reason for choosing it over the alternatives.
Troubleshooting: If you cannot decide between two hosts, choose the one with better restore options, clearer support answers, and more transparent resource limits.
Build on a Hosting Foundation You Can Trust
Reliable WordPress hosting gives your site a stronger foundation for speed, uptime, security, backups, and future growth. The best choice is not always the cheapest plan; it is the plan that matches your workload and reduces technical risk.
Use the checklist in this guide before you buy, migrate, or renew. When your host supports performance and security from the server level, WordPress becomes easier to maintain and much safer to grow.
Further Reading
- Managed WordPress Hosting Guide
- WordPress Hosting Backups
- WordPress Performance Tuning Beginner Guide
- Beginner WordPress Security Best Practices Guide
- Complete WordPress Caching Setup Guide