WordPress Migration Checklist for Blogs Step by Step Guide
Practical process to move your blog without downtime or stress
A WordPress migration checklist keeps your blog safe while you move it to a new host, server, or domain. Without a clear plan, you risk broken pages, lost content, and dropped search rankings that are hard to recover.
You will see how to prepare your blog, pick the right migration method, follow a step by step process, and verify everything afterward. The guide starts with a quick overview, then walks you through preparation, the actual WordPress blog migration, post-migration checks, troubleshooting, and helpful FAQs.
Quick WordPress Migration Checklist for Blogs
Here is the high-level WordPress migration checklist you can follow for almost any blog move. You can print this list and check off each step as you go.
- Back up your full site, database, and files.
- Update WordPress core, themes, and plugins.
- Audit plugins, caching, and security tools.
- Set up new hosting or a staging site.
- Copy files and database using a migration method.
- Update URLs, permalinks, and site settings.
- Point DNS to the new server and verify SSL.
- Test key pages, forms, comments, and logins.
- Set up redirects, analytics, and XML sitemaps.
- Enable backups, security, and performance monitoring.
This quick checklist gives you the structure. The rest of the guide explains each phase in detail so you always know what to click and what to double-check during your WordPress migration.
What This Checklist Focuses On
This WordPress migration checklist focuses on small to medium WordPress blogs that want a safe move rather than a complex enterprise migration. It assumes you are moving from one WordPress host to another and want to avoid downtime, data loss, and SEO problems.
Safest Ways to Move a WordPress Site
The safest option for most owners is to migrate to a staging site on the new host first, test everything, and only then switch DNS. A reliable migration plugin or your hostâs free migration service reduces the risk of mistakes with the database and serialized data during WordPress site migration.
Can You Migrate a Blog on Your Own?
Yes, you can handle a WordPress blog migration yourself if you are comfortable with basic hosting tasks such as creating databases and editing DNS records. However, if your site earns money or gets steady traffic, consider using a managed migration or at least practicing on a test site first.
When Moving Your Blog Makes Sense
Before you act, you should be clear on why you are migrating your blog. A clear reason helps you choose the right host, plan your timing, and measure whether the WordPress migration actually helped.
Common Reasons to Move
Many bloggers move because their current hosting is slow, unstable, or lacks features like staging and automatic backups. Others need better support, want cheaper long-term pricing, or prefer a host closer to their main audience for faster page loads after a WordPress blog migration.
Typical Scenarios for Blog Moves
Common scenarios include moving from shared hosting to managed WordPress hosting, switching to a new domain, or merging several small blogs into one. Sometimes you simply move from a bloated old server to a cleaner environment with newer PHP and database versions as part of a planned WordPress migration checklist.
Will Moving Your Site Hurt SEO?
A migration can hurt SEO if you change URLs without 301 redirects or forget to update internal links and sitemaps. When you preserve URL structure, set redirects, and keep content the same, search traffic usually stabilizes again after a short adjustment period, especially if you follow a structured blog migration checklist.
Prepare Your Blog for a Safe Move
Good preparation removes most of the risk. You want clean backups, updated software, and a clear inventory of what must work after the migration. This preparation phase is the foundation of any WordPress migration checklist.
Create Reliable Backups First
First, create a full backup that includes the database and all WordPress files, especially the wp-content folder. Ideally, keep one copy on your current server and another in cloud storage so you can restore even if a single location fails during WordPress site migration.
Update WordPress, Themes, and Plugins
Outdated software causes many migration issues. Therefore, update WordPress core, your active theme, and all critical plugins before you move. Always take the backup first so you can roll back if an update introduces a bug while you follow your WordPress migration checklist.
Clean Up and Declutter Your Blog
Migration is a good time to remove unused themes and plugins, clean spam comments, and delete unneeded drafts or test pages. A leaner site migrates faster and gives you fewer moving parts to debug afterward in your WordPress blog migration.
From the Dashboard, go to Tools » Export if you want a simple content-only export as an extra safety net.

Set Up the New Hosting Environment
Your new hosting environment should be ready before you start moving data. This includes the WordPress installation, database, and any staging or temporary domains you will use for your WordPress migration.
Choose Hosting and Create Access Credentials
Pick a host that offers solid performance, clear upgrade paths, and backup tools. Then create and store all credentials securely, including control panel, SFTP or FTP, phpMyAdmin, and WordPress logins, so you do not stall mid-migration while hunting down passwords during your WordPress site migration.
You can compare detailed hosting options in guides such as Managed WordPress Hosting or WordPress Hosting Explained to refine your decision as part of your WordPress migration checklist.
Use a Staging Site to Test Changes
If your host offers staging, create a staging copy of your new blog there. Otherwise, install WordPress on a subdomain or temporary URL. This setup lets you test without risking the live site and gives you time to fix issues before DNS changes in your WordPress blog migration.
Compare Different Migration Methods
There are three common ways to move a WordPress blog. The table below compares them so you can choose the right one for your skills and risk tolerance when planning your WordPress migration.
| Method | Pros | Cons | Best For |
|---|---|---|---|
| Migration Plugin | Simple, handles database URLs, fewer manual steps | May have size limits, plugin conflicts | Most bloggers, small to medium sites |
| Manual Copy | Full control, no extra plugin needed | More technical, easier to break serialized data | Advanced users, custom setups |
| Host Managed | Handled by experts, usually low risk | Timing limited by support, less learning | Busy owners, revenue-generating blogs |
Pick the approach that matches your technical comfort level and the importance of your blog. For a high-traffic or monetized blog, managed migration is often worth the small extra cost within your WordPress migration checklist.
Run the Step by Step Migration
Once your backups and new hosting are ready, you can follow a clear step by step sequence. This reduces confusion and helps you avoid skipping anything important in your WordPress migration checklist.
Step by Step Migration Process
Follow these steps in order for a typical WordPress blog migration from one host to another. Adjust them slightly if you use a host-provided migration tool.
- Put your current blog into maintenance mode and temporarily disable caching and security plugins.
- Create a fresh backup or migration package of your live site, including files and database.
- Upload the package to the new hosting environment or staging site using SFTP or your migration plugin.
- Create a new empty database and database user on the new host, and note the credentials.
- Import the database, either through the migration plugin or via a tool such as phpMyAdmin.
- Edit wp-config.php on the new site to point to the new database if your tool does not do it.
- Log into the new WordPress Dashboard and check that themes, plugins, and media appear correctly.
- Update the WordPress Address (URL) and Site Address (URL) settings if your domain changes.
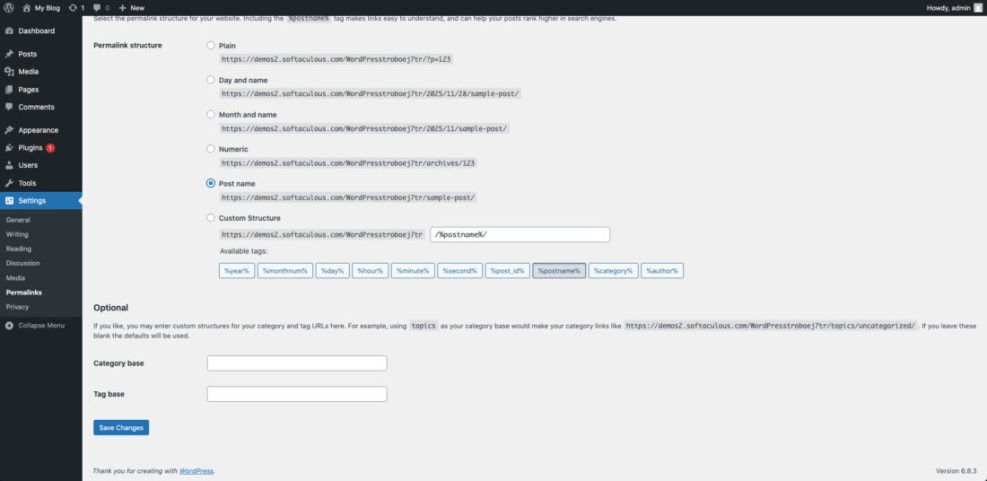
- Clear caches on both the old and new hosts and regenerate permalinks by saving the Permalinks settings.
- Once you are happy with the staging site, schedule DNS updates during a low-traffic window.
From the Dashboard, open Settings » Permalinks and click Save Changes once to flush rewrite rules after the move. This simple step fixes many issues that appear after a WordPress site migration.
How Do You Avoid Downtime During Migration?
You avoid downtime by building and testing the migrated site on staging first, then lowering DNS TTL ahead of time, and finally switching DNS during low-traffic hours. Keeping the old site online for several days ensures visitors who still see cached DNS records do not face errors during your WordPress blog migration.
Post-Migration Checks and SEO Fixes
After the migration, your job is not finished. You must test your blog on the new host and protect your SEO visibility so readers and search engines can find everything. This post-migration phase is where your WordPress migration checklist protects rankings.
Test Critical Blog Features
Start by testing the homepage, top traffic posts, archive pages, search, and pagination. Then submit a test comment, send a message through your contact form, and verify any email opt-in forms still connect to your email marketing service after the WordPress site migration.
From the Dashboard, go to Appearance » Menus and review your navigation for broken or outdated menu items.
Fix Internal Links, Media, and Redirects
If you changed domains or moved from HTTP to HTTPS, internal links and image URLs may still point to the old address. Many migration plugins handle this, but you should still spot check. Configure 301 redirects from old URLs to new ones, especially if any slugs or paths changed, and include redirects in your blog migration checklist.
For structured internal links, you can use a guide like Beginner Guide to Internal Linking in WordPress to refine how your posts connect after WordPress blog migration.
Reconnect Analytics and Search Console
Make sure your analytics tracking code (such as Google Analytics) still fires on the new site. Then verify that your blog is added to Google Search Console under the correct domain and submit an updated XML sitemap so search engines can discover your migrated content faster another key step on any WordPress migration checklist.
If you use SEO plugins, verify that canonical URLs, XML sitemaps, and meta tags still generate correctly. Consider checking out Analytics Setup WordPress Google Analytics if you want a deeper analytics configuration after your WordPress migration.
Fix Common Migration Problems
Even with careful planning, migrations can create odd bugs. It helps to know the most frequent issues and how to fix them quickly so your WordPress blog migration stays on track.
Fix White Screen or PHP Errors
A white screen or error message usually means a plugin conflict, memory issue, or a partial file upload. Deactivate all plugins via SFTP by renaming the plugins folder, then reactivate them one by one until you find the culprit. Also confirm your PHP version matches your theme and plugins to avoid issues during WordPress site migration.
Fix Mixed Content and SSL Warnings
When moving from HTTP to HTTPS, images and scripts that still use old HTTP URLs cause browser warnings. You can often fix this by forcing HTTPS in your SSL plugin settings, running a database search and replace for old URLs, and clearing all caches again as part of your WordPress migration checklist.
Fix Login and Redirect Loops
Login issues often come from mismatched site URLs or cached redirects. Check the WordPress and Site Address settings in General settings, verify any security plugin settings, and clear browser and server caches. If you still cannot log in, temporarily disable security plugins via SFTP while you stabilize your WordPress migration.
Conclusion
A solid WordPress migration checklist lets you treat your blog move like a routine process instead of a risky one-time event. When you back up, prepare, test on staging, and follow a structured step by step flow, you protect your content, rankings, and readers trust.
The next smart step is to document your own version of this checklist, tailored to your blogs plugins, theme, and hosting stack. Save it alongside your regular backup and maintenance plan so the next WordPress blog migration whether in six months or three years feels familiar rather than stressful.
More WordPress Guides You Might Like
These related resources help you keep your migrated blog fast, secure, and easy to manage after completing your WordPress migration checklist.
- WordPress Maintenance Plans for Growing Businesses
- WordPress Performance Speed Optimization
- WordPress SEO â Complete Beginnerâs Guide
- How to use ai in WordPress
- Install WordPress step by step
You can work through these guides over time to refine performance, SEO, and maintenance so each future WordPress site migration becomes easier and less risky.