WordPress Speed Basics
A beginner-friendly guide to understanding what really makes your WordPress site fast (or slow).
When people say “WordPress is slow,” they’re usually feeling the symptoms: pages that hang, stores that time out, or blogs that lose visitors before the first paragraph loads. The good news is that most WordPress speed issues come from a few predictable bottlenecks that you can learn to recognize and fix.
This guide walks you through the basics of WordPress speed: what “fast” really means, which parts of your site matter most, and which changes are safe to try first. Think of it as your mental model for performance before you dive into advanced checklists and heavy-duty optimization plugins.
By the end, you’ll know how hosting, themes, plugins, images, caching, and testing all fit together, so you can make smarter decisions and stop guessing when something makes your site slower.
Prerequisites
You don’t need to be a developer to follow this guide, but you should be comfortable doing basic admin tasks in WordPress. Before you start, make sure you have:
- Access to your WordPress admin dashboard (yoursite.com/wp-admin).
- Login details for your hosting control panel (or at least support chat access).
- Permission to install, deactivate, and update plugins and themes.
- A backup solution in place so you can roll back if anything goes wrong.
Step 1: Understand What “Speed” Really Means
“Speed” is not just one number. When a visitor opens your WordPress site, the browser requests your server, WordPress generates HTML, then the browser downloads and renders CSS, JavaScript, fonts, and images. Any one of these layers can slow everything down.
For practical purposes, think about speed in three layers: server speed (hosting and PHP), WordPress speed (themes, plugins, database), and front-end speed (images, CSS/JS, fonts). When you know which layer is slow, you can fix the right thing instead of randomly changing settings.
- Server layer: Hosting plan, PHP version, database performance, and caching on the server.
- WordPress layer: Your theme, active plugins, page builder, and how much work WordPress does per request.
- Front-end layer: Image sizes, number of requests, script weight, fonts, sliders, and embeds.
Step 2: Learn the Key Speed Metrics for WordPress
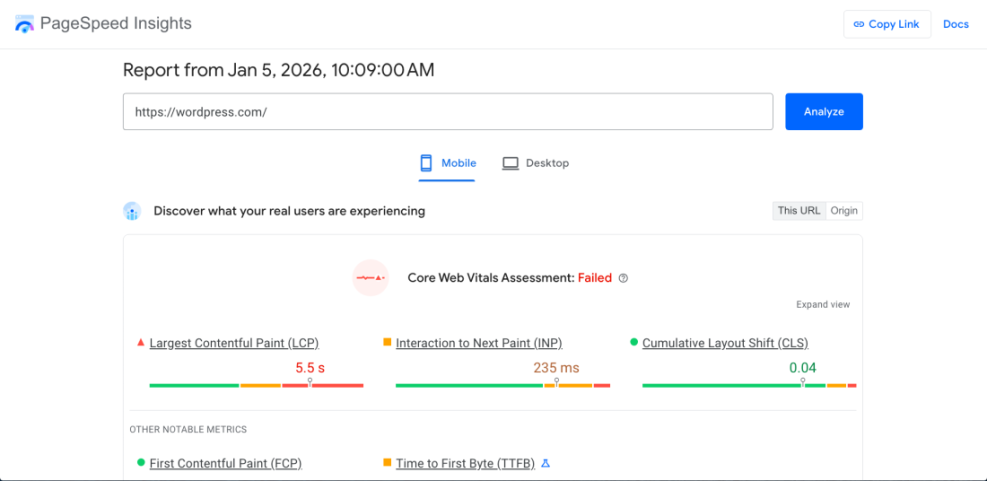
Speed tools throw many acronyms at you, but you only need a few to interpret results. Modern tools like PageSpeed Insights and Web Vitals focus on what users actually experience instead of raw “load time.”
- Largest Contentful Paint (LCP): When the main content (hero image, heading, or big block) is visible. Aim for under ~2.5 seconds on real users.
- Interaction to Next Paint (INP): How responsive your site feels when users interact. Slow scripts and heavy page builders can make this worse.
- Cumulative Layout Shift (CLS): Measures “page jumpiness” while loading. Big shifts often come from images without dimensions or late-loading ads and embeds.
- Time to First Byte (TTFB): How long your server takes to start responding. This is strongly influenced by hosting and server-level caching.
When you run a test, don’t chase a perfect 100/100 score. Instead, use these metrics to spot where the delay is: server response, heavy images, render-blocking scripts, or layout shifts.
If you want a deeper dive into how Core Web Vitals relate specifically to WordPress and SEO, explore our dedicated beginner’s guide to WordPress speed and Core Web Vitals: beginner guide to WordPress speed and Core Web Vitals.
Step 3: Get the Foundation Right with Hosting and PHP
Your hosting environment is the foundation of WordPress speed. Even the best-optimized theme and caching setup cannot compensate for an overloaded, underpowered server. If TTFB is consistently high, hosting is often the culprit.
There are three big levers you can usually control with your provider: hosting type, PHP version, and built-in caching.
- Check your hosting type. Shared plans are fine for small sites, but cheap oversold hosting causes slowdowns at busy times. Managed WordPress or performance-focused hosting usually gives you better caching and fewer noisy neighbors.
- Use a current PHP version. Modern PHP versions are noticeably faster and more resource-efficient. Look in your hosting panel for “PHP Manager” or ask support which version your site is using.
- Enable server-level caching if available. Many hosts offer page caching, object caching, or edge caching built in. Turn those on before installing multiple caching plugins.
If hosting is your bottleneck, moving to a performance-focused provider can be the single biggest upgrade you make. For more detail on what to look for, see our guide on choosing fast WordPress hosting.
Step 4: Control Themes, Plugins, and Page Builders
Most WordPress speed problems come from a heavy theme, too many plugins, or an aggressive page builder. Each adds CSS, JavaScript, and database queries that your server must handle for every request.
Instead of guessing, start by auditing what is actually running on your site and removing what you don’t need. A lighter stack almost always loads faster and is easier to maintain.
Audit your active theme and plugins
- In WordPress admin, go to Appearance > Themes and note your active theme and any bundled features (sliders, page builders, mega menus).
- Go to Plugins > Installed Plugins and list all plugins that are active. Look for overlapping functionality (multiple SEO, cache, slider, or form plugins).
- On a staging site, deactivate non-essential plugins one by one and re-test speed to see which ones make the biggest difference.
If you are comfortable with SSH and WP-CLI, you can list active plugins from the command line. Run this from your WordPress root directory:
# SSH terminal with WP-CLI installed
wp plugin list --status=active --fields=name,version,updateChoose lean building blocks
- Prefer a well-coded, lightweight theme over feature-heavy multipurpose themes if you don’t need everything they ship.
- Use a single primary page builder (or the Block Editor) instead of stacking multiple builders and layout plugins.
- Avoid “do everything” plugins that add dozens of modules you’ll never use, especially if they load scripts on every page.
Step 5: Use Caching and a CDN the Right Way
Caching is how you avoid rebuilding the same page over and over again for every visitor. Instead of running all WordPress and database logic on each request, your server can serve a pre-generated HTML version of the page.
There are four main types of caching you’ll encounter as a WordPress site owner: page cache, browser cache, object cache, and CDN edge cache. Understanding the basics will help you configure them without breaking your site.
- Page cache: Stores full HTML pages so your server doesn’t re-run WordPress on every visit.
- Browser cache: Tells visitors’ browsers to reuse static files (CSS, JS, images) instead of downloading them on every page view.
- Object cache: Caches database queries and PHP objects to speed up repeated operations (very helpful for WooCommerce and membership sites).
- CDN (Content Delivery Network): Serves static assets (and sometimes HTML) from edge servers closer to your visitors.
- Start with your host’s caching. Many managed WordPress hosts provide built-in caching. Use that first instead of adding multiple overlapping plugins.
- Add a single reputable caching plugin if needed. Choose one mainstream caching plugin rather than stacking several “speed booster” tools together.
- Enable a CDN for global audiences. If you have visitors from multiple countries, a CDN can significantly reduce latency.
Step 6: Test, Compare, and Track Your Site Speed
Without testing, you’re just guessing. The goal of testing is not to impress yourself with a single perfect benchmark, but to establish a realistic baseline and then verify that each change you make is actually an improvement.
Focus on testing a small set of key URLs: homepage, a typical blog post, an important landing page, and (if applicable) your shop or checkout. Run multiple tests and look for consistent patterns, not one-off spikes.
- Pick one or two tools (for example, PageSpeed Insights and GTmetrix) and use them consistently.
- Test from a location close to your main audience when possible.
- Record key metrics like LCP, INP, CLS, and TTFB before and after significant changes.
If you want a structured process for testing and retesting without missing anything important, follow our dedicated WordPress speed test checklist.
Step 7: Fix Common WordPress Speed Problems
Once you understand your metrics and have a testing routine, you can start targeting specific issues. Most real-world speed problems fall into a handful of patterns.
Problem 1: Huge images and media
Uncompressed, oversized images are one of the fastest ways to slow a WordPress site down. Even a few multi-megabyte hero images can ruin LCP on mobile connections.
- Resize images before upload to realistic dimensions (for example, 1600px wide for full-width banners).
- Use modern formats like WebP where supported.
- Enable lazy loading for below-the-fold images to delay them until the user scrolls.
Problem 2: Too many scripts, fonts, and embeds
Every extra tracking script, widget, social embed, and font adds weight and can create render-blocking requests. Third-party scripts are especially dangerous because you don’t control their speed.
- Remove unnecessary third-party scripts and widgets from templates.
- Limit custom fonts and font weights; use system fonts where possible.
- Embed only what you truly need on high-traffic pages.
Problem 3: Slow admin and editor experience
If your WordPress dashboard feels slow, editors will be less productive and may assume the entire site is slow. Admin slowness often points to heavy plugins, database bloat, or insufficient server resources.
- Audit and remove high-overhead plugins that run on every admin screen.
- Clean up old revisions, transients, and logs using a reputable optimization plugin or scheduled maintenance task.
- Consider upgrading RAM or CPU if your host offers plans tuned for higher PHP worker counts.
For a structured, beginner-friendly path from identifying issues to applying specific fixes, combine what you’ve learned here with a complete optimization guide such as our beginner guide to WordPress speed optimization.
From Basics to a Fast, Stable WordPress Site
WordPress speed becomes much less mysterious once you see it as a combination of hosting, WordPress itself, and front-end assets. Each layer can be measured, tested, and improved in isolation instead of guessing at random settings.
By understanding key metrics, tightening up your theme and plugins, using caching wisely, and testing regularly, you give yourself a repeatable process instead of a one-time “speed boost.” Keep your stack lean, review changes carefully, and you’ll be ahead of most WordPress site owners who never look beyond a single performance plugin.
Further Reading
- Step-by-Step Guide to WordPress Speed Optimization
- WordPress Speed Optimization Checklist for Busy Site Owners
- WordPress Performance Tuning Beginner Guide
- WordPress Speed Optimization for New Bloggers