AI in WordPress is no longer a distant idea reserved for tech experts. You can use AI in WordPress to write better content, design pages faster, answer visitor questions, and automate repetitive tasks.
In this guide, you will see practical ways to use AI in WordPress even if you are a beginner. You will learn where AI fits into your existing workflow, which types of plugins to look for, and step by step actions you can take without breaking your site or hurting your SEO.
What You Need Before You Start Using AI
- An existing WordPress site where you have Administrator access.
- A modern theme that supports the block editor (Gutenberg) or a page builder.
- Basic familiarity with creating posts and pages in the WordPress editor.
- A backup solution in place so you can undo any experiments if needed.
- Optionally, an API key or account with an AI provider if your chosen plugin requires it.
You do not need to be a developer to start using AI in WordPress. Most AI features are added through plugins and simple settings screens.
Clarify Why You Want AI in WordPress
“Using AI” is too vague to guide good decisions. Before installing plugins, decide what you actually want AI to help you with.
- Write down your main bottleneck today: content writing, images, support, SEO, or something else.
- List tasks you repeat often, such as drafting blog posts, writing product descriptions, or replying to similar support questions.
- Decide your risk level: Do you want AI only as a helper, or are you comfortable letting it create first drafts automatically?
- Note any compliance or privacy rules you must follow so you do not send sensitive data to AI tools.
- Rank your priorities, for example 1) content speed, 2) SEO, 3) support automation, 4) code help.
Keep this list visible while you read the sections below so you can match AI options to your real needs instead of installing every trendy plugin.
Where You Can Use AI Inside WordPress
Most AI features in WordPress come from plugins that integrate with the block editor, page builders, forms, or your theme. Here are the most common areas where AI is useful:
- Content creation: Draft blog posts, product descriptions, headings, summaries, or FAQ sections.
- Image generation: Create featured images, hero sections, and illustrations without leaving the editor.
- SEO assistance: Suggest titles, meta descriptions, keywords, FAQs, or schema markup ideas.
- Chatbots and support: Add an AI chat widget that can answer basic questions from your documentation or pages.
- Automation and workflows: Use AI to classify content, tag posts, or trigger actions based on user behavior.
- Development help: Generate code snippets, CSS tweaks, or block patterns for more advanced users.
AI Methods in WordPress at a Glance
The table below summarizes the most common ways to use AI in WordPress, where they appear in your dashboard, and what they are best for.
| Method | Where You Use It | Main Purpose |
|---|---|---|
| AI Content Assistant in Editor | Post or page editor » AI button in toolbar or sidebar | Generate or improve headlines, paragraphs, summaries, and outlines directly while you write. |
| AI Image Generator | Media library, image block, or page builder widget | Create custom featured images, hero backgrounds, and illustrations without leaving WordPress. |
| AI SEO Helper | SEO plugin meta box under posts and pages | Suggest SEO titles, meta descriptions, keywords, and FAQs to optimize content faster. |
| AI Chatbot or Support Widget | Appearance » Widgets or plugin settings » Chat/Support tab | Answer common visitor questions 24/7 using your docs, posts, or product pages as training data. |
| AI Automation & Workflows | Automation plugin settings or WP-CLI / developer tools | Tag content, classify leads, and trigger actions using AI so you spend less time on manual tasks. |
Step 1: Install a Beginner Friendly AI Plugin
To get started safely, choose one main AI plugin that matches your top priority instead of installing many tools at once.
- From your WordPress dashboard, go to Plugins » Add New.
- Search for keywords like “AI content”, “AI assistant”, or “AI chat”.
- Look for plugins with high active installs, frequent updates, and recent reviews.
- Click Install Now, then Activate for the plugin you want to test first.
- Follow the plugin’s setup wizard, which may ask you to connect an API key or select which post types to enable AI for.
Most modern AI plugins add buttons inside the block editor so you can generate content or images from the same screen where you already write posts.
Step 2: Use AI to Draft and Improve Content
AI is most visible when it helps you write faster. Instead of staring at a blank editor, you can ask AI for a first draft and then edit it into your own voice.
- Create a new post under Posts » Add New in your WordPress dashboard.
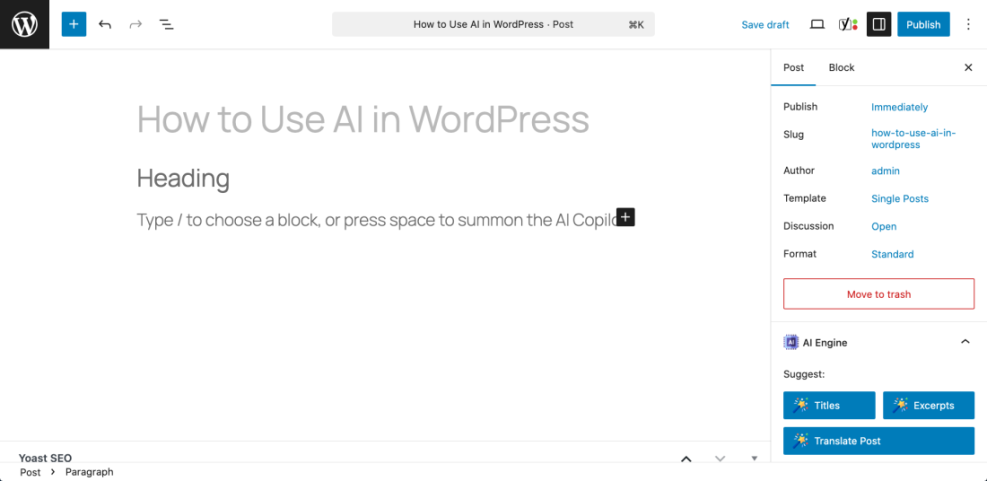
- Write a working title that clearly describes your topic, such as “How to Use AI in WordPress.”
- Open the AI panel or click the AI button usually located in the toolbar or sidebar of the block editor.
- Give the AI a specific prompt, for example: “Write a short introduction for a beginner friendly guide about using AI in WordPress.”
- Insert the generated text into your post, then immediately edit it to:
- Match your brand’s tone and style.
- Correct facts, examples, and internal links.
- Add personal experience or case studies AI cannot know.
- Use AI again to create section outlines, bullet points, or FAQ questions based on your main topic.
Think of AI as a fast assistant, not an automatic author. Your job is to guide it with clear prompts and then polish the output so it is accurate and unique.
Step 3: Generate Images with AI Inside WordPress
AI image tools can save time when you do not have custom photography or design resources for every post.
- Ensure your chosen AI plugin supports image generation or install a dedicated AI image plugin.
- In the post editor, add an Image block or open the Featured Image panel.
- Click the Generate with AI or similar button provided by your plugin.
- Describe the image you want, including style and colors, for example: “Flat illustration of a person using WordPress with AI icons around the screen.”
- Review the generated images, choose the closest match, and insert it into your post.
- Add alt text that describes the image for accessibility and SEO instead of leaving the AI description as-is.
Always check licensing details in your plugin’s documentation and avoid generating images that could infringe on trademarks or real people’s likeness without permission.
Step 4: Use AI for SEO Titles, Meta Descriptions, and FAQs
AI can speed up on-page SEO by suggesting titles, meta descriptions, and FAQs, especially when integrated into a WordPress SEO plugin.
- Install and activate a reputable SEO plugin if you have not already.
- Open a post or page and scroll to the SEO settings section under the editor.
- Look for an AI Suggest or Generate button next to the SEO title or meta description fields.
- Click the button and review the suggested title and description. Make sure they:
- Match the real content of the page.
- Include your focus keyword naturally.
- Stay within character limits so they are not cut off in search results.
- Use AI to propose FAQ questions, then add your own answers based on expert knowledge or real customer inquiries.
- Publish and monitor how these pages perform over time, adjusting manually if needed.
AI can help spark better SEO ideas, but you remain responsible for keyword research, search intent, and aligning content with what your audience actually needs.
Step 5: Add an AI Chatbot or Knowledge Base Assistant
AI chatbots inside WordPress can answer common questions and guide visitors to the right pages, especially when connected to your existing documentation or posts.
- Install a chatbot or knowledge base plugin that supports AI chat integration.
- Follow the setup wizard to connect it to your documentation, blog posts, or product pages.
- Configure which pages the chat widget appears on, such as your help center, pricing page, or dashboard area.
- Write a short welcome message that explains what the AI assistant can and cannot help with.
- Test the chatbot with real questions your visitors ask and refine its settings, training data, or prompts.
For best results, keep your documentation updated. AI chat is only as helpful as the information you give it to work with.
Step 6: Automate Repetitive Tasks with AI
Once you are comfortable with AI content and chat, you can start using AI for small automations that save time every week.
- Tagging and categorizing posts: Suggest categories or tags based on the content of each post.
- Summarizing long content: Create short summaries for newsletters, social media, or archive pages.
- Lead qualification: Score or classify form submissions so your team can prioritize responses.
- Content repurposing: Turn long posts into email sequences, social captions, or quick tips.
- Look for automation or workflow features in your existing AI plugins.
- Start with one simple automation, such as generating a summary every time you publish a post.
- Track whether the automation actually saves time or improves results before adding more.
Best Practices for Using AI in WordPress Safely
AI is powerful, but it can also introduce risks if you rely on it blindly. Follow these best practices to stay safe and effective.
- Always review AI output: Never publish AI content or responses without a human review for accuracy, tone, and brand fit.
- Protect sensitive data: Do not paste private customer information, passwords, or internal financial data into AI prompts.
- Avoid duplicate content: Use AI for unique drafts and ideas, not for mass-generating thin or spun content.
- Be transparent: Consider disclosing when you use AI assistance, especially in support or educational content.
- Monitor performance: Use analytics and search console data to confirm AI-assisted pages are performing as expected.
Security, Privacy, and Compliance Considerations
Because AI plugins often send text or data to external services, you should verify how they handle information.
- Read the privacy policy of your AI provider and confirm where data is processed and stored.
- Check whether prompts and outputs are used for training and if you can opt out.
- Update your own privacy policy to mention any AI tools that process user data.
- Disable AI features on sensitive post types, such as internal notes or private customer areas.
- For EU or similar jurisdictions, make sure your AI usage aligns with GDPR and other regulations.
Next Steps: Build a Simple AI Workflow in WordPress
Once you have AI running in one area of your site, expand slowly with a simple workflow.
- Pick one content type, such as blog posts or product pages, and define a repeatable AI-assisted process.
- Use AI to draft the outline, introduction, and conclusion, but write key sections and examples yourself.
- Generate a featured image and a few in-post illustrations with AI, then compress and optimize them.
- Have your SEO plugin’s AI suggest titles and meta descriptions, then refine them manually.
- Review analytics after a month to confirm that your new AI-assisted process maintains or improves quality and performance.
By treating AI as a helper you design into your WordPress workflow, you gain speed and consistency without giving up control.