How to Test a Staging Store Before Going Live
A step-by-step WooCommerce staging checklist so you can launch with confidence
Launching a WooCommerce store without proper testing is like opening a physical shop without checking if the doors unlock or the cash register works. Broken checkout, misconfigured payments, or slow pages can cost you sales and damage trust from day one.
Your staging store is the safe place to find and fix those problems before your customers ever see them. In this guide, you’ll walk through a complete, repeatable checklist to test your staging store — from browsing and checkout to payments, performance, and security — so going live feels boring (in a good way).
If you haven’t created a staging copy of your WooCommerce site yet, start with this guide on how to create a WordPress staging site and then come back to this checklist.
Prerequisites
Before you begin testing, make sure your staging environment is ready and safe to use. You don’t want real customers or real money flowing through your test store.
- A working WordPress + WooCommerce staging site cloned from your live store (or pre-launch build).
- Administrator access to both staging and live sites.
- Sandbox or test credentials for your payment gateways (e.g. Stripe, PayPal, WooCommerce Payments) and any shipping/fulfillment tools.
- Access to your hosting control panel or server logs (useful for performance and error troubleshooting).
- At least one test email inbox to receive order and notification emails.
Step 1: Confirm Your Staging Store Is an Exact Copy
Your tests are only useful if staging behaves like your future live store. Start by confirming that your staging site matches your intended production environment.
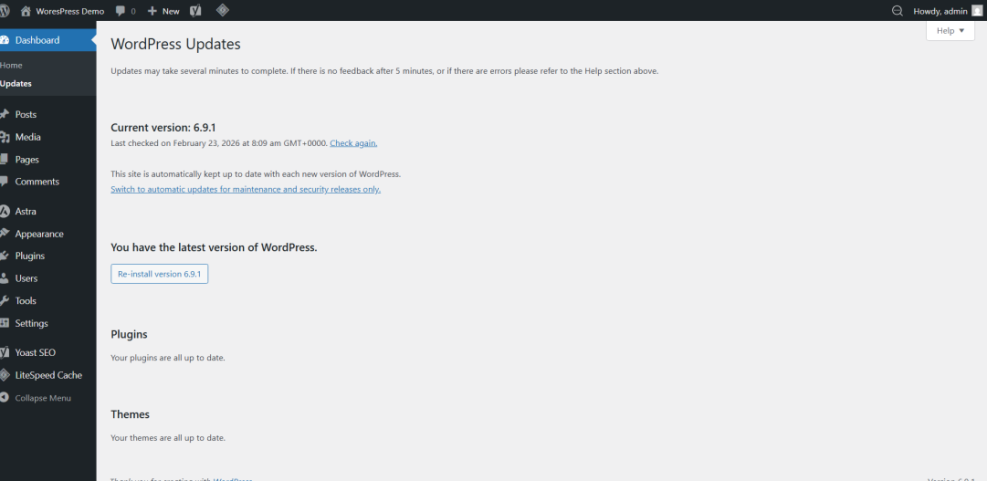
- Compare core software versions. In your WordPress dashboard, go to Dashboard > Updates and verify that WordPress, your theme, WooCommerce, and key plugins are the versions you plan to use live.
- Check active plugins and theme. Go to Plugins > Installed Plugins and Appearance > Themes to confirm that the same theme and plugins are active as on your current (or planned) live store.
- Verify URLs and site settings. Under Settings > General, check that the WordPress Address (URL) and Site Address (URL) clearly show the staging domain or subdomain, not your live domain.
- Check WooCommerce store settings. In WooCommerce > Settings, confirm that currency, base location, taxes, and shipping zones match what you want in production.
Step 2: Configure Safe Testing Settings (Email, Payments, SEO)
Now that staging mirrors your real store, you need to “defang” it so tests don’t leak to real customers, inboxes, or search engines.
2.1 Switch payment gateways to sandbox mode
- Go to WooCommerce > Settings > Payments.
- Open each payment method (e.g. Stripe, PayPal, WooCommerce Payments, bank transfer) and look for Test mode or Sandbox options.
- Enable test mode and enter sandbox API keys or credentials from your payment provider.
- Save changes and perform a quick “test checkout” later to confirm that test transactions appear in your payment dashboard, not as real charges.
2.2 Redirect or contain outgoing emails
- Go to WooCommerce > Settings > Emails and change any “From” or recipient addresses to your own test inboxes (for both customer and admin emails).
- If your host or email service offers a catch-all or redirect for staging, configure it so all emails from the staging domain go to a test mailbox.
- Note which test addresses you use so you can search for and verify all expected emails later.
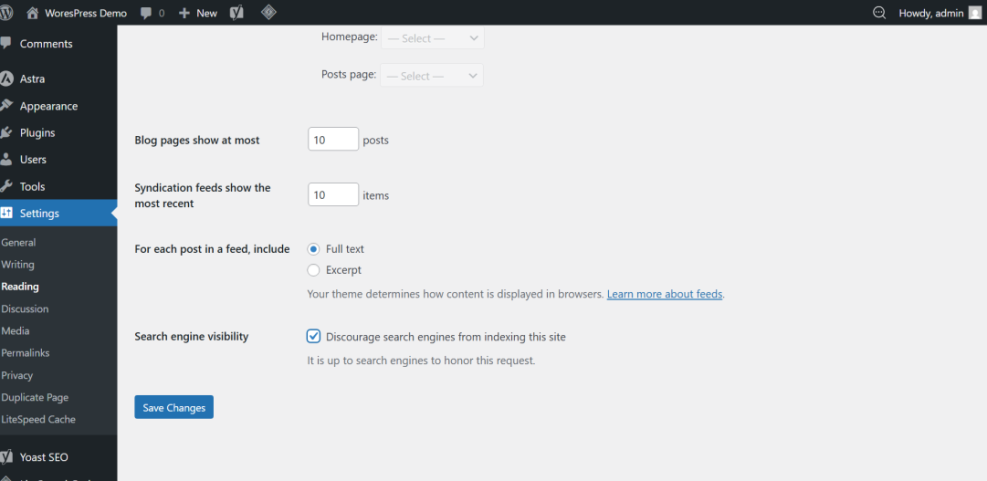
2.3 Block search engine indexing on staging
- In WordPress, go to Settings > Reading.
- Check the box for “Discourage search engines from indexing this site”.
- Ensure staging uses a different robots.txt or password protection at the server level if possible.
Step 3: Test Browsing, Search, and Product Pages
Real customers will experience your store first through browsing and product pages, so your testing should start there.
- Homepage and key landing pages. Visit your homepage, main shop page, and any important landing pages. Check that images, hero banners, and featured products display correctly and links work.
- Category and tag archives. Click through each major product category and key product tags. Verify product counts, sorting options, and filters behave as expected.
- Search functionality. Use the site search for:
- Product names (exact and partial).
- SKUs (if supported).
- Common phrases your customers might type.
Confirm that relevant products appear and no error pages or irrelevant posts dominate results.
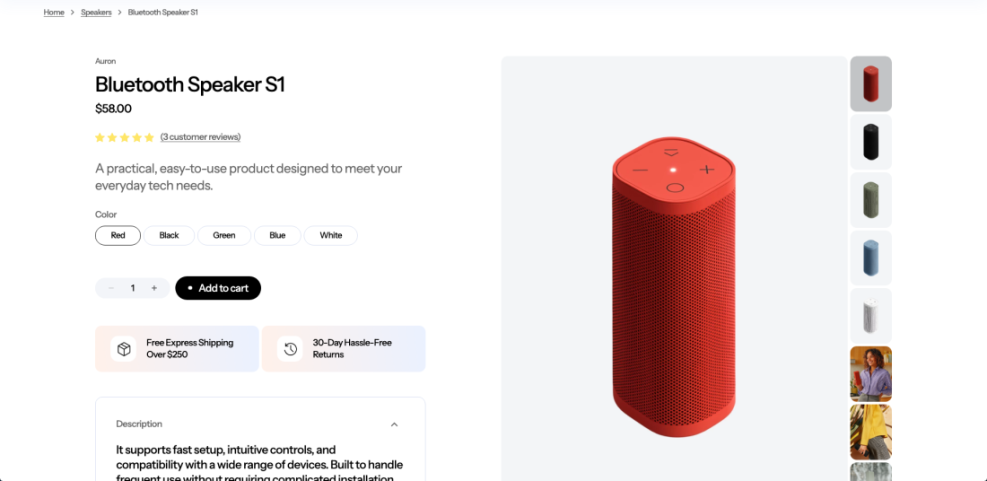
- Single product pages. For every major product type (simple, variable, grouped, subscription, downloadable), check:
- Prices, sale prices, and stock messages.
- Variation dropdowns and add-to-cart behavior.
- Images, galleries, and zoom/lightbox features.
- Shipping information, dimensions, and related products.
Step 4: Test Cart, Coupons, and Checkout
Most revenue-killing bugs appear in the cart and checkout flow. This is where you should test carefully and in multiple scenarios.
- Add different product combinations. Test:
- Single simple product.
- Multiple different products.
- Variable products with different options.
- Subscription and downloadable items if you sell them.
- Manipulate the cart. On the cart page:
- Change quantities and click Update cart.
- Remove items and confirm totals update instantly.
- Test any “continue shopping” or upsell links.
- Apply coupons and discounts.
- Test valid coupons (percentage, fixed, free shipping).
- Test expired or invalid coupons to confirm error messages are clear.
- Verify automatic discounts or cart rules work only under the correct conditions.
- Walk through the checkout page.
- Fill in billing and shipping details using realistic test data.
- Check that taxes and shipping update correctly when addresses change.
- Ensure required fields are enforced and error messages are understandable.
For more ideas on streamlining the checkout itself, see this guide to faster WooCommerce checkouts and fold its recommendations into your testing scenarios.
Step 5: Test Payments and Order Management
Once the cart and checkout forms behave correctly, move on to full test orders using sandbox payments. This validates the last critical step before money changes hands.
- Place test orders with every gateway.
- Use each active payment method in turn (credit/debit card, PayPal, bank transfer, cash on delivery, etc.).
- For card gateways, use the official “test card” numbers from your provider.
- Mix order totals (small, large, discounted) to see if anything breaks.
- Check WooCommerce order records.
- Go to WooCommerce > Orders and confirm every test purchase appears.
- Verify order statuses (pending payment, processing, completed, failed, refunded) update correctly.
- Test manual status changes, refunds, and order notes.
- Verify emails and customer communication.
- Confirm customers receive order confirmation, payment confirmation, and status update emails.
- Confirm the store admin receives new order notifications.
- Check that links in emails (view order, track order, account login) point to the correct staging URLs.
- Check third-party dashboards.
- Log into Stripe, PayPal, or your payment provider dashboards.
- Confirm test transactions are clearly marked as test or in a sandbox environment.
- Verify any webhooks (for subscriptions, refunds, etc.) behave as expected.
Step 6: Test Performance and Caching
Even if everything “works,” a slow store will still lose money. Use staging to find performance problems before customers do.
- Measure core pages. Test load time for:
- Homepage.
- Shop and category pages.
- Single product pages.
- Cart and checkout.
Aim for consistently fast responses, especially on cart and checkout.
- Verify caching behavior.
- Ensure your caching plugin excludes pages like cart, checkout, and account.
- Log in as a customer and confirm you don’t see cached data from another user (e.g. someone else’s cart contents).
- Test clearing cache and see if changes deploy cleanly.
- Test under light “load.”
- Have multiple testers browsing and placing test orders at the same time.
- Watch for slowdowns, timeouts, or 500 errors in your hosting error logs.
If you want a deeper, store-wide approach to tuning WooCommerce, walk through this WooCommerce optimization guide after you complete your basic staging checks.
Step 7: Review Security and User Roles
A staging store still needs good security practices, but its main job is to prepare your live store to be safe on day one. Use this step to clean up access and permissions.
- Review user roles and accounts.
- In Users > All Users, confirm which accounts will have Administrator or Shop Manager access.
- Remove or downgrade any temporary accounts used during development that won’t be needed post-launch.
- Protect staging access.
- Add basic HTTP authentication at the server level if possible (username/password before WordPress login).
- Confirm that no staging URL is linked from public pages or email templates.
- Check for obvious vulnerabilities.
- Make sure there are no default “admin/admin” type logins.
- Confirm that directory listing is disabled and no debug logs are exposed publicly.
Step 8: Create a Go-Live Checklist and Final Sync
Once your tests pass, capture what you did and plan exactly how you’ll move from staging to live. This prevents last-minute surprises.
- Document all changes made on staging.
- Theme tweaks (CSS, templates, child theme changes).
- Plugin additions or removals.
- WooCommerce settings changes, shipping/tax rules, and payment gateway configurations.
- Decide how you’ll deploy.
- If your host supports “push staging to live”, review what will be overwritten (files, database, or both).
- If you’ll configure live manually, repeat key setting changes and theme/plugin updates on the live site.
- Create a launch-day smoke test list.
- Homepage and shop open correctly on the live URL.
- Key products, cart, checkout, and at least one test payment (using small real amount or QA discount) all work.
- Order emails arrive as expected on live.
Lock In Confidence Before You Go Live
Testing your staging store isn’t glamorous, but it’s one of the highest-ROI tasks you can do before launch. By walking through browsing, cart, checkout, payments, performance, and security step-by-step, you dramatically reduce the chance of nasty surprises on day one.
Use this checklist as a repeatable workflow before every major update or redesign. Over time, your team will get faster, your store will stay more stable, and your customers will simply experience a WooCommerce shop that “just works.”
Further Reading
- WooCommerce Performance Tips for Faster Stores
- Best WordPress Backup Plugins for Online Stores
- WordPress Maintenance and Backup Plan for Site Owners
- WooCommerce Hardening Checklist for Secure Stores