If you want to learn how to start a Blog WordPress site but feel overwhelmed by hosting, themes, and plugins, this guide will walk you through every click. We will focus on a self hosted WordPress.org setup using a classic blogging theme and the Classic Editor so your dashboard looks simple and familiar.
By the end, you will have a live Blog WordPress site with a custom domain, a clean theme, essential plugins, and your first post published and ready to share. You can reuse this checklist whenever you want to improve, clean up, or expand your Blog WordPress setup and review how to start a Blog WordPress site the right way.
What You Need to Get Started
Before you install anything, make sure you have a few basics ready so the whole Blog WordPress setup process goes smoothly from the first step.
- A domain name idea (for example, yourblogname.com).
- A shared or managed WordPress hosting account for your Blog WordPress site.
- About 30–60 minutes of uninterrupted time.
- A payment method (for domain and hosting).
- Basic content ideas for your first 3–5 posts on your new Blog WordPress site.
Step 1: Plan Your Blog Foundations
Before you buy hosting or install anything, clarify what your Blog WordPress site is about and who you want to reach. A focused plan makes every later decision easier, from theme choice to content strategy, and keeps your Blog WordPress project from feeling random or confusing.
This planning step is really the first part of how to start a Blog WordPress site, because it shapes your content, categories, and the way visitors experience your blog.
- Write down your main topic and audience (for example, “beginner gardening for apartment renters”).
- List 10–15 post ideas that solve real problems for that audience. Imagine how each idea will look as a published post on your new Blog WordPress site.
- Brainstorm 5–10 domain names that are short, easy to spell, and clearly related to your topic.
- Check domain availability with your preferred hosting provider’s domain search tool.
- Read How to Choose a WordPress Blog Niche for help narrowing your focus if you are stuck.
Step 2: Choose Hosting and Install WordPress
Your hosting provider is the foundation of your Blog WordPress site. Good hosting keeps your blog fast and stable, even when traffic grows, and makes it simple to maintain backups and updates. Getting this right is a core part of how to start a Blog WordPress site that loads quickly and feels reliable.
- Open your hosting provider’s website and choose a plan that specifically mentions WordPress support for blogs.
- Compare beginner friendly options in How To Choose The Right WordPress Hosting if you are unsure.
- Register your chosen domain during checkout or connect a domain you already own.
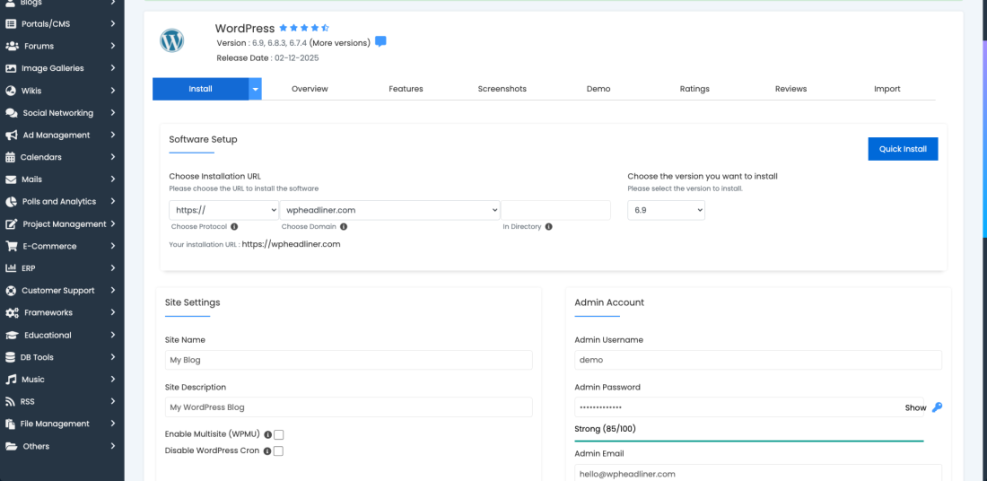
- Log in to your hosting control panel (often called cPanel or Dashboard).
- Find the one click installer section, usually labeled Softaculous Apps Installer, WordPress Installer, or Apps.
- Click WordPress in the installer list, then click Install.
- Fill in the fields for Site Name, Site Description, Admin Username, Admin Password, and Admin Email.
- Choose HTTPS and the correct domain from the Domain dropdown to avoid installing to the wrong location.
- Click Install and wait for the confirmation screen with your login URL (usually https://yourdomain.com/wp-admin).
- Bookmark that login URL immediately in your browser so you can always reach your Blog WordPress dashboard.
- For a more detailed walkthrough, see How To Install WordPress on Any Host.
To verify success, open your login URL in a new tab and sign in. If you see the WordPress dashboard with the left sidebar menu, your Blog WordPress installation worked.
Step 3: Configure Core Site Settings
Default WordPress settings are generic and not optimized for blogging or SEO. Configure them now so your URLs, time zone, and basic info are correct from day one, instead of fixing them later when your Blog WordPress site already has traffic.
- Log in at https://yourdomain.com/wp-admin using the admin credentials you created for your Blog WordPress site.
- In the left sidebar, go to Settings » General.
- Set Site Title to your blog name and Tagline to a short, descriptive phrase that matches your Blog WordPress topic.
- Confirm your WordPress Address (URL) and Site Address (URL) both show HTTPS.
- Scroll down and set Timezone, Date Format, and Time Format to your preference.
- Click Save Changes.
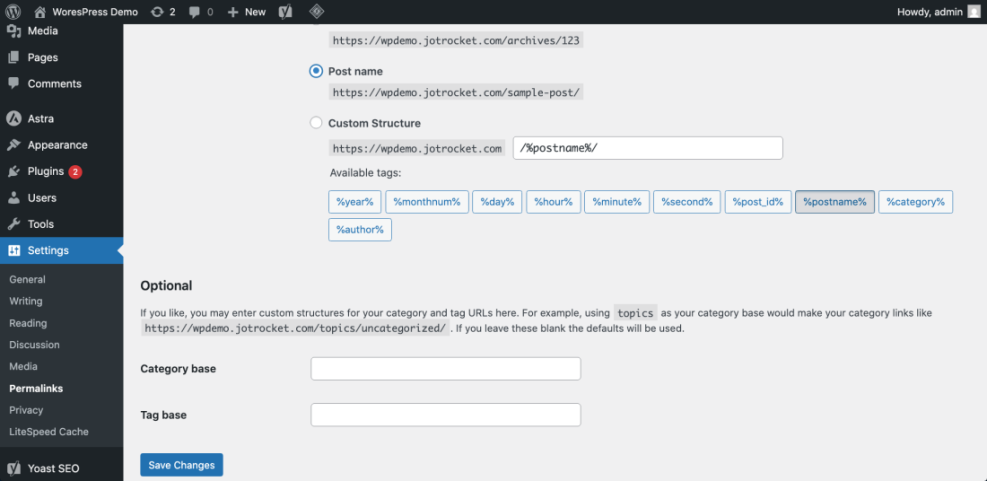
- Next, go to Settings » Permalinks.
- Select the Post name option so your URLs look like /my-first-blog-post/, which is ideal for a WordPress blog.
- Click Save Changes again.
- Read Beginner Guide to WordPress Permalinks for more permalink tips.
To verify success, open one of the default posts from the Posts » All Posts screen and view it. The browser address bar should show a clean URL ending with the post slug, which looks professional for any Blog WordPress site.
Step 4: Choose and Customize Your Theme
Your theme controls the overall look, typography, and layout of your Blog WordPress website. Start with a lightweight, mobile friendly blog theme so speed and readability stay strong on every device.
- In the WordPress dashboard, go to Appearance » Themes.
- Click Add New to open the theme directory.
- Use the search box to find blogging themes with good ratings and regular updates.
- If you own a premium theme such as Jannah, click Upload Theme, choose the ZIP file, and click Install Now.
- After installation, click Activate on your chosen theme.
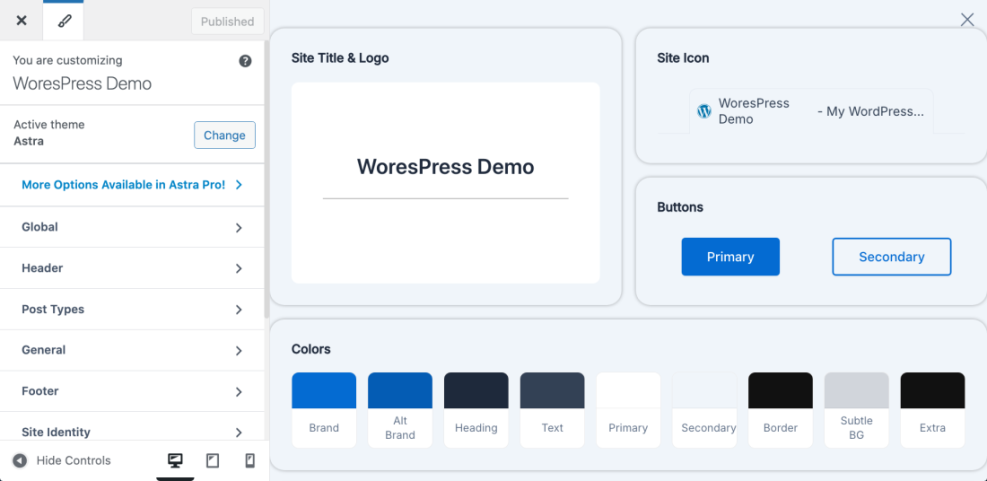
- Go to Appearance » Customize to open the live customizer.
- Adjust Site Identity, Colors, Typography, and Homepage Settings so your Blog WordPress design matches your brand.
- If you prefer the classic editing experience, go to Plugins » Add New, search for Classic Editor, install, and activate it.
- Review Free vs Premium WordPress Themes if you are unsure whether to invest in a paid theme.
To verify success, open your homepage in another tab. You should see the new design, logo, and typography changes reflected immediately on your Blog WordPress homepage and post listings.
Step 5: Install Essential Plugins
Plugins add features that WordPress does not include out of the box, such as SEO tools, contact forms, caching, and backups. A small, focused set of plugins is enough to power up your Blog WordPress site without slowing it down. This step is also where many guides on how to start a Blog WordPress site go wrong by recommending too many plugins—keep it lean.
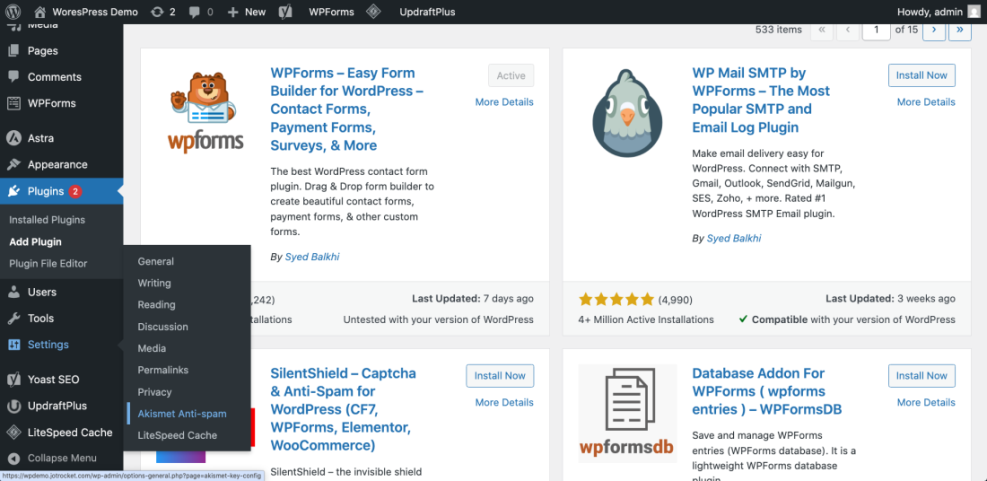
- In the dashboard, go to Plugins » Add New.
- Use the search bar to find each plugin by name.
- For each plugin, click Install Now, wait for installation, then click Activate.
- Install an SEO plugin (for example, Yoast or Rank Math) to control titles and meta descriptions for your Blog WordPress posts and pages.
- Install a caching plugin to keep your blog fast.
- Install a backup plugin that can send backups to cloud storage.
- Install an anti spam plugin like Akismet or a similar tool.
- Install a contact form plugin so visitors can reach you.
- Read Essential WordPress Plugins for New Blogs to choose vetted options.
To verify success, you should see your new tools listed under Plugins » Installed Plugins, and new menu items (for example, SEO or Contact) should appear in the sidebar of your Blog WordPress dashboard.
Step 6: Create Key Pages and Your First Post
With the structure in place, it is time to publish content. Start with a few core pages, then create your first post using the Classic Editor or block editor, so your Blog WordPress site feels complete and trustworthy when visitors arrive. This is the fun part of how to start a Blog WordPress project: turning your ideas into real articles.
- Go to Pages » Add New.
- Create an About page explaining who you are and what readers can expect from your Blog WordPress posts.
- Create a Contact page and insert your contact form shortcode from your form plugin.
- Create a Privacy Policy page (you can start with WordPress’s built in template under Settings » Privacy).
- Next, go to Posts » Add New.
- Enter a clear, benefit driven title for your first Blog WordPress post.
- Write your content using headings, short paragraphs, and bullet points for readability.
- Set a Featured Image and assign your post to one or more Categories.
- Click Publish when you are ready to show your first Blog WordPress article to the world.
- For a detailed walkthrough, see How to Create Your First Blog Post in WordPress.

To verify success, visit your homepage and blog page. You should see your new Blog WordPress post listed with its title, excerpt, and featured image.
Quick Reference: Ways to Edit Image Alt Text
As you add featured images and in post images to your Blog WordPress content, make sure you also add meaningful alt text for accessibility and SEO. Here is a quick table comparing the main alt text editing methods in WordPress:
| Alt Text Editing Method | Best For | Where You Edit Alt Text | Notes |
|---|---|---|---|
| Media Library (single image edit) | Setting a default alt text for images you reuse often | Media » Library » Attachment details » Alternative Text | Updates the attachment record; existing posts may still use the old alt text saved in their HTML. |
| Block Editor image block (Gutenberg) | Modern sites using the block editor fixing alt text inside posts and pages | Open post, select image block, edit Alt text in the Block settings panel | Directly changes the rendered <img> tag in that specific post or page. |
| Classic Editor image details popup | Legacy sites or themes that still use the Classic Editor | Click image in Classic Editor, click pencil icon, edit Alternative Text in Image Details | Works well on older sites; remember to save both the image details and the post. |
| Code snippet / theme filter | Developers who want automatic fallback alt text | Add a wp_get_attachment_image_attributes filter in a child theme or code snippets plugin | Good for filling blanks with a default, but still needs human-written alt text on important Blog WordPress images. |
Step 7: Launch and Grow Your Site
Once your first content is live, do a quick quality and performance check before you start promoting your Blog WordPress site. These steps help you avoid common beginner mistakes and make sure your blog is ready for visitors.
- Open your site on desktop, tablet, and phone to confirm your Blog WordPress layout is mobile friendly.
- Click every menu item, button, and internal link to ensure nothing returns a 404 error.
- Run a basic speed test using tools like PageSpeed Insights or GTmetrix.
- Create a free Google Analytics and Google Search Console account and connect your site following official setup guides.
- Share your first Blog WordPress posts with friends, communities, or social channels where your audience spends time.
- Plan a simple weekly publishing schedule so you keep adding high quality Blog WordPress content.
- Read WordPress Blog Launch Checklist before you promote heavily.
To verify success, confirm Analytics is recording page views and Search Console has detected your Blog WordPress URLs after a few days.
Conclusion You Are Ready to Grow
You have planned your niche, set up hosting, installed WordPress, configured essential settings, chosen a theme, installed key plugins, and published your first content. Your Blog WordPress site is now a real, working blog that you can grow with consistent publishing and smart optimization.
Now you know the practical steps of how to start a Blog WordPress site from scratch. From here, focus on publishing helpful Blog WordPress posts, improving site speed and security, and learning the basics of SEO so your ideal readers can find your Blog WordPress content in search results.