How to Make a WordPress Website
Step-by-Step Beginner Guide to Building a WordPress Website
Want to launch a website without learning to code? A WordPress website lets you publish pages, blog posts, and products with just a few clicks, and you stay in full control of your content and design.
In this step-by-step guide, you’ll make a self-hosted WordPress website using a domain name, reliable hosting, the Classic Editor, and a modern theme like Jannah. By the end, you’ll have a working site that looks professional, loads fast, and is ready for real visitors.
If you’re brand new to the platform, you may want to quickly review what WordPress is and how it works in this overview: what is WordPress, then come back and follow along with the build.
Prerequisites
Before you start creating your WordPress website, make sure you have a few basics ready. This keeps the setup smooth and avoids backtracking later.
- A clear idea of your site type (blog, business site, portfolio, or store).
- 20–30 minutes of uninterrupted time to complete the initial install.
- Access to a domain name registrar (like Namecheap or GoDaddy) and a hosting provider account.
- A notepad or document where you can store logins (domain, hosting, WordPress admin).
Step 1: Plan Your WordPress Website Structure
Planning what your site will include makes every later step easier, from choosing a theme to writing your first pages. Skipping this step often leads to messy navigation and confusing content.
Define your primary goal
Decide what your WordPress website should accomplish in the next 6–12 months. Examples include generating leads, selling services, sharing blog posts, or building an email list.
- If you want leads, you’ll need a clear contact or booking page.
- If you want to blog, you’ll need categories and an easy-to-browse blog layout.
- If you want to sell, you’ll eventually add WooCommerce or another e-commerce plugin.
List your essential pages
Most beginner sites can start with this core structure:
- Home
- About
- Services or Products (or “Blog” for content-focused sites)
- Contact
- Privacy Policy / Terms (you can use WordPress’s built-in privacy policy generator later)
Step 2: Choose a Domain Name and WordPress Hosting
Your domain is your web address (like example.com) and hosting is where your WordPress files live. Choosing well here affects speed, security, and SEO.
Pick a clear, brandable domain
- Choose a name that’s short, easy to spell, and related to your topic or brand.
- Prefer .com when possible, but local TLDs (like .co.uk, .com.au) are fine for local businesses.
- Avoid hyphens and unusual spellings that people won’t remember.
Choose WordPress-friendly hosting
Look for hosts that specifically advertise “WordPress hosting” with PHP 8+, free SSL certificates, and one-click WordPress install support. Avoid ultra-cheap plans that can’t handle traffic spikes or upgrades.
For a deeper breakdown of how to compare hosting plans, read this guide on choosing the right WordPress hosting and then pick a plan that fits your budget and traffic expectations.
Step 3: Install WordPress on Your Hosting Account
With your domain pointed to your hosting, the next step is to actually install WordPress. Most providers offer a one-click installer; some require a manual install.
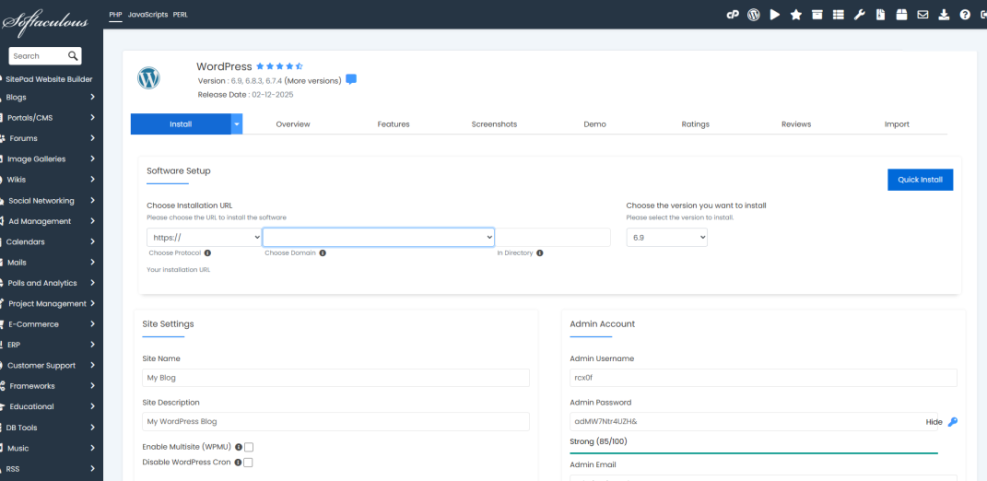
Option 1: Use a 1-click installer (recommended for beginners)
- Log in to your hosting control panel (often cPanel or a custom panel).
- Look for “WordPress”, “Softaculous”, or “Apps Installer”.
- Click the WordPress icon and choose Install.
- Select your domain from the dropdown list.
- Set your site name and admin username, email, and a strong password.
- Click Install and wait for the installer to finish.
Option 2: Manual install (for more control)
If your host doesn’t have a 1-click installer, you can install WordPress manually:
- Download WordPress from wordpress.org.
- Upload the files to your hosting account using the File Manager or FTP.
- Create a new MySQL database and user in your hosting control panel.
- Visit your domain in a browser and follow the on-screen installer.
When the install is complete, you can log in at https://yourdomain.com/wp-admin/ using the credentials you set.
Step 4: Configure Essential WordPress Settings
Out of the box, WordPress works — but a few key settings will make your website more professional and SEO-friendly.
Set your site title and tagline
- In your WordPress dashboard, go to Settings > General.
- Enter a clear Site Title (usually your brand name).
- Write a short, descriptive Tagline (e.g., “Web design services for small businesses”).
- Confirm that your WordPress Address (URL) and Site Address (URL) use
https://.
Choose SEO-friendly permalinks
- Go to Settings > Permalinks.
- Select the Post name option.
- Save changes.
This makes your URLs human-readable, like /about/ instead of /?p=123.
Set your timezone and language
- In Settings > General, set your Timezone to match your location.
- Set your Site Language to the language you’ll publish in.
This keeps scheduled posts and timestamps accurate for you and your visitors.
Step 5: Install and Configure a Professional Theme (Example: Jannah)
Your theme controls the visual design of your WordPress website. A well-coded, responsive theme like Jannah gives you modern layouts without sacrificing performance.
Install your theme
- Go to Appearance > Themes in your WordPress dashboard.
- Click Add New. If Jannah is a premium theme, click Upload Theme and select the
.zipfile from your computer. - Click Install Now, then Activate.
Run the theme setup wizard (if available)
Many modern themes include a setup wizard to import demo layouts and configure basic settings.
- After activation, follow any on-screen prompts such as “Run the Setup Wizard”.
- Choose a starter demo that matches your site type (blog, news, business, etc.).
- Import only what you need (layouts, not dummy posts, if you want a clean start).
For deeper design improvements later on, you can follow a full tutorial like how to design a WordPress website once your basics are in place.
Step 6: Enable the Classic Editor and Create Core Pages
By default, WordPress uses the Block Editor (Gutenberg). If you prefer the Classic Editor for a more traditional writing experience, you can switch with a plugin.
Install the Classic Editor plugin
- Go to Plugins > Add New.
- Search for Classic Editor.
- Click Install Now, then Activate.
- Go to Settings > Writing (if available) and set the default editor to Classic Editor.
Create your core pages
- Go to Pages > Add New.
- Create a Home page and add a short welcome message, a brief description of what you offer, and a call-to-action (CTA) button.
- Create an About page that explains who you are, your expertise, and why visitors should trust you.
- Create a Services or Blog page depending on your website’s main goal.
- Create a Contact page (you can add a contact form in a later step using a plugin).
Step 7: Build Your Navigation Menus and Widgets
Menus and widgets help visitors move through your site easily. Poor navigation is one of the fastest ways to lose visitors.
Create your main menu
- Go to Appearance > Menus.
- Click Create a new menu and name it something like “Main Menu”.
- In the left column, select your Home, About, Services/Blog, and Contact pages, then click Add to Menu.
- Drag and drop items to reorder them.
- Under “Menu Settings” or “Display location”, assign the menu to the Primary or Main menu location.
- Save the menu.
Configure your sidebar and footer widgets
- Go to Appearance > Widgets (or Appearance > Customize > Widgets in some themes).
- Add useful widgets like Search, Recent Posts, and Categories to your sidebar.
- Add a Text or Custom HTML widget to your footer for your copyright notice and basic contact info.
Step 8: Publish Your First Blog Posts
Even if your website isn’t primarily a blog, adding helpful articles builds trust, improves SEO, and gives visitors reasons to return.
Understand Posts vs Pages
- Pages are for timeless content (About, Services, Contact).
- Posts are for dated, categorized content that appears in your blog feed.
Create your first post
- Go to Posts > Add New.
- Write a helpful, beginner-friendly topic related to your niche (e.g., “How We Help Small Businesses Build Their First Website”).
- Use headings (
<h2>,<h3>) to break up sections. - Add at least one relevant image with descriptive alt text.
- Assign a category (e.g., “News” or “Tips”) and a few relevant tags.
- Click Publish.
Step 9: Set Up Basic SEO, Analytics, and Security Before Launch
Before you send traffic to your new WordPress website, put a few essentials in place to keep it secure and track performance.
Install an SEO plugin
- Go to Plugins > Add New.
- Search for a reputable SEO plugin such as Yoast SEO or Rank Math.
- Install and activate the plugin.
- Follow the setup wizard to configure basic SEO settings and generate an XML sitemap.
Connect Google Analytics and Search Console
- Create a Google Analytics property for your domain.
- Use your SEO plugin or a dedicated plugin to add the tracking code to your site.
- Set up Google Search Console and submit your XML sitemap so Google can crawl your pages.
Add basic security and backups
- Install a trusted security plugin that offers firewall, malware scanning, and login protection.
- Enable regular database and file backups, storing them off-site (cloud storage or another server).
- Use strong, unique passwords for your WordPress admin, database, and hosting logins.
/wp-admin unless you’re using a VPN. Step 10: Test Your WordPress Website and Go Live
Now that your site is configured and secure, you need to test it the way your visitors will experience it. This helps you catch broken links, layout issues, or slow pages before launch.
Test across devices and browsers
- Open your website on desktop, tablet, and mobile phones.
- Check that your main menu works and no items are cut off on smaller screens.
- Scroll through your Home, About, Blog, and Contact pages to confirm all text is readable and images load properly.
Test your forms and CTAs
- Fill in your contact form with a test message and confirm that you receive the email.
- Click any “Book Now”, “Subscribe”, or “Contact Us” buttons to ensure they go to the right pages.
Remove “coming soon” plugins or blocks
- If you used a “Maintenance” or “Coming Soon” plugin, disable it now.
- Share your live URL with a few trusted friends or colleagues and ask them to report any issues.
Launch Your New WordPress Website with Confidence
You’ve just planned, installed, configured, and launched a complete WordPress website — without needing to write a single line of code. You now understand how domains, hosting, themes, and content all fit together.
From here, your focus should shift to improving your design, publishing valuable content, and measuring what works. With a solid foundation in place, you can confidently add new features like email opt-ins, online courses, or an e-commerce store as your audience grows.
Further Reading
- WordPress Guides & Tutorials Overview
- How to Start a WordPress Website
- Make a WordPress Website for Beginners
- WordPress SEO Beginner Guide
- Beginner Guide to WordPress Menus and Navigation