WordPress plugins let you add almost any feature to your site without writing code, and in this guide you will learn how to install a plugin in WordPress step by step. Throughout this tutorial you will see exactly how to install plugin WordPress safely on your own site.
By the end of this tutorial you will be able to install plugins from the WordPress directory, upload premium plugin ZIP files, use FTP when needed, and safely manage updates, deactivation, and removal.
What You Need to Start
- An existing self hosted WordPress site using your own domain name.
- Administrator access to the WordPress Dashboard.
- Reliable login details for your hosting control panel or FTP client if you plan to use manual installation.
- A basic idea of the feature you want, such as contact forms, caching, or backups.
- For premium plugins, a valid download link or ZIP file from the developer.
What WordPress Plugins Do
A plugin is a small software package that extends what WordPress can do. Instead of building a custom feature from scratch, you install a plugin that already solves that problem. Popular examples include contact forms, SEO tools, caching, backup solutions, and page builders.
Plugins can be added, updated, and removed without changing your core WordPress files. This makes your site flexible, but it also means you need a safe process for choosing and installing them whenever you want to install plugin WordPress features without breaking anything.
Ways You Can Install Plugins
Before you start clicking the install button, it helps to understand the main ways you can add plugins to a typical WordPress site when you need to install plugin WordPress functionality quickly.
| Method | Where You Use It | When To Choose It |
|---|---|---|
| Search and install from directory | Inside your WordPress Dashboard in the Plugins Add New screen | Best for free plugins listed in the official WordPress directory |
| Upload plugin ZIP file | Plugins Add New Upload Plugin button | Best for premium plugins or custom plugins downloaded as a ZIP file |
| Manual install via FTP | FTP or file manager on your hosting account | Best when uploads are blocked or you need to fix a broken plugin manually |
Check a Plugin Before You Install It
Installing a plugin is easy. Choosing a safe one is where most site owners need help. Use this quick checklist before you install plugin WordPress on your site.
- Active installations Look for a reasonable number of active installs. More users often means better testing and community feedback.
- Recent updates Confirm the plugin has been updated within the last few months and is marked as compatible with your WordPress version.
- Ratings and reviews Read a few recent reviews to spot any repeated problems like security issues or performance complaints.
- Support responsiveness Check the support forum or developer site to see whether issues are being answered.
- Source and trust Download premium plugins only from the official developer or a reputable marketplace. Avoid nulled or cracked copies.
Step 1: Open the Plugins screen
The easiest way to install plugin WordPress tools on your site is directly from your WordPress Dashboard using the built in plugin directory.
- Log in to your WordPress Dashboard at yourdomain.com/wp-admin.
- In the left menu, hover over Plugins and click Add New.
- You will see the plugin install screen with featured, popular, and recommended plugins.
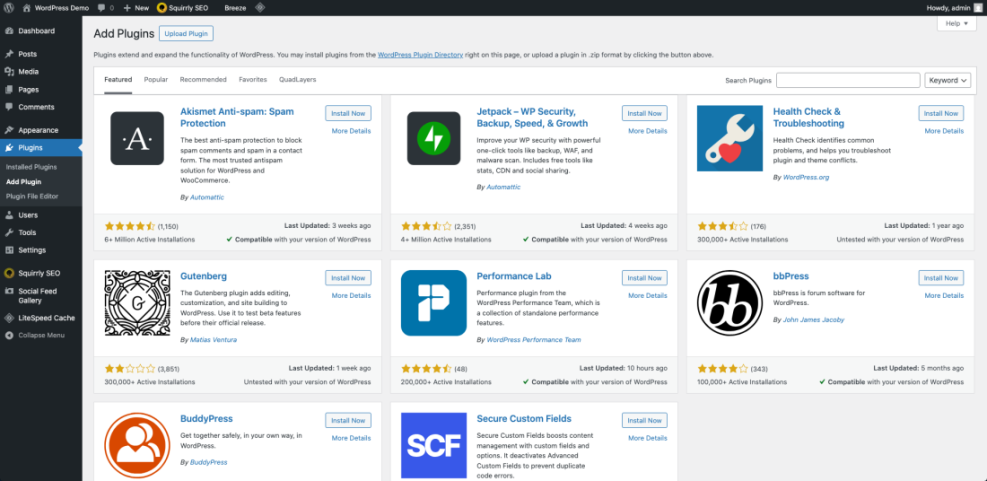
Verification Confirm you see a search bar at the top right and cards for multiple plugins below. This means you are viewing the correct screen.
Step 2: Search for the plugin you want
Next, find the specific plugin you want to install, or browse by keyword if you are still choosing.
- In the search box at the top right, type the name of the plugin or the type of feature you need, such as contact form or cache.
- Review the list of matching plugins that appears.
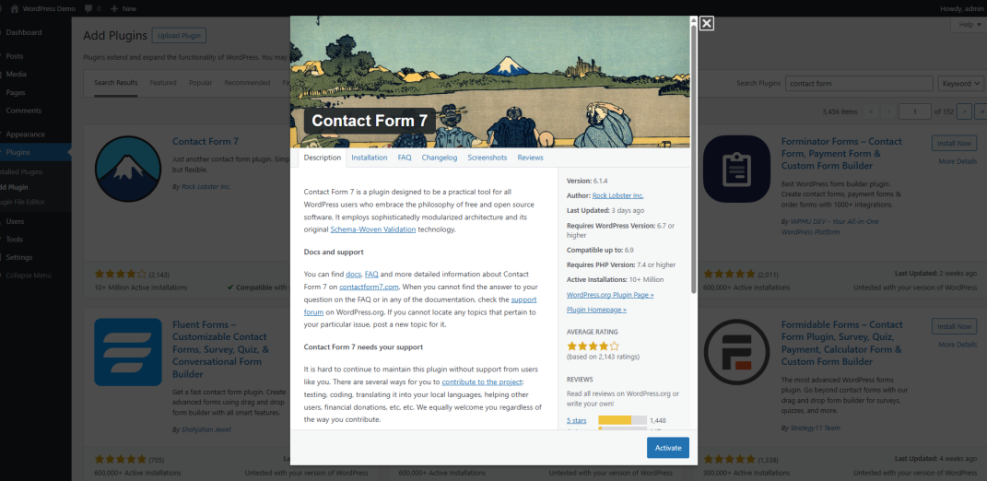
- Click a plugin card title to open more details in a pop up window, including screenshots, ratings, and changelog.
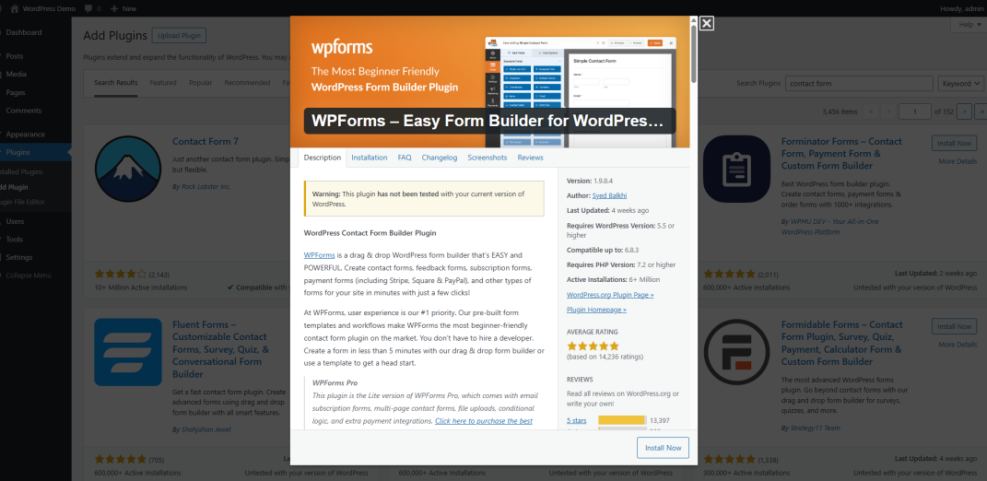
Verification Before you continue, quickly check the plugin ratings, number of active installations, and last updated date to confirm it looks trustworthy.
Step 3: Install and activate the plugin
Once you have chosen a plugin that looks safe, you can install it with two clicks.
- On the plugin card, click the Install Now button.
- Wait a few seconds while WordPress downloads and installs the plugin files.
- When the button label changes to Activate, click it to turn the plugin on.
- After activation, many plugins add a new menu item in the sidebar or under Settings where you can configure their options.
Verification Go to the Plugins Installed Plugins screen and confirm your new plugin appears in the list with a status of Active.
Install a plugin from a ZIP file
Premium plugins and custom plugins are usually provided as a ZIP file you download from the developer. You can upload this file directly through WordPress whenever you need to install plugin WordPress that you purchased from a trusted source.
- Download the plugin ZIP file from the developer or marketplace and save it to your computer.
- In your WordPress Dashboard, go to Plugins then Add New.
- At the top of the page, click the Upload Plugin button.
- Click Choose File, select the plugin ZIP file from your computer, then click Install Now.
- Wait while WordPress uploads and unpacks the plugin.
- When the success message appears, click Activate Plugin to enable it on your site.

Verification Return to Plugins Installed Plugins and confirm your premium plugin appears as active in the list.
Install a plugin with FTP
If the Dashboard upload fails or your hosting environment is locked down, you can install plugins manually using FTP or your hosting file manager. This method is slightly more technical but still straightforward when you need to install plugin WordPress on a more restricted hosting setup.
- On your computer, locate the plugin ZIP file and extract it. You should see a folder with the plugin name inside.
- Open your FTP client or hosting file manager and connect to your website files.
- Navigate to the wp content folder, then open the plugins folder inside it.
- Upload the extracted plugin folder into the wp content/plugins directory.
- Wait for the upload to finish completely before continuing.
- Log in to your WordPress Dashboard and go to Plugins Installed Plugins.
- Find the plugin you just uploaded in the list and click Activate.

Verification Visit a test page or the settings area for the plugin and confirm its features load without errors.
How to configure a newly installed plugin
After you activate a plugin, you usually need to adjust a few settings so it works correctly on your site.
- Find the settings page Many plugins add a new top level menu item, while others appear under Settings, Tools, or within another plugin menu.
- Run setup wizards Some plugins open a guided setup wizard after activation. Follow each step carefully and read the descriptions before accepting defaults.
- Use test content For contact forms, popups, and similar features, create a test page or form first to verify everything works before rolling it out across your site.
- Check permissions If the plugin adds roles or capabilities, make sure regular users and editors only get the access they need.
Every time you install plugin WordPress on your site, take a moment to run through these configuration steps so the new feature works as expected.
How to update deactivate and delete plugins
Keeping your plugins tidy and up to date is just as important as installing them correctly, especially after you install plugin WordPress to add key features your site depends on.
Updating plugins safely
- Go to Dashboard Updates or Plugins Installed Plugins to see a list of available plugin updates.
- Update a few plugins at a time rather than everything at once, especially on busy or complex sites.
- Create a quick backup before major updates, such as security plugins, page builders, or key e commerce tools.
- After updating, check a few important pages to confirm layouts and forms still work correctly.
Deactivating and deleting plugins
- To temporarily turn off a plugin, click Deactivate on the Plugins Installed Plugins screen.
- To remove it completely, deactivate it first, then click Delete. WordPress will remove the plugin files from your server.
- Some plugins keep their settings in the database even after deletion. Check the documentation if you want a full clean up.
- Regularly review your plugin list and remove tools you no longer use to reduce clutter and potential security risks.
Common plugin installation errors and fixes
Even with a careful process, you may run into errors during installation, especially the first few times you install plugin WordPress. Here are some of the most common issues and quick ways to fix them.
| Error | Likely Cause | Quick Fix |
|---|---|---|
| Destination folder already exists | A previous install or failed upload left a plugin folder on the server | Delete or rename the existing plugin folder in wp content/plugins then try installing again |
| Link you followed has expired | Your hosting upload limit or timeout setting is too low for the plugin ZIP file | Increase upload and timeout limits in hosting or use FTP to upload the plugin manually |
| Unable to create directory | File permissions on the server are incorrect | Ask your host to fix file permissions for your WordPress installation |
| Site shows a white screen after activation | The new plugin conflicts with your theme or another plugin | Disable the plugin via Plugins Installed Plugins or by renaming its folder via FTP |
Conclusion You can now install and manage plugins
You have learned how to install a plugin in WordPress using the built in plugin search, how to upload premium plugin ZIP files, and how to handle manual installs with FTP when needed. You now know how to install plugin WordPress in several different ways depending on your hosting setup and experience level.
From here you can safely experiment with new features while keeping your site fast and secure. Remember to review plugins before installing them, keep everything updated, and remove tools you no longer use.
Further Reading
-
- How to Create Your First Blog Post in WordPress
- Beginner Guide to WordPress Speed Optimization