How to Improve WordPress SEO
A practical, step-by-step checklist to boost your existing WordPress site's search visibility
Your WordPress site is live, you’re publishing content, but your Google rankings still feel stuck. Maybe a few posts bring in traffic, but most pages barely show up in search results. That’s a sign your WordPress SEO needs improvement, not just a one-time setup.
This guide walks you through a practical, step-by-step process to improve WordPress SEO on an existing site. You’ll audit what you already have, fix critical settings, optimize your content, strengthen internal links, and tune performance so search engines (and visitors) love your site.
If you’re brand new to the topic, start with a broader overview like this complete WordPress SEO beginner guide, then come back here to work through this improvement checklist on your live site.
Prerequisites
Before you start tweaking settings and content, make sure you have the access and tools you need. These basics will save you time and prevent mistakes.
- Administrator access to your WordPress dashboard.
- An SEO plugin installed (Yoast SEO, Rank Math, or a similar plugin).
- Access to Google Search Console and Google Analytics (or another analytics tool).
- A recent backup of your WordPress site.
- For this tutorial, we assume you’re using the Classic Editor and a modern theme like Jannah.
Step 1: Run a Quick WordPress SEO Audit
Improving SEO starts with understanding where you are today. A lightweight audit will show you which issues to prioritize first: indexing, rankings, or on-site optimization.
- Check if your site is indexed. In Google, type
site:yourdomain.comand see how many pages appear. If you see very few results, there may be indexing problems. - Verify Search Console. Open Google Search Console for your domain and review the “Pages” (or “Indexing”) report. Look for “Not indexed” pages and common error messages.
- Confirm search visibility in WordPress. In your dashboard, go to Settings → Reading and ensure “Discourage search engines from indexing this site” is unchecked.
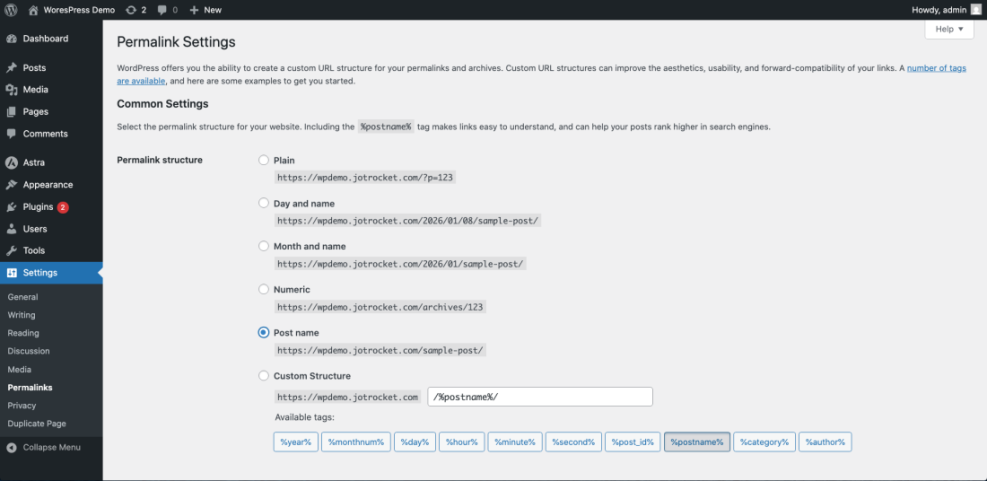
- Review permalink structure. Go to Settings → Permalinks and confirm you’re using a clean, SEO-friendly structure such as Post name.
Step 2: Fix Critical WordPress SEO Settings
With the big red flags checked, it’s time to strengthen your WordPress SEO foundations. These settings affect every page on your site, so small mistakes here can have a big impact.
- Set a clear Site Title and Tagline. Go to Settings → General. Use a descriptive site title that includes your brand and a short, keyword-relevant tagline (not “Just another WordPress site”).
- Enable pretty permalinks (if not already). Under Settings → Permalinks, choose Post name. For existing sites, consider using a redirection plugin to handle legacy URLs safely.
- Force HTTPS. Make sure your site runs on
https://and that both WordPress Address and Site Address (in Settings → General) use the HTTPS version of your domain. - Configure your SEO plugin’s basics. In Yoast or Rank Math, run the onboarding wizard. Set your site type (blog, business site, online store), set your preferred homepage and blog pages, and enable XML sitemaps.
- Check your XML sitemaps. In your SEO plugin, copy the sitemap URL and submit it in Google Search Console under Indexing → Sitemaps.
www and non-www versions in menus or widgets. Step 3: Optimize On-Page SEO for Your Key Content
Next, focus on the pages and posts that matter most for traffic and conversions. On-page SEO improvements are often the quickest way to see ranking gains in WordPress.
- Choose 5–10 priority URLs. Pick your main service pages, best-performing blog posts, and any pages that are close to page 1 in Google.
- Map a primary keyword per page. Use your favorite keyword tool to assign one main keyword (plus a few related phrases) to each URL. Avoid targeting the same keyword with multiple posts.
- Optimize SEO title & meta description. In the Classic Editor, scroll to your SEO plugin box under the content. Edit the SEO title and meta description to include your primary keyword, keep them within length limits, and make them appealing to click.
- Fix headings and content structure. Ensure there is exactly one H1 (usually the post title) and use H2/H3 headings to break content into logical sections. Avoid stuffing keywords into every heading.
- Improve images. Add descriptive alt text that describes the image and supports the topic. Compress large images before uploading to reduce page size.
If you want a deeper dive into individual page optimization, follow this step-by-step on-page SEO guide for WordPress and apply it to each important post.
Step 4: Strengthen Internal Linking and Site Structure
Internal links help search engines understand which pages are important and how your content is related. They also keep visitors on your site longer, which is great for conversions and SEO.
- Create topic clusters. Group related posts together (for example, “WordPress SEO” guides, “Performance” guides, “Security” guides). Make one central “pillar” page the hub for each cluster.
- Add links from older posts to new ones. Edit high-traffic posts and add contextual links to newer, relevant content using natural anchor text.
- Use descriptive anchor text. Instead of “click here,” link phrases that describe the destination page (for example, “beginner WordPress SEO checklist”).
- Improve menus and widgets. In Appearance → Menus, ensure your most important categories and pages are one or two clicks from the homepage. Use Jannah’s widget areas to highlight key guides or categories in the sidebar.
For a structured approach to cross-linking your posts, follow these proven internal linking strategies for WordPress and adapt them to your content clusters.
Step 5: Improve Speed and Technical SEO in WordPress
Search engines favor fast, stable, mobile-friendly websites. Technical SEO overlaps heavily with performance and UX, especially Core Web Vitals and mobile responsiveness.
- Test your current speed. Run your homepage and a few key posts through tools like PageSpeed Insights and GTmetrix. Note the biggest issues (large images, render-blocking scripts, slow server response).
- Enable caching. Install a well-supported caching plugin and configure page caching, browser caching, and, if your host allows, object caching. Test your site after enabling each feature.
- Optimize images site-wide. Use an image optimization plugin to compress existing uploads and serve properly sized images.
- Review your plugins. Deactivate and delete plugins you don’t need. Too many heavy plugins can slow down every page load.
- Create a clean robots.txt file. Make sure you’re not blocking important content or resources needed for rendering.
Add the following to your robots.txt file using your hosting File Manager or FTP if you don’t already have a clean baseline:
User-agent: *
Disallow: /wp-admin/
Allow: /wp-admin/admin-ajax.php
Sitemap: https://example.com/sitemap_index.xml
Step 6: Track Results and Keep Improving
SEO improvements compound over time. To know what’s really working, you need to track performance and build a repeatable process for optimization.
- Set clear goals. Decide what “improvement” means for you: more organic sessions, higher rankings for a set of keywords, more leads, or more sales.
- Monitor key reports in Search Console. Check the “Performance” report weekly for clicks, impressions, and average position. Look at which queries bring traffic to your optimized pages.
- Review analytics behavior. In your analytics tool, track bounce rate, time on page, and conversion rate for the URLs you optimized. Use this to decide which content needs more work.
- Create a monthly SEO checklist. Each month, update a few posts, add internal links, fix broken links, and re-run speed tests. Over time, this becomes a routine instead of a one-off project.
Turn SEO Tweaks into a Repeatable WordPress Workflow
Improving WordPress SEO isn’t about one magic plugin or a single setting. It’s the combination of solid foundations, optimized content, smart internal linking, and fast performance that moves the needle.
By following this checklist—auditing your site, fixing core settings, re-optimizing key posts, strengthening internal links, and tuning performance—you turn SEO from a vague goal into a concrete workflow you can repeat every month. Over time, that consistency is what brings more qualified visitors, leads, and revenue from search.
Further Reading
- Best WordPress SEO Plugins and Tools
- How to Improve Google Ranking for WordPress
- How to Add Schema Markup in WordPress
- Image Optimization Checklist for WordPress Websites