How to Delete WordPress Site
A step-by-step guide to safely remove your self-hosted WordPress.org website, hosting files, and domain.
1
Maybe your WordPress site was a side project, a temporary campaign, or a client site that has run its course. Simply ignoring it is risky: abandoned sites can still be hacked, send spam, or confuse visitors and search engines.
In this guide, you will learn how to delete WordPress site data safely on a self-hosted WordPress.org installation. You will back up everything, remove WordPress files and the database, and clean up hosting, domain, and basic SEO footprints so nothing important is left behind.
Before you remove anything, it is essential to keep a copy of your work. If you need a more detailed walkthrough for backups, follow this guide on how to back up your WordPress site properly, then come back to continue.
Prerequisites
This tutorial assumes you are using self-hosted WordPress (WordPress.org) on a web host, not a free WordPress.com site. You should gather a few things before you start deleting files and databases.
- WordPress admin login (username and password).
- Hosting control panel access (cPanel, Plesk, or your host’s custom panel).
- Domain registrar login (where your domain name is registered).
- A recent full backup stored off the server (files + database).
- Clarity on which domain and folder you want to delete (especially if the host has multiple sites).
Step 1: Decide What You’re Deleting (Site, Account, or Domain)
“Deleting a WordPress site” can mean different things, and mixing them up is a common mistake. Clarify what you actually want to remove so you do not delete more than intended.
Know the difference
- Delete WordPress installation only: Remove the WordPress files and database, but keep the hosting account and domain for a new project.
- Delete site + hosting account: Cancel your hosting plan so the server and all sites on it are removed.
- Delete or let your domain expire: Stop paying for the domain, or move it to another registrar or project.
- Delete a WordPress.com site/account: This is a different platform. If you are on WordPress.com, follow this separate guide on how to delete a WordPress.com account instead.
Step 2: Create a Full Backup of Your WordPress Site
Before you delete WordPress site data, always assume you might want the content again someday. A full backup gives you a safety net if you later change your mind or need to restore a specific page or blog post.
Use your existing backup plugin
- Log in to your WordPress admin dashboard.
- Open your backup plugin’s page (for example, under Tools or its own menu).
- Run a fresh backup that includes both files and the database.
- Download the backup archive to your computer and, ideally, store a copy in cloud storage.
Manually back up via hosting (cPanel example)
- Log in to your hosting control panel (for example, cPanel).
- Open File Manager and locate your site’s document root (often
public_htmlor a subfolder likepublic_html/oldsite). - Select all WordPress files and folders (
wp-admin,wp-content,wp-includes, plus core files) and compress them into a zip archive. - Download the zip file to your local computer.
- In cPanel, open phpMyAdmin, select your site’s database, click Export, and download the SQL file.
Advanced backup with WP-CLI (SSH)
If your host provides SSH and WP-CLI, you can back up quickly from the command line. Run these commands in your site’s web root folder:
# In SSH, inside your WordPress root directory:
wp db export backup-before-delete.sql
tar -czf wp-files-before-delete.tar.gz .
Step 3: Put Your Site in Maintenance or Private Mode
While you prepare for deletion, you may want to prevent new visitors (or search engines) from hitting a half-deleted site. A simple maintenance or “goodbye” page keeps your shutdown looking intentional and professional.
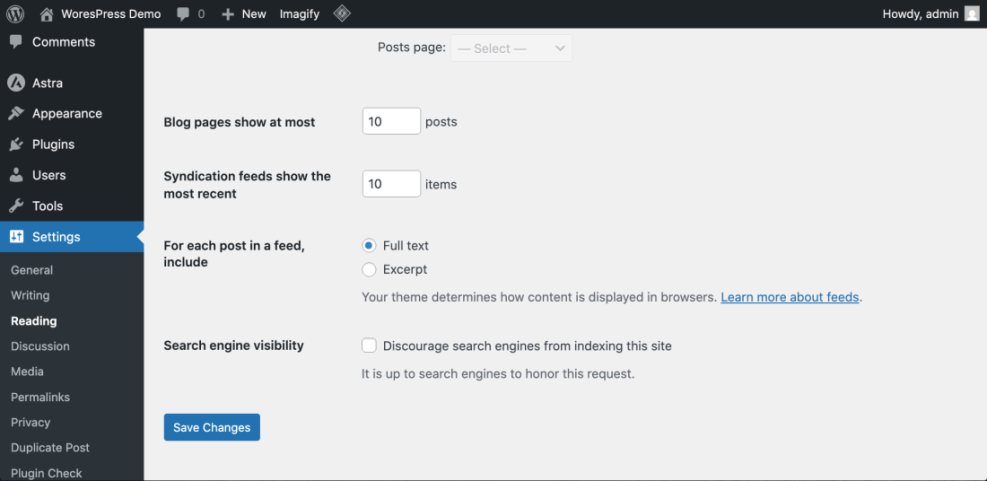
Temporarily discourage search engines
- Log in to your WordPress admin dashboard.
- Go to Settings > Reading.
- Check the box for “Discourage search engines from indexing this site”.
- Click Save Changes.
Show a simple maintenance or goodbye page (optional)
- Install a maintenance or coming-soon plugin and activate maintenance mode, or
- Replace your homepage with a simple “This site has closed” message if you prefer to do it manually.
This step is optional, but it creates a better experience for any visitors who land on your site during the shutdown process.
Step 4: Delete WordPress Files and Database from Your Hosting
This is the moment where you actually delete WordPress site files and database. Once this step is done, your WordPress installation will no longer load from that hosting account.
Identify your WordPress folder and database
- In your hosting control panel, open File Manager.
- Locate the folder where WordPress is installed. Common examples:
public_html(WordPress is the main site on the account).public_html/blog(WordPress in a subfolder).- A domain-specific folder like
example.com/public_html.
- Open the
wp-config.phpfile and find the database name so you delete the correct database later.
/** The name of the database for WordPress */
define( 'DB_NAME', 'example_db' );

/** MySQL database username */
define( 'DB_USER', 'example_user' );
Delete WordPress files via File Manager
- In File Manager, select all WordPress files and folders in the identified directory.
- Click Delete and confirm the deletion. Some hosts allow you to move items to a trash bin first; if so, empty the trash afterward.
- Visit your domain in a browser. You should see either a default hosting page, a 404 error, or a “directory listing” page, confirming WordPress is gone.
Delete the WordPress database via phpMyAdmin
- From your hosting control panel, open phpMyAdmin.
- In the left sidebar, select the database that matches the
DB_NAMEinwp-config.php. - Click Export one last time if you want an extra backup.
- Return to the main phpMyAdmin screen, select the database again, and choose Drop (or use the “Drop database” option in your panel).
- Confirm that the database is removed from the list.
Step 5: Update or Remove Your Domain and DNS
After you delete WordPress site files and database, your domain may still point to that now-empty server. Decide what you want to happen when someone visits your domain.
If you want to reuse the domain for a new site
- Set up your new site (on the same host or a new one).
- Update the domain’s nameservers or A record at your domain registrar to point to the new host.
- Allow DNS changes to propagate (this can take a few hours).
If you want the domain to stop working completely
- Remove or change the DNS records (A, AAAA, CNAME) so they no longer point to an active server.
- Optionally, let the domain expire at the end of its registration term.
Step 6: Handle Search Visibility and Basic SEO Cleanup
Once you delete WordPress site content, search engines will gradually notice that pages are gone. You can either let them drop naturally over time or take a more active role if the site had meaningful traffic.
For low-traffic or test sites
- If you have already deleted files and removed DNS, simply wait. Search engines will encounter errors when crawling the old URLs and will eventually remove them from results.
- You do not need to do anything else unless you see unwanted cached content lingering for a long time.
For sites with real traffic or sensitive content
- If possible, keep minimal hosting active for a short time and configure your server (or a simple .htaccess file) to return 410 Gone or redirect to a new site.
- In Google Search Console, use the Removals tool under the Index section to request temporary removal for especially sensitive URLs.
- Monitor the site’s coverage and performance reports to confirm that pages are dropping out of the index over the following weeks.
Safely Wrapping Up Your WordPress Site Deletion
Deleting a WordPress site is more than just clicking “Delete” in your hosting panel. By backing up first, cleaning out files and the database, and then updating domain and DNS settings, you ensure the shutdown is safe and controlled instead of chaotic.
With the steps in this guide, you can confidently remove an old WordPress project without leaving security holes, broken hosting accounts, or confusing search results behind. If you ever change your mind, your backups mean you still have the option to restore or reuse your content elsewhere.
Further Reading
- WordPress Backup Strategy
- WordPress Disaster Recovery Walkthrough
- WordPress Hosting Backups Explained
- Complete Overview of WordPress Security
Frequently Asked Questions
Can I undo the deletion after I delete my WordPress site?
Do I need to cancel my hosting plan after deleting WordPress?
What if my host runs multiple sites and I’m afraid of deleting the wrong one?
wp-config.php inside that folder and note the database name. Cross-check the domain, directory, and database carefully before deleting anything. When unsure, contact your host’s support and ask them to confirm the correct path and database name before you proceed.