When you run a WordPress site, you will eventually need to delete a page you no longer want visitors to see. The good news is that WordPress lets you delete a page safely, either by moving it to the trash first or by removing it permanently when you are sure.
In this step by step tutorial, you will learn how to find any page, move it to the trash, permanently delete it, or simply unpublish it instead. You will also update menus, fix internal links, and add redirects so users and search engines never end up on broken pages.
What You Need to Delete a Page in WordPress
- Access to your WordPress admin dashboard with an account that has Editor or Administrator permissions.
- A recent backup of your site, created manually or with a plugin. If you do not have one, follow How to backup a WordPress site first.
- A list of pages you plan to remove, including any that are linked from menus or important posts.
- Optional but recommended: basic understanding of permalinks. You can review What is managed WordPress if this is new to you.
Step 1: Understand How to Delete a Page in WordPress
Before you delete anything, understand what happens when you remove a page. WordPress uses a trash system so you can undo accidental deletions before you permanently erase the content from your database.
- Log in to your WordPress dashboard by visiting yourdomain.com/wp-admin and entering your username and password.
- Look at the left admin menu and locate Pages. This is where all static pages on your site are stored.
- Know the difference:
- Trash moves the page out of public view but keeps it recoverable.
- Delete Permanently erases the page from the trash so it cannot be restored.
- Changing status to Draft or Private unpublishes the page without deleting it.
Step 2: Locate the WordPress Page You Want to Delete
Next, identify the exact page or pages you want to remove. You can search by title or filter through the list so you do not accidentally delete the wrong page.
- In the left admin menu, click Pages then click All Pages.
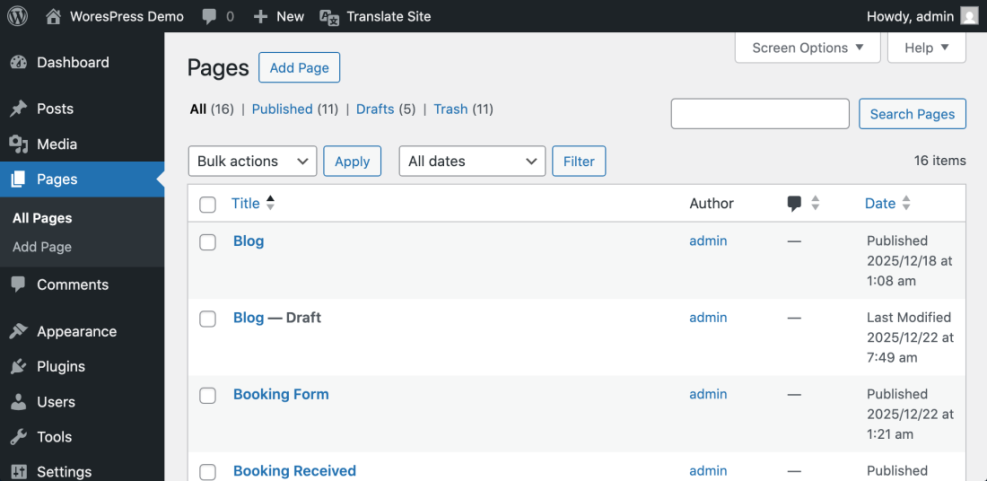
- Use the search box in the top right labeled Search Pages to type the page title, then press Enter.
- Alternatively, scroll through the list and use the column headers (such as Title or Date) to sort pages until you find the one you want.
- Hover your mouse over the page title. A row of links such as Edit, Quick Edit, Trash, and View will appear under the title.
Verify that the page you selected is the correct one by checking its URL (slug) shown under the title and confirming it matches the address you plan to remove.
Step 3: Move the WordPress Page to Trash Safely
Moving a page to the trash is the safest first step. The page disappears from your live site, but you can still restore it later if you made a mistake.
- Hover over the page title in Pages » All Pages until you see the action links.
- Click Trash to move the page into the WordPress trash.

- To trash multiple pages at once:
- Check the box to the left of each page you want to remove.
- Open the Bulk actions dropdown above the list.
- Select Move to Trash, then click the Apply button.
Visit the front end of your site in a new browser tab and try to open the deleted page URL. You should now see a 404 not found page or your theme’s default error page instead of the old content.
Step 4: Delete the Page in WordPress Permanently
Once a page sits in the trash and you are certain you no longer need it, you can delete it permanently. This removes the content from your database so it cannot be restored from the admin screen.
- In the admin menu, click Pages then click the Trash link above the list table.

- Hover over the page you want to remove forever and click Delete Permanently.
- To delete several trashed pages at once:
- Check the boxes for each item in the trash.
- Use the Bulk actions dropdown to select Delete Permanently.
- Click Apply to remove them from your site.
To confirm, refresh the Trash view. The page should no longer appear in the list, which means it has been fully removed.
Step 5: Unpublish a WordPress Page Instead of Deleting It
Sometimes you do not want to delete a page forever. You may want to hide it while you redesign it or keep it accessible only to logged in users. In these cases, unpublish the page instead of deleting it.
- Go to Pages » All Pages and click the title of the page you want to hide.

- In the right sidebar of the editor, locate the Status & visibility panel.
- Click the current status (such as Published) and change it to Draft or Private.
- Click Update (for published pages) or Save (for drafts) to store the new status.
Open the page URL in an incognito window. You should see either a 404 page (for drafts) or an access restricted message (for private pages), confirming that the public can no longer see it.
Step 6: Update Menus and Internal Links After You Delete a Page in WordPress
Deleting a page is only half the job. You must also update your navigation menus and any internal links that previously pointed to the deleted URL so visitors do not hit broken links.
- In the admin menu, go to Appearance » Menus (or Appearance » Editor for block themes managing menus in the Site Editor).
- Scan your menu structure for the deleted page title.
- Click the down arrow on that menu item and click Remove to delete it from the menu.
- Click Save Menu to store your changes.
- Next, review your important posts and pages for links to the deleted URL. Use your browser’s find tool or a link checker plugin to locate them.
- Edit each piece of content and either remove the link or point it to a more relevant replacement page.
After saving changes, browse your site’s main navigation and a few key posts to confirm that no menu item or internal link still points to the old, deleted URL.
If you need help planning menu changes, you can review Beginner guide to WordPress speed optimization for a deeper walkthrough.
Step 7: Add Redirects for Deleted Pages in WordPress
If the deleted page had search traffic or external links, create a redirect so users and search engines are sent to a helpful replacement instead of a 404 error. This protects your SEO and improves user experience.
- Decide on a target URL that best replaces the deleted page, such as a newer page or a category archive.
- Install and activate a reputable redirect plugin from Plugins » Add New, or configure redirects at the server level if you have access.
- In your redirect tool, create a new rule that sends the old page URL to the new target URL with status 301 Moved Permanently.
- Save the rule, then visit the old page URL in your browser and confirm that it automatically forwards to the new address.
If you manage redirects at the server level using an .htaccess file (Apache), a simple rule looks like this:
Redirect 301 /old-page-slug/ https://example.com/new-page-slug/
After you confirm that the redirect works and there are no remaining internal links to the deleted page, your cleanup is complete. For more SEO context, see WordPress seo complete beginners guide.
Common WordPress Plugins That Affect Deleted Pages and URLs
While you are reviewing deleted pages and redirects, it is a good time to check which plugins are adding extra content or functionality to your site. These plugin types often influence how your pages behave, how they load, and how users experience them.
| Plugin Type | What It Adds | Common Examples |
|---|---|---|
| SEO | Titles, meta descriptions, sitemaps, schema | SEO suite plugins |
| Performance | Caching, minification, image optimization | Caching/optimization plugins |
| Security | Firewall rules, login protection, scans | Security plugins |
| Forms | Contact forms, lead capture, surveys | Form builder plugins |
| Ecommerce | Products, cart, checkout, payments | WooCommerce + add-ons |
If you remove a page that is used by any of these plugins (such as a checkout, contact, or login page), make sure you also update the plugin settings so they point to the correct replacement page.
Conclusion You Are Ready to Delete a Page in WordPress Safely
You have learned how to find, trash, permanently delete, and unpublish pages in WordPress without creating a mess for visitors or search engines. You also updated your menus, fixed internal links, and added redirects for any important deleted pages.
With these steps, you can confidently clean up outdated content, remove test pages, and keep your WordPress site organized. If you ever need to remove the entire site instead of a single page, you can follow How to publish WordPress site for that process.
Further Reading on Deleting and Managing WordPress Pages
- How to backup a WordPress site
- How to duplicate WordPress page
- What is managed WordPress
- Beginner guide to WordPress speed optimization
- WordPress seo complete beginners guide