How to Create a WordPress Website
Beginner-friendly blueprint for planning, building, and launching your first WordPress site.
Creating your first WordPress website can feel intimidating: domains, hosting, themes, plugins, and settings all competing for your attention. The good news is that you can go from “blank slate” to a live, professional site by following a clear, structured process.
In this guide, you’ll build a self-hosted WordPress.org website on a typical shared hosting plan, using the Classic Editor and the Jannah theme. By the end, you’ll have a clean, fast, and secure site with core pages, a working menu, and a simple launch checklist.
If you’re still unsure what WordPress is and how it works, start with this overview of what WordPress is, then come back and follow this step-by-step build.
Prerequisites
Before you start clicking around, make sure you have a few essentials ready. Having these in place keeps the setup smooth and avoids getting stuck mid-way.
- Goal for your site – e.g., portfolio, business website, blog, or simple landing page.
- Domain name – either already registered or ready to register with your host.
- Web hosting account – ideally with cPanel or a similar control panel and a one-click WordPress installer.
- Access to your email – for verification and password resets.
- Jannah theme license (if you’re using the premium version) and the theme ZIP file downloaded to your computer.
Step 1: Plan Your WordPress Website Structure
Rushing into design without a simple plan usually leads to cluttered navigation and lots of rework. Spend a few minutes mapping out your basic structure so WordPress pages and menus are easier to set up later.
- Define your main objective. Decide whether the site’s primary job is to get leads, show a portfolio, publish articles, or sell products.
- Choose your primary audience. Identify who you’re talking to (for example, local clients, online readers, or students).
- List your core pages. For most sites, you’ll start with:
- Home
- About
- Services or “What I Do”
- Blog or “Articles”
- Contact
- Sketch a simple menu. Decide what should appear in the main navigation and what can live in the footer.
Step 2: Choose a Domain Name and Hosting
Your domain name and hosting are the foundation of your WordPress website. A poor-quality host will make your site slow, unstable, and harder to maintain, no matter how good your theme is.
- Pick a clear, memorable domain. Use your business name or a simple phrase related to what you offer. Avoid long strings of words and hyphens if possible.
- Choose a WordPress-friendly host. Look for:
- One-click WordPress installation
- Free SSL certificates
- PHP 8.x support
- Automatic backups and good uptime guarantees
To go deeper, check this guide on how to choose the right WordPress hosting so you don’t overpay or pick a slow provider.
- Connect your domain to hosting. If you bought your domain from a registrar and hosting from a different provider, update your domain’s nameservers to point to your host (your host’s documentation will show the exact values).
Step 3: Install WordPress on Your Host
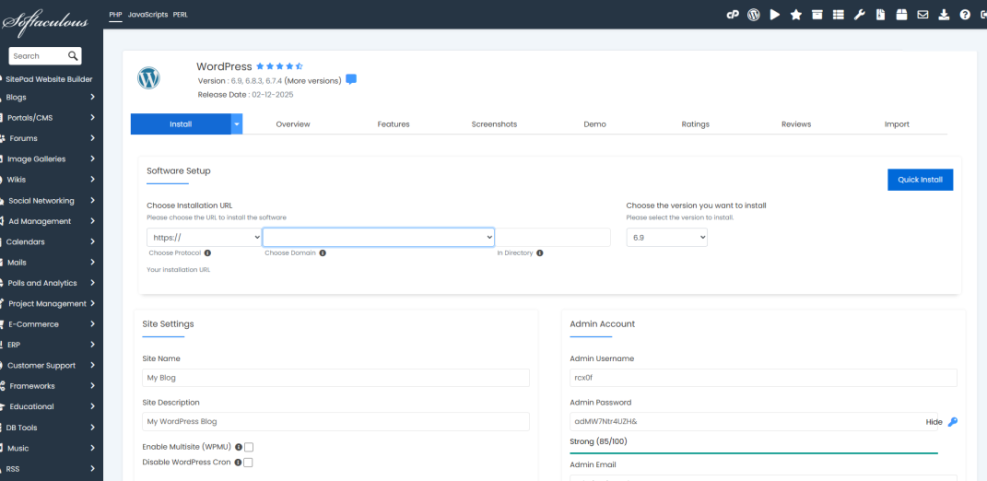
Once your domain and hosting are connected, it’s time to install WordPress. Most shared hosts offer a one-click installer (often via Softaculous, Installatron, or a similar tool), which is the easiest path for beginners.
- Log in to your hosting control panel. Access cPanel (or equivalent) from your hosting dashboard.
- Open the WordPress installer. Look for “WordPress”, “Softaculous Apps Installer”, or “Website Installer” and click the WordPress icon.
- Choose your domain. In the installer, select the domain you want to install WordPress on. Leave the “Directory” field empty to install WordPress directly on the main domain (not in a subfolder).
- Set admin credentials. Enter:
- Site name & description (you can change these later in WordPress Settings > General)
- Admin username – avoid “admin”; choose something unique
- Strong password – use a password manager if possible
- Admin email – make sure it’s an address you can access
- Run the installation. Click “Install” and wait for the process to complete. You should see:
- Your site URL (e.g.,
https://example.com) - Your WordPress admin URL (e.g.,
https://example.com/wp-admin/)
- Your site URL (e.g.,
If you’d like a more detailed walkthrough (including manual installation), see this complete step-by-step WordPress installation guide.
Step 4: Install Jannah and Set Up the Classic Editor
With WordPress installed, the next step is to apply a professional theme and configure the editor you’ll use for writing content. This guide uses the Jannah theme plus the Classic Editor plugin for a familiar, stable editing experience.
- Log in to WordPress admin. Go to
https://yourdomain.com/wp-admin/and log in with the admin credentials you created earlier. - Install the Jannah theme.
- In the left menu, go to Appearance > Themes.
- Click Add New, then Upload Theme.
- Choose the Jannah theme ZIP file from your computer and click Install Now.
- After installation, click Activate.
- Install required Jannah plugins. If prompted, follow the on-screen instructions to install any required or recommended plugins (e.g., for demos or page-building features).
- Install and configure Classic Editor.
- Go to Plugins > Add New.
- Search for Classic Editor.
- Click Install Now, then Activate.
- Go to Settings > Writing and set Classic Editor as the default editor for all users.
Step 5: Create Your Core Pages and Navigation
Now that your theme and editor are ready, it’s time to create the main pages and navigation so visitors can move around your site easily.
Create your main pages
- Go to Pages > Add New.
- Enter a page title (e.g., “Home”, “About”, “Services”, “Blog”, “Contact”).
- Use the Classic Editor to add a short introduction and any key content you already have.
- Click Publish.
- Repeat for each core page in your plan.
Set a static homepage and blog page
- Go to Settings > Reading.
- Select A static page for “Your homepage displays”.
- Choose your “Home” page as the Homepage and your “Blog” page as the Posts page.
- Click Save Changes.
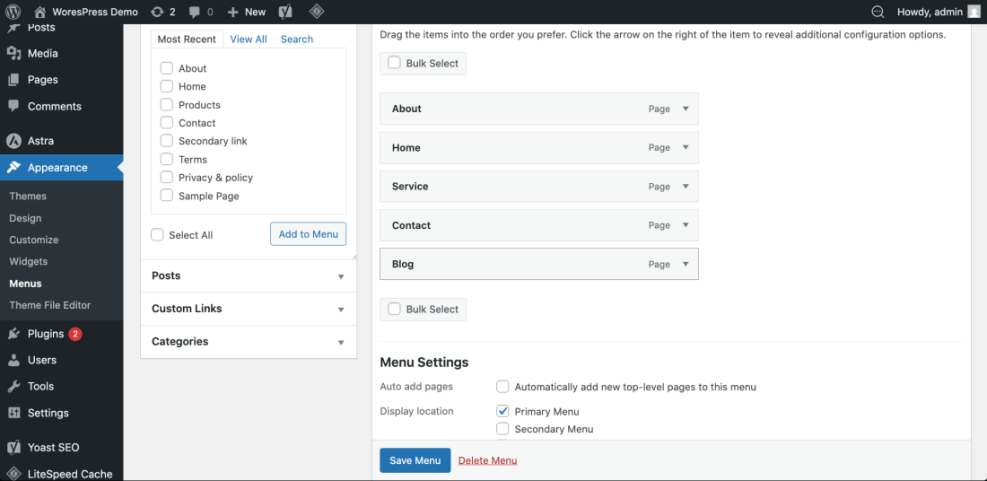
Build your main navigation menu
- Go to Appearance > Menus.
- Enter a menu name (e.g., “Main Menu”) and click Create Menu.
- Select the pages you created (Home, About, Services, Blog, Contact) and click Add to Menu.
- Drag and drop the items to reorder them, then assign the menu to the primary menu location (often called “Main Menu” or “Primary Navigation”).
- Click Save Menu and preview your site’s header to confirm the links work.
Step 6: Configure Essentials and Launch
Before you officially launch your WordPress website, take a few minutes to configure key settings that affect performance, SEO, and security. Doing this now saves you time and problems later.
Update basic site settings
- Go to Settings > General and confirm:
- Site Title and Tagline accurately describe your site.
- WordPress Address (URL) and Site Address (URL) use
https://if SSL is enabled. - Timezone, date, and time formats are correct for your location.
- Go to Settings > Permalinks and select Post name. Click Save Changes.
Check performance, SEO, and backups
- Performance: Enable caching (through your host or a caching plugin) and optimize large images before uploading them.
- SEO basics: Ensure pages have clear titles, headings, and meta descriptions. Later, you can add a dedicated SEO plugin for more control.
- Backups: Confirm that your host or a plugin is taking regular backups of files and the database.
- Security basics: Use strong passwords, change default usernames, and keep WordPress core, themes, and plugins updated.
Run a quick pre-launch checklist
- Visit your homepage and main pages on desktop and mobile.
- Click every menu link to confirm there are no 404 errors.
- Submit a test form on your Contact page and confirm the email is delivered.
- Ask a friend or colleague to review the site for obvious issues.
Launch Your WordPress Website with Confidence
You’ve planned your structure, chosen hosting, installed WordPress, applied the Jannah theme, set up the Classic Editor, created core pages, and configured essential settings. That’s everything you need to launch a clean, functional WordPress website.
From here, you can refine your design, publish more content, and add advanced features like email marketing, e-commerce, and analytics. The important part is done: you now have a working WordPress Website that you control, can improve over time, and can confidently share with visitors.
Further Reading
- How to Create a Website with WordPress (Alternative Workflow)
- Complete Overview of WordPress Security Best Practices
- WordPress SEO for Beginners: Getting Your Site Ready for Search
- Beginner Guide to WordPress Menus and Navigation
Frequently Asked Questions
Do I need coding skills to create a WordPress website?
What should I do if I can’t log in to my new WordPress site?
/wp-admin/ or /wp-login.php) and that your username and password are typed correctly. If you still can’t log in, use the “Lost your password?” link to reset your password via email. As a last resort, you can reset your password from your hosting control panel using phpMyAdmin, but make a database backup first.