How to Create a WordPress Form with File Upload
Step-by-step guide to building a secure file upload form in WordPress
Sometimes a regular contact form is not enough. You might need visitors to upload PDFs for quotes, resumes for job applications, design briefs, or screenshots when they report a bug. For all of these cases, you need a secure file upload form in WordPress that’s easy for users to fill out and easy for you to manage.
In this guide, you’ll learn how to create a WordPress file upload form using a modern form plugin. We’ll walk through choosing the right plugin, adding a file upload field, embedding the form in your page (including Classic Editor and Jannah theme layouts), and testing everything so files arrive safely in your inbox or dashboard.
We’ll also cover smart security practices so file uploads don’t become a weak point in your site, including how to limit file types and sizes and how to keep things running smoothly over time.
Prerequisites
Before you build your file upload form, make sure you have the basics in place. These are the minimum requirements to follow this tutorial.
- A working WordPress site with administrator access.
- A modern form plugin that supports file upload fields (for example WPForms, Gravity Forms, Ninja Forms, or Formidable Forms).
- Access to your WordPress dashboard (and optionally your hosting control panel for adjusting upload limits).
- A recent backup of your site in case you need to roll back changes.
Step 1: Choose a form plugin that supports file uploads
The first decision is which form plugin you’ll use. Most modern, well-supported form plugins include a file upload field, but this may be limited to certain plans or add-ons. Check the plugin’s features page or documentation to confirm it supports file uploads and lets you control file types and size limits.
Look for a plugin that offers:
- A drag-and-drop form builder.
- Built-in spam and bot protection.
- Options to store file uploads securely and attach them (or links) to notification emails.
- Active development and regular security updates.
If you’re still evaluating plugins, compare your options using a dedicated roundup like “best contact form plugins” before committing, so you won’t have to rebuild the form later as your needs grow.
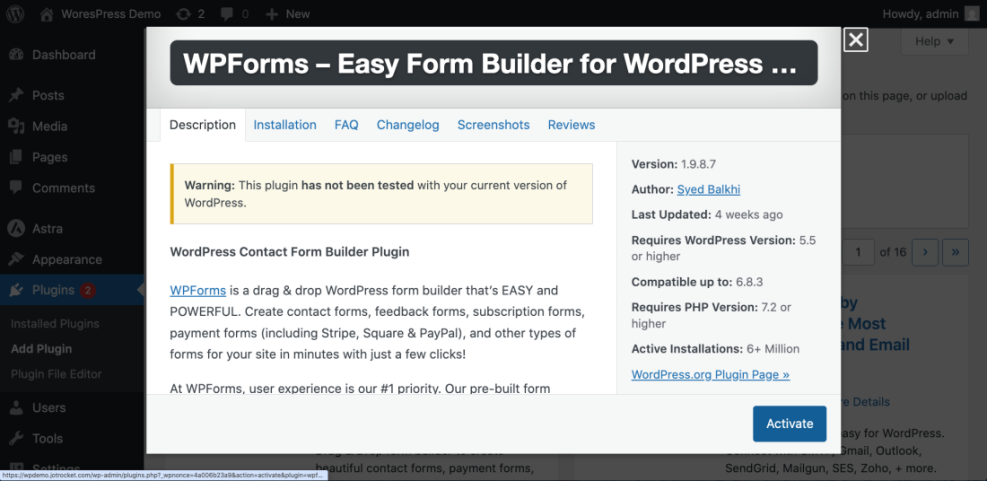
Step 2: Install and activate your chosen form plugin
Once you’ve picked a plugin, install it from your WordPress dashboard.
- Log in to your WordPress admin area.
- Go to Plugins > Add New.
- Use the search box to find your chosen form plugin by name.
- Click Install Now, then click Activate.
After activation, most plugins add a new menu in your dashboard (for example, WPForms, Forms, or Contact). You’ll use this menu to create your file upload form.
Step 3: Create a new form
Now you’re ready to create the actual form that will accept file uploads.
- From your WordPress dashboard, go to your form plugin’s main menu (for example WPForms > Add New or Forms > Add New).
- Choose a starting template such as Simple Contact Form, Blank Form, or Job Application Form, depending on your use case.
- Give your form a descriptive name like File Upload Form – Job Applications or Support Ticket with File Upload.
This loads the drag-and-drop builder where you can add, remove, and rearrange fields. Most plugins show the form preview on the right and a field list on the left.
Step 4: Add and configure the file upload field
The core of this tutorial is the file upload field itself. You’ll add it to the form and then configure the details to keep uploads under control.
- In the form builder sidebar, locate the File Upload field (sometimes called Upload, File, or File Uploads).
- Drag the field into the form layout where you want it to appear, usually after the user’s name, email, and message fields.
- Click the file upload field to open its settings panel.
Common settings you should review:
- Label: Change this to something clear, such as “Upload your resume (PDF only)” or “Attach screenshots (JPG/PNG).”
- Required: Enable this if the file is mandatory (for example, a CV for job applications).
- Allowed file types: Restrict this field to safe, expected file types such as
pdf, doc, docx, jpg, png. - Maximum file size: Set a sensible limit, such as 2–10 MB, depending on your use case.
- Number of files: Allow single or multiple file uploads, if your plugin supports it.
Many plugins have a text box where you enter allowed file extensions. A typical example might look like this:
pdf, doc, docx, jpg, jpeg, png.php, .exe, or .js. Limiting uploads to documents and images greatly reduces your security risk. Step 5: Configure notifications and confirmations
Next, make sure you actually receive the uploaded files and your visitors see a confirmation message after submitting the form.
Email notifications
- In the form builder, open the Notifications or Emails tab.
- Set the To email address to the inbox where you want submissions sent.
- Customize the Subject line, for example: “New file upload form submission from {Name}”.
- Insert form field smart tags (like {name}, {email}, {file_upload}) into the email body to include submission details.
- Choose whether to attach files directly to the email or include secure download links, depending on what your plugin supports.
Attaching files is convenient, but linking to them can be safer and may reduce email size and deliverability issues, especially when files are large.
On-screen confirmation
- Open the Confirmations or Messages tab.
- Choose a confirmation type: a simple thank-you message, a redirect to a “Thank You” page, or both.
- Customize the copy so users know their file was uploaded successfully and what will happen next (for example, “We’ll review your application within 2–3 business days”).
Step 6: Add the form to a page or post
Now you can embed the file upload form on any page or post where visitors should access it. The exact steps depend on whether you use the Block Editor (Gutenberg) or the Classic Editor (which is common with the Jannah theme).
Block Editor (Gutenberg)
- Go to Pages > Add New (or edit an existing page).
- Click the + icon to add a block and search for your form plugin’s block, such as Form or WPForms.
- Select the block, then choose your file upload form from the dropdown list.
- Publish or update the page.
Classic Editor / Jannah theme
- Open the page or post where you want the form.
- Copy the form’s shortcode from your form plugin (for example
[wpforms id="123"]or similar). - Paste the shortcode into the Classic Editor where you want the form to appear.
- If you’re using Jannah’s page builder or blocks, paste the shortcode into a content or text module.
- Save or update the page.
Step 7: Test your file upload form
Before you share the page link with users, thoroughly test the form end-to-end. This helps you catch configuration problems before your visitors do.
- Open the page on the front-end in a private/incognito browser window.
- Fill in the form with test data and upload a valid file that matches your allowed file types and size limit.
- Click Submit and confirm that you see the success message or Thank You page.
- Check your email inbox to confirm you received the notification and can access the uploaded file or link.
- Log in to your WordPress dashboard and open the form entries screen to verify the submission is stored correctly.
Repeat the test using an invalid file type or oversized file to confirm the plugin shows a helpful error message and blocks unsafe uploads.
Step 8: Secure and maintain your file upload form
File uploads add flexibility to your site, but they also introduce new security considerations. Take these steps to keep things safe and manageable over time.
- Limit who can upload: If the form is sensitive, share the URL only with known users or protect the page with a password.
- Restrict file types and sizes: Keep your allowed file types list as short as possible and enforce a reasonable file size cap.
- Keep plugins updated: Regularly update your form plugin, theme, and WordPress core to patch security vulnerabilities.
- Use security plugins: Consider a reputable security plugin that can scan uploads for malware and block malicious requests.
- Monitor and clean up: Periodically clean old file uploads you no longer need, especially if they contain sensitive information.
For a broader hardening checklist, pair this setup with a general security guide so file uploads are not your only line of defense.
/wp-content/uploads/ folder if your plugin offers that option, and limit access to the people who truly need it. Wrap up: safely collect files through WordPress forms
By now you’ve created a dedicated file upload form that matches your workflow, embedded it in your WordPress site, and verified that submissions (and files) arrive where they should. You’ve also put guardrails in place to control file types, sizes, and security.
From job applications to support tickets, project briefs, and client onboarding, a well-built file upload form can save you hours of chasing attachments by email. Keep monitoring submissions, occasionally revisiting your settings, and updating your plugins so the form remains fast, secure, and easy for visitors to use.
Further Reading
- WordPress Security: Complete Overview
- Best WordPress Backup Plugins
- Email Marketing for WordPress
- Best Appointment Booking Plugins
Frequently Asked Questions
Which WordPress form plugins support file uploads?
Why do users get an error that their file is too large?
How can I block dangerous file types in my upload form?
Should I store uploaded files in the Media Library or somewhere else?
lass=”yoast-text-mark” />>For non-sensitive content, storing uploads in the Media Library is usually fine and makes files easy to reuse. For private or sensitive documents, it’s better to use your form plugin’s option to store files outside publicly accessible folders if available. That way, only logged-in administrators or specific user roles can access the files, and they are not directly indexable or guessable by URL.