Today, learning how to create a website with WordPress is one of the most useful skills you can pick up as a business owner, freelancer, or blogger. With WordPress, you can create a website that looks professional without knowing how to code, and you still stay in control of your content and design.
In this step by step guide, you will first learn how to create a website with WordPress from scratch by choosing a domain and hosting. Then, you will install WordPress, pick a theme, customize your layout, add essential pages, and finally install the must have plugins you need to launch a real world website.
What You Need Before You Create a Website with WordPress
Before you begin, it helps to prepare a few basics so the process of creating a website with WordPress goes smoothly.
- First, have a clear idea of what your WordPress website is for (blog, business site, portfolio, store, etc.).
- Next, keep a payment method ready for buying a domain and hosting (credit card, PayPal, or similar).
- Additionally, plan at least 30–60 minutes of uninterrupted time for the initial setup.
- Finally, make sure you can log in to your email and follow confirmation links without issues.
Step 1: Understand the WordPress Website Setup Flow
Before you actually start to create a website with WordPress, it is helpful to understand the big picture of how a WordPress website comes together. This way, you always know what comes next.
- First, choose a domain name (yourwebsitename.com).
- Then, buy web hosting and connect it to your domain.
- After that, install WordPress on your hosting account.
- Next, pick and configure a theme to control your site’s design.
- Later, create core pages and menus so visitors can navigate your site.
- Then, install key plugins for SEO, security, and performance.
- Finally, review, test, and launch your site to the public.
To make this even clearer, use the comparison table below to see where each part of the process happens when you build a WordPress website.
| Stage | Where It Happens | Main Purpose |
|---|---|---|
| Domain & Hosting | Domain registrar & hosting provider dashboard | Secure your website address and server space to run WordPress. |
| WordPress Installation | Hosting control panel (often via 1-click installer) | Install the WordPress core software that powers your site. |
| Theme & Design | WordPress Dashboard » Appearance | Control your site’s layout, colors, fonts, and header/footer. |
| Content & Pages | WordPress Dashboard » Pages / Posts | Create home, about, contact, blog posts, and other core content. |
| Plugins & Features | WordPress Dashboard » Plugins | Add SEO, contact forms, security, backups, and more tools. |
As a result of following this structure, you avoid getting lost in random settings. Instead, you simply move through each stage in order and you will create a website with WordPress very quickly.
Step 2: Choose a Domain Name and Buy Hosting for Your WordPress Website
Now that you understand the flow, the next step is to secure your domain and hosting. Your domain is your website’s address, and hosting is where your site’s files live. You need both to create a website with WordPress.
- First, brainstorm a short, memorable domain that matches your brand or topic (for example, mybrand.com or mybrandstudio.com).
- Then, use a reputable registrar or hosting company to check if the domain is available.
- Afterward, pick a hosting plan that specifically supports WordPress (shared hosting, managed WordPress hosting, or VPS if you need more power).
- During checkout, connect your new domain to the hosting account (most hosts do this automatically when you buy both together).
- Finally, check your email for host login credentials and control panel details.
How to verify After setup, visit your domain. At this point, you may see a default hosting page or an empty site. Nevertheless, that means the domain is correctly pointing to your hosting and you’re ready to install WordPress and continue creating your website.
Step 3: Install WordPress on Your Hosting Account
Once your domain and hosting are ready, you can move on and install WordPress. Fortunately, most modern hosts offer a one click WordPress installer that saves you from manual uploads and database creation when you create a website with WordPress.
- First, log in to your hosting control panel (cPanel, Plesk, or a custom dashboard).
- Next, look for WordPress or 1-click install options, often under a section like “Website” or “App Installer”.
- Then, click the installer and choose your domain from the dropdown.
- After that, set an admin username, a strong password, and your email address.
- Finally, click Install and let the tool finish the setup.
How to verify Once the installation is done, visit https://yourdomain.com/wp-admin. If you see the WordPress login screen, it means you can now log in and start building your WordPress website right away.
Step 4: Configure Basic WordPress Settings
Before you dive into design, it is wise to adjust a few important settings. Otherwise, you might need to redo them later as you create a website with WordPress.
- First, log in to your dashboard at https://yourdomain.com/wp-admin.
- Then, go to Settings » General and:
- Set your Site Title (your brand or website name).
- Set a simple Tagline that describes your site, or leave it empty.
- Confirm the WordPress Address (URL) and Site Address (URL) match your domain.
- Also set your timezone, date and time format, and language.
- Next, go to Settings » Permalinks and choose Post name so your URLs look like
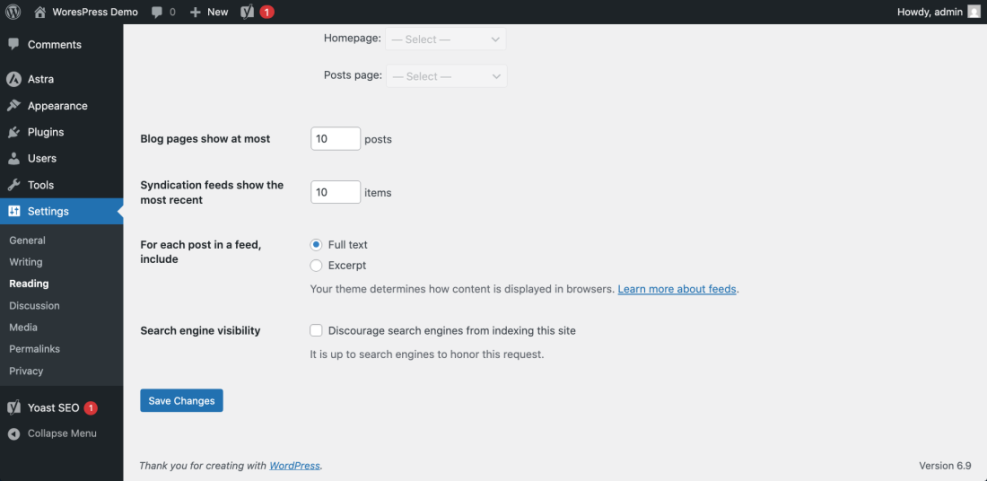
/sample-page/instead of messy numbers. - After that, go to Settings » Reading and make sure Search engine visibility is not checked if you want Google to index the website you are creating with WordPress.
Step 5: Choose and Install a WordPress Theme
With the basics set, you can now focus on design. Your theme controls how your website looks and how layouts are structured. When you create a website with WordPress, you can change themes later without losing your content, which makes experimenting easier.
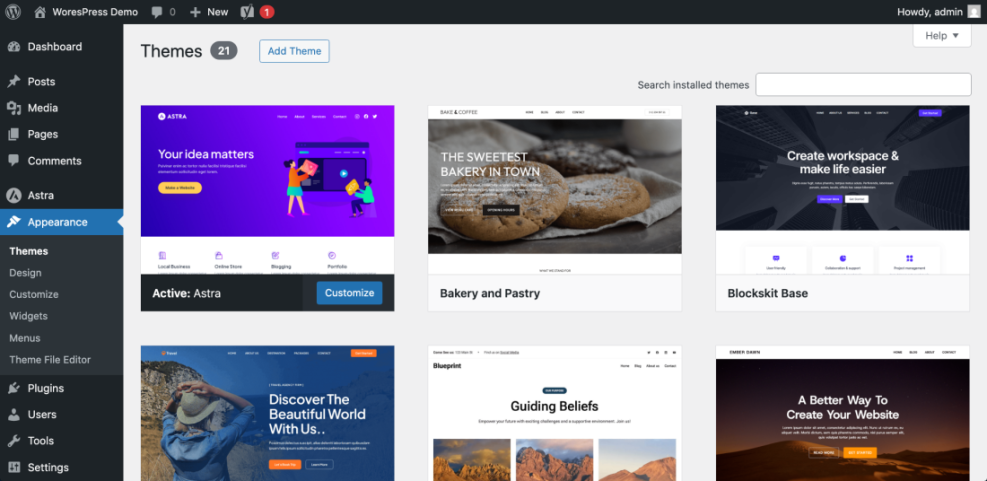
- First, in the dashboard, go to Appearance » Themes.
- Then, click Add New. You can browse the available free themes or use the search bar for keywords like “business”, “blog”, or “portfolio”.
- After that, preview themes to see their demo layouts.
- Once you find one you like, click Install then Activate.
- Finally, note that many modern themes use the Customizer or Site Editor, which you can access under Appearance.
Step 6: Customize Your Design and Layout
After activating your theme, it is time to make the site feel like yours by adjusting the logo, colors, fonts, and layouts. At this stage, your plan to create a website with WordPress really starts to look like a real brand.
- To begin, go to Appearance » Customize or Appearance » Editor (for block themes).
- Next, upload your logo and set your site icon (favicon).
- Then, choose your primary and accent colors to match your brand.
- Additionally, pick font styles that are readable on desktop and mobile.
- Finally, adjust header and footer layouts (menus, social icons, contact info) so everything looks consistent.

Step 7: Create Essential Pages and a Menu
Once the design framework is ready, you can start adding real content. Every time you create a website with WordPress, you should start with a few core pages so visitors immediately understand who you are and what you offer.
- First, go to Pages » Add New and create:
- Home – your main overview page.
- About – who you are and what you do.
- Services or Portfolio (if relevant).
- Contact – how people can reach you.
- Blog (optional) – for ongoing articles and updates.
- Next, use the Block Editor to add headings, paragraphs, images, buttons, and columns without code as you build out your WordPress website.
- After creating these pages, go to Settings » Reading to choose:
- Your homepage displays: A static page (select your Home page).
- Posts page: Select your Blog page.
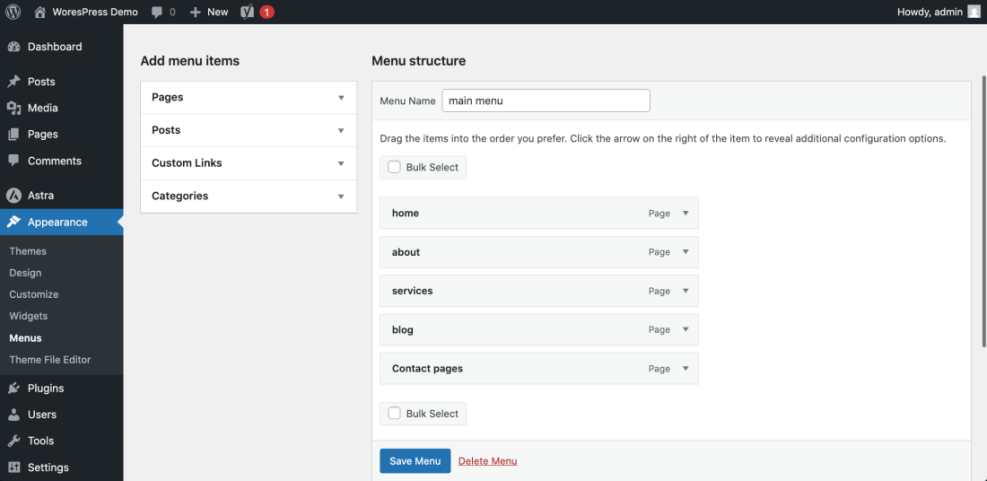
- Then, go to Appearance » Menus (or the navigation area in the Site Editor) and:
- Create a new menu (for example, “Main Menu”).
- Add your Home, About, Services, Blog, and Contact pages.
- Finally, assign the menu to your theme’s primary location.
Step 8: Install Essential Plugins
At this point, your basic site structure is ready. Now you can extend it. Plugins add extra features to your WordPress website. When you create a website with WordPress, it is best to start with a small, essential set instead of installing everything you see.
- First, in your dashboard, go to Plugins » Add New.
- Then, search for and install plugins for:
- SEO (to optimize your pages for search engines).
- Security (to protect login and block attacks).
- Backups (to automatically save copies of your site).
- Contact forms (to let visitors email you easily).
- Performance / caching (to make your site load faster).
- After installation, activate each plugin and follow its setup wizard or settings page.
Step 9: Test Your Website and Launch
Finally, before you share your WordPress website with the world, you should test it like a real visitor would. This extra step helps you avoid embarrassing mistakes.
- First, visit your site on desktop and mobile devices. Check that menus work, pages load, and text is easy to read.
- Next, click every link in your header and footer to confirm there are no 404 errors.
- Then, submit a test message through your contact form to ensure emails arrive.
- Additionally, ask a friend or colleague to visit the site and give a quick first impression.
- Once you are happy, share the website you created with WordPress on social media, business profiles, and email signatures.
Conclusion You Have Built Your WordPress Website
In conclusion, you just learned how to create a website with WordPress from start to finish, including domain and hosting setup, WordPress installation, theme selection, basic design, essential pages, and must have plugins.
From here, you should focus on publishing helpful content, improving your design over time, and keeping WordPress, themes, and plugins updated. As you do this, the more you work inside the dashboard, the more natural it will feel to manage and grow the website you created with WordPress.
Overall, with this solid foundation in place, your WordPress website can grow with your business, audience, and long term goals.