How to Build a WordPress Website (Step by Step)
If you want to launch a WordPress Website that looks professional, you can build it yourself without coding by following a clear checklist.
In this guide you will register a domain, install WordPress on reliable hosting, choose a fast theme, add essential pages and plugins, and launch a secure WordPress Website that is ready for visitors.
By the end of this guide, you will have a fully working WordPress Website that you can keep improving over time with new content and simple design tweaks.
This tutorial is designed so that even if this is your first site, you can follow each step and finish with a live WordPress Website you control.
What You Need to Start Your WordPress Website
Minimum Setup for a Beginner WordPress Site
- A domain name you can register, such as example.com.
- A WordPress ready hosting plan with PHP and MySQL support. For help choosing, read How to choose the best WordPress hosting.
- Access to your hosting control panel or dashboard.
- A working email address for account verification and admin notifications.
- Thirty to sixty minutes of focused time without distractions so you can set up your WordPress Website in one sitting.
Once you have these basics, you are ready to start building your own WordPress Website from scratch.
Step 1: Choose Your WordPress Website Domain and Hosting
Pick the Right Domain for Your WordPress Site
Every WordPress Website needs a unique web address and a server to live on. Choose a domain that matches your brand and a host that is optimized for WordPress.
- Brainstorm three to five short domain ideas that match your brand or topic.
- Log in to your hosting provider account or create a new one.
- Use the domain search tool to check if your preferred domain is available.
- Select the hosting plan that supports WordPress and includes an SSL certificate.
- Complete the checkout and confirm your email so your account is fully activated.
Review Your Hosting Order Before Payment
On the hosting checkout screen, review the selected domain, plan length, and any add ons before you pay. This is the foundation of your WordPress Website, so double-check everything carefully.
After payment your host will send a welcome email with login details for the control panel or dashboard you will use in the next step to install your WordPress Website.
Once hosting is active and your domain is connected, you are ready to put WordPress on the server and turn that empty space into a real WordPress Website.
Step 2: Install WordPress on Your WordPress Website Host
Use One Click Tools to Create Your WordPress Site
Most hosts provide a one click installer that sets up WordPress for you. Use it to avoid manual uploads and database creation and get your WordPress Website online quickly.
- Log in to your hosting control panel from the welcome email.
- Locate the WordPress installer, often under WordPress, Softaculous, or Website tools.
- Click the installer and choose your domain from the Domain dropdown.
- Leave the Directory field blank so WordPress installs at the root of your domain.
- Enter your Site Title, Admin Username, Password, and Admin Email.
- Click Install and wait for the progress bar to reach 100 percent.
On the installer screen, double check the domain and admin email before you start the installation so the login details for your WordPress Website are correct.
Troubleshooting Your WordPress Website Installation
If your host does not offer a one click installer, download the latest WordPress package from WordPress.org and follow the official installation instructions.
If you need a detailed walkthrough, follow How to install a WordPress theme for screenshots and alternatives.
When the installer finishes, open your site in a new tab and confirm that you see the default WordPress homepage and that your new WordPress Website loads correctly on both desktop and mobile.
At this point your WordPress Website technically exists, and the remaining steps focus on configuring, designing, and filling it with content.
Step 3: Configure Basic WordPress Website Settings
Set Up Your WordPress Site Name and URLs
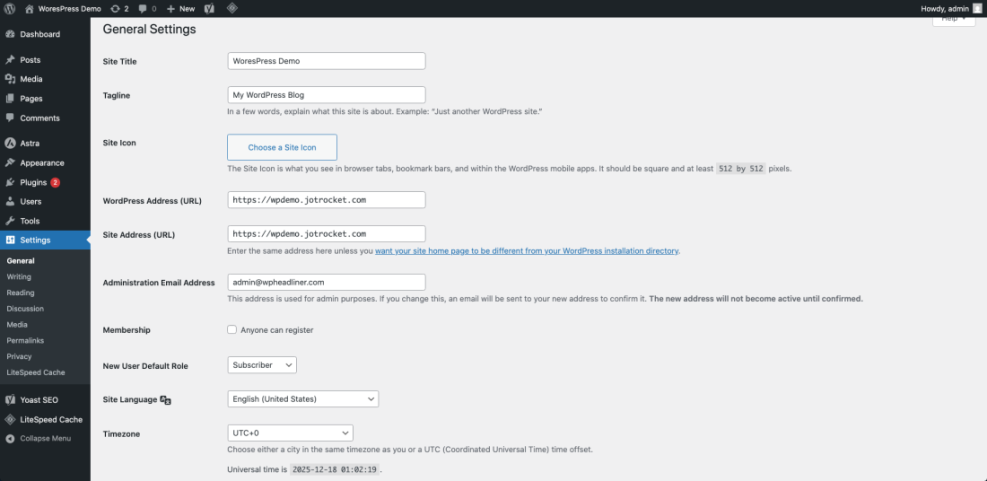
Now configure general settings so your WordPress Website shows the correct name, time, and URL structure from the beginning.
- Visit your site admin area by opening yourdomain.com/wp-admin in your browser.
- Log in with the Admin Username and Password you created during installation.
- In the dashboard menu, go to Settings » General.
- Update your Site Title, Tagline, and Administration Email Address.
- Set your Timezone, Date Format, and Time Format, then click Save Changes.
- Next go to Settings » Permalinks and choose Post name, then click Save Changes.
On the General Settings screen, confirm that the WordPress Address and Site Address fields show the same correct domain for your WordPress Website.
Visit one of the sample posts and confirm that the address bar now shows a clean URL with the post name rather than numbers and symbols.
Setting these options correctly now saves you from future headaches and keeps your WordPress Website easy to manage as you publish more content.
Step 4: Choose and Install Your WordPress Website Theme
Design the Look of Your WordPress Site or Blog
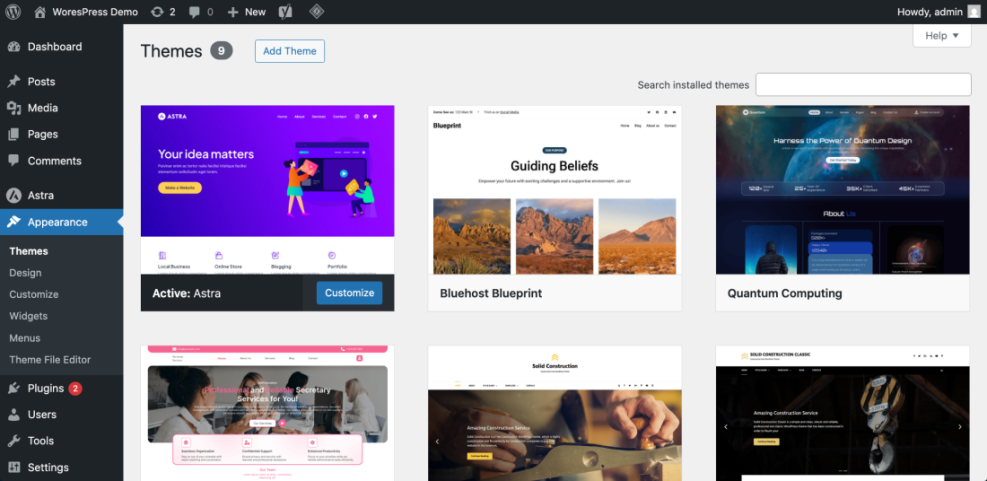
Your theme controls the design of your WordPress Website. Choose a lightweight theme that loads fast and matches your content style.
- In the WordPress dashboard, go to Appearance » Themes.
- Click Add New to browse free themes from the official directory.
- Use the search box to find a design you like, then hover and click Preview to see how it might look.
- Click Install, then click Activate on your chosen theme.
- If you purchased a premium theme such as Jannah, click Upload Theme, choose the theme zip file, click Install Now, then Activate.
- Open Appearance » Customize or the theme options panel to upload your logo, set colors, and adjust layouts.
On the Themes screen, confirm that your selected theme appears first and is labeled Active.
For more design tips and layout ideas, review the WordPress migration blog guide and adapt the suggestions to your own pages so your WordPress Website looks consistent and on brand.
A clean, fast theme makes your WordPress Website feel more professional and improves the experience for new visitors.
Step 5: Create Core Pages for Your WordPress Website
Essential Pages Every WordPress Site Needs
Next create the key pages that every professional WordPress Website needs. Start with a simple structure and improve the copy over time.
- In the dashboard, go to Pages » Add New.
- Enter Home as the page title.
- In the content editor, add a short welcome paragraph, a few bullet points about what you offer, and a clear call to action button.
- Click Publish to make the page live.
- Repeat the process to create About, Services or Blog, and Contact pages.
On the Add New Page screen, keep the layout clean with short paragraphs, headings, and simple buttons so visitors can scan quickly.

Check How Your WordPress Website Pages Look
Open each new page in a new tab and confirm that the text, headings, and links look correct on both desktop and mobile. These pages form the backbone of your WordPress Website and make your site feel complete even with only a few pieces of content.
With these core pages in place, your WordPress Website already looks more professional and is ready for your first visitors.
Step 6: Build Your WordPress Website Navigation Menu
Create a Clear Menu for Your WordPress Site
A clear navigation menu helps visitors move around your WordPress Website. Create a primary menu that links to your most important pages.
- In the dashboard, go to Appearance » Menus.
- Click Create a new menu, enter a name like Main Menu, and click Create Menu.
- Under Pages, check Home, About, Blog, and Contact, then click Add to Menu.
- Drag and drop menu items into the order you want. Indent items slightly to create dropdowns.
- In Menu Settings, check the location that represents your main header menu, then click Save Menu.
On the Menus screen, make sure your menu is assigned to the correct display location for your theme.

Visit your homepage, refresh the page, and confirm that your new menu appears across the top and all links work correctly for your WordPress Website.
Step 7: Set Your WordPress Website Homepage and Blog
Control How Visitors See Your WordPress Site
Tell WordPress which page should be your front page and which page should list your latest posts. This gives you full control over the Home design and how visitors experience your WordPress Website.
- In the dashboard, go to Settings » Reading.
- Under Your homepage displays, choose A static page.
- Select your Home page in the Homepage dropdown.
- Select your Blog or News page in the Posts page dropdown.
- Scroll down and click Save Changes.
On the Reading Settings screen, confirm that the correct pages are selected before saving your WordPress Website configuration.
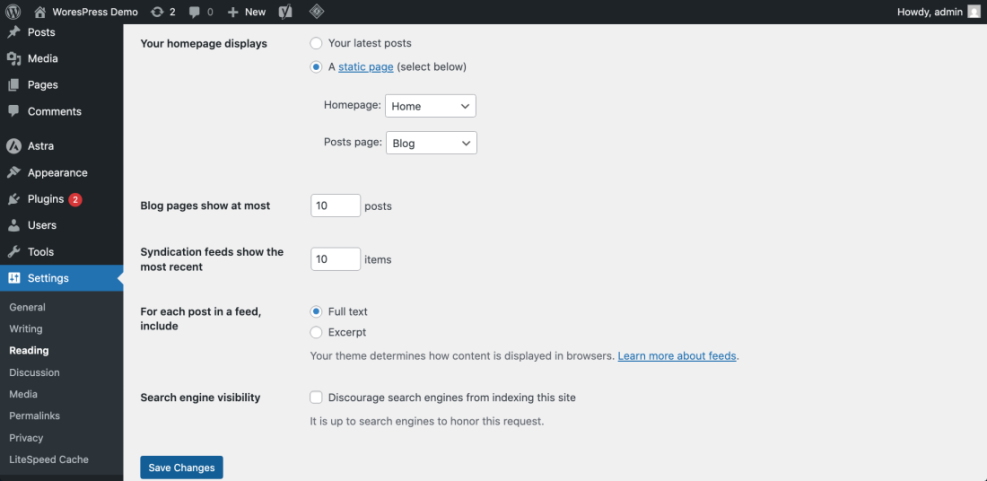
Reload your site in a new tab and verify that your custom Home page appears at the root domain and your posts page lists your latest articles.
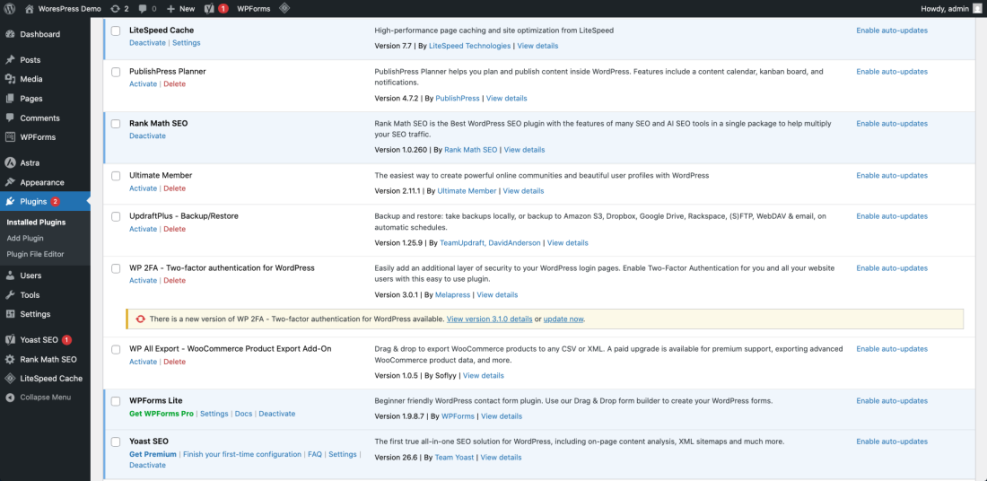
Step 8: Add Essential Plugins to Your WordPress Website
Key Plugins for a Healthy WordPress Site
Plugins extend your WordPress Website with new features. Start with a focused set to handle SEO, backups, security, caching, and contact forms.
- In the dashboard, go to Plugins » Add New.
- Use the search box to find a reputable SEO plugin, such as Yoast SEO or Rank Math.
- Click Install Now, then click Activate.
- Search for a backup plugin and a security plugin, install, and activate them in the same way.
- Install a caching plugin recommended by your host and a contact form plugin so visitors can reach you.
On the Plugins screen, review the list and confirm that only trusted, actively maintained plugins are installed.
Recommended Plugin Setup for Your WordPress Website
To learn how to configure SEO settings properly, read Is WordPress good for seo and apply the recommendations to your new site.
To help you plan ongoing maintenance for your WordPress Website, compare these common methods:
| Method | Where You Use It | Main Purpose |
|---|---|---|
| DIY Manual Maintenance | WordPress dashboard and hosting control panel | Maximum control over updates, theme and plugin changes, and manual checks for title issues on small or low-risk sites. |
| Managed Hosting Tools | Your host’s control panel or custom dashboard | Simplify routine maintenance with one-click updates, built-in backups, and basic monitoring so template problems are less likely to appear. |
| SEO, Maintenance & Security Plugins | Plugins section inside the WordPress dashboard | Automate repetitive tasks like backups, database cleanup, image optimization, and security scans, while also running periodic audits of titles and meta tags. |
| WP-CLI and Developer Tools | SSH terminal with WP-CLI and deployment tools | Scriptable, fast maintenance for developers managing multiple or complex sites, including scanning themes for legacy header.php markup. |
| Professional WordPress Care Plan | External provider, freelancer, or agency | Hands-off maintenance with proactive monitoring, regular audits, and expert fixes so problems like duplicate titles are caught early. |
Using Your WordPress Dashboard for Ongoing Website Maintenance
Everyday Tasks to Maintain Your WordPress Site
Your WordPress dashboard is the control center for your WordPress Website. After your site is live, log in regularly to:
- Apply updates for WordPress core, themes, and plugins.
- Check SEO, security, and backup plugin dashboards for alerts.
- Review comments, form entries, and basic traffic stats.
- Run quick visual checks on key pages to catch layout or title issues early.
Whether you manage everything yourself or work with a care plan, understanding the dashboard makes it easier to spot problems on your WordPress Website before visitors do.
Step 9: Test and Launch Your WordPress Website
Final Checks Before Launching Your WordPress Site
Before you announce your new WordPress Website, run a quick launch checklist to catch broken links and design issues.
- Open your homepage and click through every menu link and button to confirm they go to the right pages.
- Test your contact form by sending a message and confirming that you receive the email.
- View your site on a phone and a tablet to check that fonts, images, and buttons are easy to read and tap.
- In the dashboard, go to Settings » Reading and make sure Discourage search engines from indexing this site is unchecked.
- Ask a friend or colleague to visit the site and share honest feedback before you start promoting it.
On your final review, look for spelling errors, blurry images, and confusing navigation items and fix them before you officially launch your WordPress Website.
Conclusion You Are Ready to Launch Your WordPress Website
You have now learned how to build a WordPress Website from a blank hosting account to a live, professional site. Your domain, hosting, WordPress installation, theme, core pages, menu, and essential plugins are all in place.
From here you can focus on writing helpful content, improving your design, and optimizing your WordPress Website for search so more people can find your new site.
As you publish new posts and refine your design, your WordPress Website will grow into a valuable asset for your brand or business and continue to attract visitors over time.
Further Reading on Building a WordPress Website
- How to start a blog WordPress
- Developer hooks for optimizing WordPress plugins with code
- Beginner guide to WordPress speed optimization
- Beginner WordPress security best practices guide
- How to add keywords in WordPress without hurting