If your WordPress site went down today, could you restore it within an hour? Hacks, bad plugin updates, or simple hosting failures can wipe out months of work if you don’t have a solid backup.
In this guide, you’ll learn how to backup WordPress site data step by step. You’ll see what to back up, how to use your host’s tools, how to configure a backup plugin, and how to check that your backups actually work.
We’ll focus on a simple WordPress backup routine you can repeat every week. It fits into your broader WordPress backup strategy without getting overly technical.
What You Need Before You Back Up Your WordPress Site
Before you back up your WordPress site, make sure a few basics are ready. This keeps the process smooth and reduces errors.
- Admin access to your WordPress dashboard so you can manage backup plugins and settings.
- Access to your hosting control panel (cPanel, Plesk, or a custom panel) or SFTP/FTP for manual file copies.
- A cloud storage account (Google Drive, Dropbox, Amazon S3, etc.) for offsite WordPress site backup files.
- Enough free space at your host and in your cloud account for several full site backups.
Step 1: Plan How to Backup Your WordPress Site
A proper WordPress backup covers both your files and your database. If you skip either one, your restore may be incomplete.
Your backup should include:
- WordPress core files in your main installation folder.
- The wp-content directory, which holds themes, plugins, uploads, and custom code.
- The database, which stores posts, pages, settings, users, menus, and plugin data.
Why Regular Backups Matter
Every new post, comment, or order changes your database. If you only backup your WordPress site occasionally, you risk losing days of work when something breaks.
Choose your backup frequency based on how often your content changes:
- High-activity sites (news, busy blogs, stores): Daily backups. Add database backups every 4–12 hours if you can.
- Moderate sites (business sites, smaller blogs): Daily backups or every 2–3 days.
- Low-activity sites (rare updates): Weekly backups plus one before major changes.
Step 2: Turn On Hosting-Level Backups for Your WordPress Site
Most decent hosts provide automatic backups or snapshots. Turn these on first. Host-level backups give you a quick way to roll back your whole account.
Find the Backup Tools in Your Hosting Panel
- Log in to your hosting control panel for the site you want to protect.
- Look for sections named Backups, Backup Wizard, Snapshots, or Automatic Backups.
- Check that your WordPress domain or site folder is included. Make sure the whole site is covered.
Configure Your Hosting Backup Schedule
- Set the backup schedule to at least daily if possible.
- Choose how many restore points to keep so old backups are not removed too quickly.
- Run a manual backup if your host has a “Backup Now” or “Create Snapshot” button. This gives you a fresh backup WordPress site copy right away.
If you want help choosing better server-side options for your WordPress backups, see our guide on WordPress hosting backups after you finish this setup.
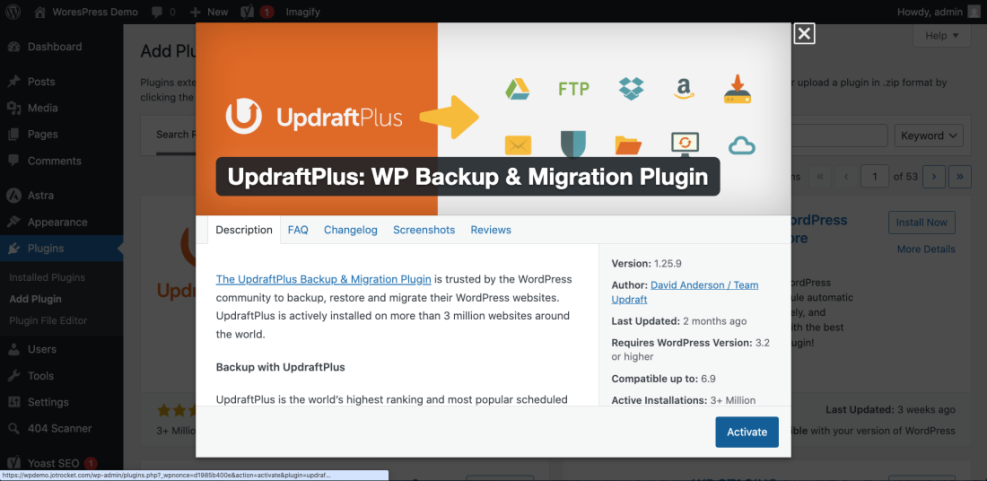
Step 3: Use a Plugin to Backup Your WordPress Site
A WordPress backup plugin is your second layer of protection. It lets you store backups offsite, automate the schedule, and restore single sites quickly, even on a new server.
- In your WordPress dashboard, go to Plugins → Add New.
- Search for “backup” and compare plugins with many installs and strong reviews.
- Click Install Now, then click Activate on the plugin you prefer.
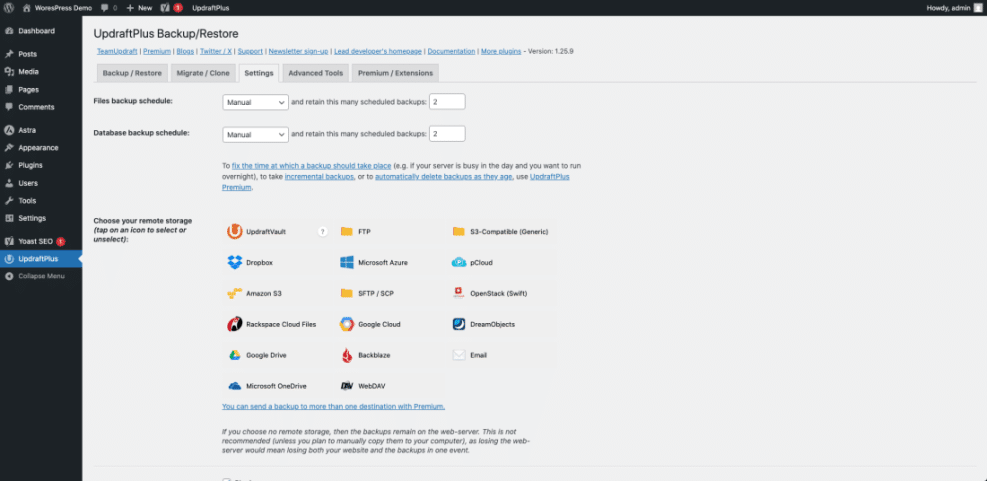
Configure Your WordPress Backup Plugin
Open the plugin settings under Settings or its own menu item. Then work through the setup wizard so it can properly backup your WordPress site.
- Choose what to back up. Start with a full site backup, then consider database-only backups between full runs.
- Set a schedule. Daily backups work well for most sites. Scale up for heavy traffic.
- Connect a remote storage service such as Google Drive, Dropbox, Amazon S3, or SFTP.
- Set how many backups to keep so storage does not fill up.
Smart Places to Store Your Files
Do not keep every backup on the same server as your site. Use at least one remote location. This could be Google Drive, Dropbox, Amazon S3, or another server you control. That way your WordPress site backup is safe even if your main host fails.
If you need help picking a plugin, our guide to WordPress backup plugins walks through popular options in more detail.
Step 4: Test a Restore So You Know It Works
A backup you never test is a backup you cannot trust. Run a test restore before a real emergency happens.
Use a staging site or a temporary subdomain so you do not risk the live site.
- Create a staging site through your host or on a separate subdomain. Install WordPress on it.
- Open your backup plugin and choose the Restore or Migrate/Clone option.
- Point it to your backup file for the WordPress site you want to test.
- Follow the steps to restore files and the database to the staging environment.
- Log in and check pages, menus, theme settings, and plugins. Make sure everything looks right.
If your host has no staging option, restore your WordPress backup to a local development setup instead. This still proves the backup works.
Manual Backup Checks via SSH
If you are comfortable with the command line, you can also create manual backups. This gives you another way to confirm the contents of your WordPress site backup.
Database export with WP-CLI:
wp db export ~/backups/wp-db-$(date +%F).sqlFile archive from your WordPress root:
tar -czf ~/backups/wp-files-$(date +%F).tar.gz .Common Mistakes to Avoid
- Backing up only the database and ignoring the
wp-contentfolder. - Keeping every backup on the same server as the live site.
- Waiting until after a major incident to test a restore.
Step 5: Automate Everything and Keep an Eye on It
Once your backups run smoothly, automate them. Then check in regularly. A few minutes each week can prevent hours of stress later.
Set Up Automatic Backup Schedules
- In your backup plugin, enable a recurring schedule so it continues to backup WordPress site data for you.
- Turn on email or dashboard alerts for both successful and failed backup jobs.
- Check that old backups are being removed so you do not run out of storage.
Review Your WordPress Backups Regularly
- Once a month, download one backup file. Open it or restore it to staging to confirm it works. This simple habit proves your latest WordPress site backup is usable.
Make Backing Up Your WordPress Site a Routine
Backing up your WordPress site is not a one-time task. It is an ongoing routine that protects your content and your business.
Combine host-level backups with a well-configured backup plugin. Store copies offsite. Test restores regularly. With that in place, you have a reliable safety net and several backup WordPress site copies ready when you need them.
Further Reading
- Beginner guide to WordPress speed optimization
- WordPress Disaster Recovery Walkthrough
- WordPress Maintenance and Backup Plan