How to Add Title Tags in WordPress
A step-by-step guide to creating SEO-friendly title tags on your WordPress site
Is every page on your WordPress site showing the same generic title in Google, or just “Home” in the browser tab? That usually means your title tags aren’t set up correctly, which can hurt both click-through rate and rankings.
In this guide, you’ll learn exactly how to add and control title tags in WordPress using core settings, an SEO plugin, and (if needed) a small theme tweak. If you’re completely new to SEO, you may also want to review our complete beginner’s guide to WordPress SEO once you’re done here.
By the end, every important page on your site will have a unique, descriptive, and search-friendly title tag that you can preview, test, and easily adjust over time.
Prerequisites
Before you start changing title tags, make sure you have a few basics covered so you don’t accidentally break anything on your live site.
- Admin access to your WordPress dashboard.
- Permission to install and configure plugins (for SEO plugins).
- Basic familiarity with either the Classic Editor or the block editor.
- Optional but recommended: access to your theme files via a child theme, FTP, or your host’s file manager.
Step 1: Understand how WordPress title tags work
WordPress title tag uses several different “titles,” and it’s important to understand how they relate to the title tag that search engines see.
- Post/Page Title: The title you type at the top of the editor (e.g., “How to Bake Sourdough Bread”).
- Title Tag (<title>): The HTML element that appears in the browser tab and as the blue link in Google’s results.
- SEO Title: A custom title (often set via plugin) that tells WordPress exactly what to output in the <title> tag.
On modern themes that support add_theme_support( 'title-tag' ), WordPress automatically generates a title tag based on your settings and templates. SEO plugins like Yoast or Rank Math let you override that default for better control on a per-page basis.
Your goal is simple: ensure that every important page has a unique, descriptive title tag that matches the content and encourages clicks.
Step 2: Configure your global site title in WordPress
Before you fine-tune individual pages, set a clean, brand-correct site title. WordPress often uses this as part of your title tag pattern (for example, “Post Title – Site Name”).
- Log in to your WordPress dashboard.
- Go to Settings → General.
- In the Site Title field, enter your brand or site name (e.g., “WP Headliner”).
- Optionally update the Tagline with a short description or leave it blank if you don’t want it used anywhere.
- Click Save Changes.
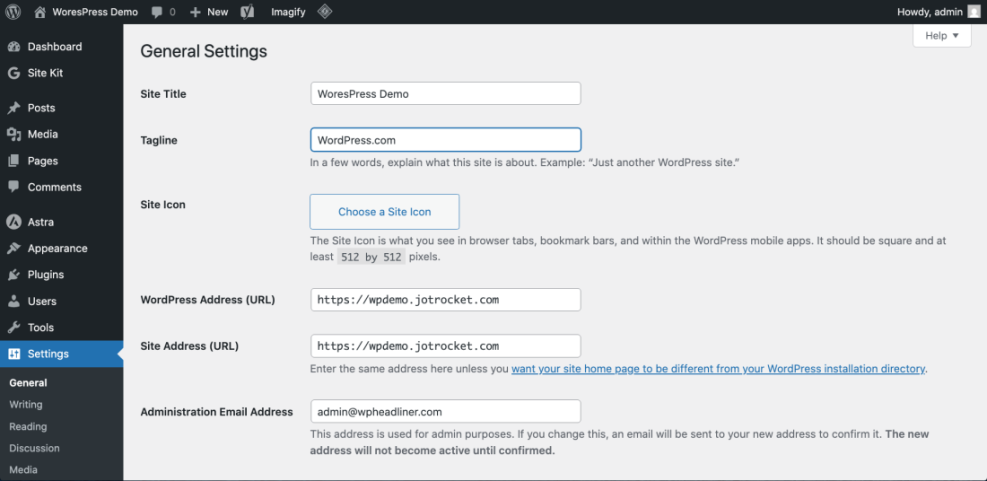
The exact way the Site Title appears in your title tags will depend on your theme and any SEO plugin you use, but getting this right now prevents confusing or off-brand titles later.
Step 3: Add custom title tags with an SEO plugin
The easiest and safest way to add and manage title tags in WordPress is with a dedicated SEO plugin. We’ll use Yoast SEO as the example, but the process is similar in Rank Math or All in One SEO.
3.1 Install an SEO plugin (Yoast example)
- In the WordPress dashboard, go to Plugins → Add New.
- Search for Yoast SEO.
- Click Install Now, then click Activate.
Once activated, Yoast adds a new SEO menu in your admin sidebar and a meta box on your post and page edit screens.
3.2 Configure global title templates
Next, you’ll define how title tags should look by default for posts, pages, categories, and other content types.
- Go to SEO → Search Appearance.
- Under the Content Types tab, find Posts and Pages.
- In the SEO title field, use variables like
%%title%%and%%sitename%%(for example:%%title%% | %%sitename%%). - Repeat for other content types you use (products, custom post types, etc.).
- Save changes.
This tells Yoast how to generate a title tag automatically when you don’t specify a custom one.
3.3 Set a custom title tag on a post or page
For important pages (home, key services, top posts), you’ll usually want a custom, hand-crafted title tag.
- Open the post or page in the editor (Classic Editor or block editor).
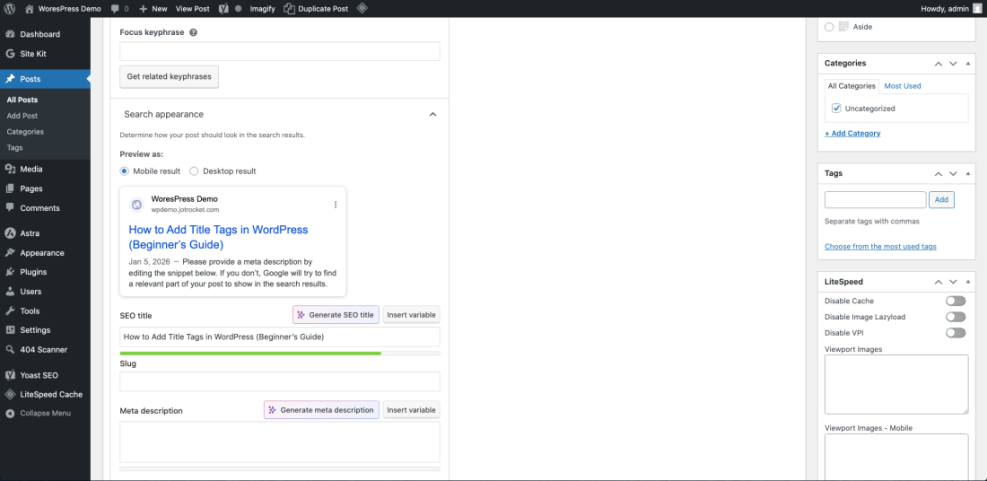
- Scroll down to the Yoast SEO meta box.
- In the SEO title field, type your optimized title (e.g., “How to Add Title Tags in WordPress (Beginner’s Guide)”).
- Watch the preview snippet and the length bar to avoid truncation in search results.
- Click Update or Publish to save.
Repeat this for your most important pages first, then work your way through the rest of your content over time.
For a deeper walkthrough of adjusting these titles across your site, see our full tutorial on changing the SEO title in WordPress.
Step 4: Fix or add theme-level title tag support
If your theme is very old or poorly coded, it might hard-code the <title> element or fail to support WordPress’s dynamic title system. Modern themes like Jannah already handle this correctly, so you mainly need to configure your SEO plugin.
4.1 Check if your theme already supports dynamic title tags
- Open a page on the front end of your site (for example, a blog post).
- Right-click and choose View Page Source (or use your browser’s developer tools).
- Search for <title> in the source code.
- Confirm that the title text changes when you view different pages and matches the SEO title you set in your plugin.
If every page shows the same title, or if it doesn’t match what you configured in Yoast, your theme might be overriding or missing dynamic title support.
4.2 Enable title tag support in your theme
- Using FTP, cPanel File Manager, or the built-in Theme File Editor, open your child theme’s
functions.phpfile. - Look for a function that runs on the
after_setup_themehook. If you don’t see one, add this:
function mytheme_setup() {
    add_theme_support( 'title-tag' );
}
add_action( 'after_setup_theme', 'mytheme_setup' );- Save the file and reload a front-end page to ensure there are no PHP errors.
If your theme already has a mytheme_setup() (or similar) function, just add the add_theme_support( 'title-tag' ); line inside that function instead of creating a new one.
4.3 Remove any hard-coded <title> tags
- Open your theme’s
header.phpfile in the child theme. - Search for a hard-coded title element, for example:
<title>My Blog</title>- Delete that line or comment it out so WordPress (and your SEO plugin) can output the title instead.
- Save your changes and reload a front-end page to confirm the title now comes from WordPress and your plugin.
If you’re already comfortable editing theme files, this is also a good moment to review other head elements like meta description and canonical tags. Our guide to adding meta tags in WordPress shows you how to handle those safely.
Step 5: Test and refine your WordPress title tags
Once your title tags are set up, you’ll want to verify that everything works as expected in the browser and in Google’s index.
- Check in the browser tab: Visit a page and look at the text in the tab. It should match the SEO title you set (or your template pattern).
- View the page source: Use View Page Source and confirm the <title> element contains the correct text.
- Spot-check in Google: Search for
site:yourdomain.com "keyword"and see how titles are displayed. Google may occasionally rewrite them, but most should be close to your originals. - Use Google Search Console: In the URL Inspection tool, fetch a few key URLs to confirm they’re being crawled and rendered correctly.
- Adjust over time: If important pages have low click-through rates, experiment with clearer, more benefit-driven titles.
Lock in better SEO with clean WordPress title tags
Adding proper title tags in WordPress is a one-time setup that pays off for years. With a good global pattern, an SEO plugin to fine-tune key pages, and a theme that supports dynamic titles, you make it easy for search engines and users to understand every page on your site.
From here, you can focus on optimizing your meta descriptions, on-page content, and internal links, knowing that your title tags are working hard to attract the right clicks from the right visitors.
Further Reading
- How to Add Meta Description in WordPress
- How to Remove Duplicate Title Tags in WordPress
- How to Do On-Page SEO in WordPress
- How to Add Schema Markup in WordPress
Frequently Asked Questions
What is a title tag in WordPress?
Why are my new title tags not showing in Google search results?
How do I stop every page from using the same title tag?
add_theme_support( 'title-tag' )), remove any hard-coded <title> in header.php, and use an SEO plugin to generate unique titles for each content type.