
Add Meta Tags in WordPress when you want search engines and social networks to better understand your content and show more accurate snippets. With the right setup, you can control titles, descriptions, and social previews for every important page on your site.
In this step by step tutorial, you’ll learn different ways to add meta tags using SEO plugins, theme options, and simple code snippets, so you can choose the method that fits your skills and keep full control over how your pages appear in search results.
What You Need Before You Get Started
- Administrator access to your WordPress site.
- A modern theme that follows WordPress coding standards.
- Optional: A popular SEO plugin (Yoast SEO, Rank Math, or All in One SEO).
- Basic understanding of posts, pages, and custom post types.
- A recent full backup before installing new plugins or editing code.
Step 1: Understand What Meta Tags Are and Why They Matter
Before you start adding anything, it helps to know which meta tags actually affect SEO and how they show up in search results and social feeds.
- <title> tag: The clickable headline in search results and browser tabs.
- Meta description: The short summary under the title in search results.
- Robots meta: Tells search engines whether to index a page or follow its links.
- Open Graph tags (og:): Control how your content looks when shared on Facebook, LinkedIn, etc.
- Twitter Card tags: Similar to Open Graph, but for Twitter/X.
You rarely need to hand-code all of these on every page. Most sites handle them through a good SEO plugin or theme integration.
Step 2: How to Add Meta Tags in WordPress with an SEO Plugin
The easiest way to Add Meta Tags in WordPress is to use a dedicated SEO plugin. These tools add title, description, and social meta tags for you based on the settings you choose.
- In your WordPress dashboard, go to Plugins » Add New.
- Search for Yoast SEO, Rank Math, or All in One SEO.
- Click Install Now next to your chosen plugin, then click Activate.
- Follow the plugin’s setup wizard (if provided) to configure basic SEO settings like site name and homepage meta.
- Check that the plugin now adds an SEO box or panel under the editor for posts and pages.
Step 3: Optimize Meta Tags for Individual Posts and Pages
Once your SEO plugin is active, you can customize the title and meta description for each post or page directly in the editor.
- Go to Posts » All Posts (or Pages » All Pages).
- Click Edit under the post or page you want to optimize.
- Scroll down below the content editor to find your SEO plugin box (for example, “Yoast SEO” or “Rank Math SEO”).
- In the SEO title field, enter a clear, keyword-rich title that will become the <title> tag.
- In the Meta description field, write a concise summary (usually 120–155 characters) that encourages clicks.
- Watch the plugin’s snippet preview to see how your meta tags will appear in search results.
- Click Update or Publish to save your changes.
Step 4: Set Sitewide SEO Defaults
Editing every page manually is slow. Most SEO plugins let you Add Meta Tags in WordPress using dynamic templates, so new posts start with sensible defaults.
- Open your SEO plugin’s main settings (for example, SEO » Search Appearance in Yoast).
- Look for sections like Content Types, Archives, or Taxonomies.
- Set a title template using variables (for example,
%%title%% - %%sitename%%). - Optionally define a default meta description template that pulls in excerpts or custom fields.
- Ensure important content types (Posts, Pages) are set to index and low-value archives (like some author archives) can be set to noindex if needed.
- Save your changes once you are happy with the templates.
Step 5: Control Social Sharing (Open Graph and Twitter)
Meta tags are not just for search engines. Open Graph and Twitter Card tags control how your content looks when shared on social media.
- In your SEO plugin settings, look for a section called Social or Social Meta.
- Enable Open Graph metadata for Facebook and other networks, and Twitter Cards for Twitter/X.
- Add default images and site-level social profiles (Facebook page, Twitter handle, etc.).
- On individual posts, use the SEO box’s Social tab to:
- Set a custom social title and description (can differ from the SEO title).
- Choose or upload a specific image for social shares.
- Save your changes and test by sharing the URL in a private post or via social preview tools.
Step 6: Manual Methods for Developers
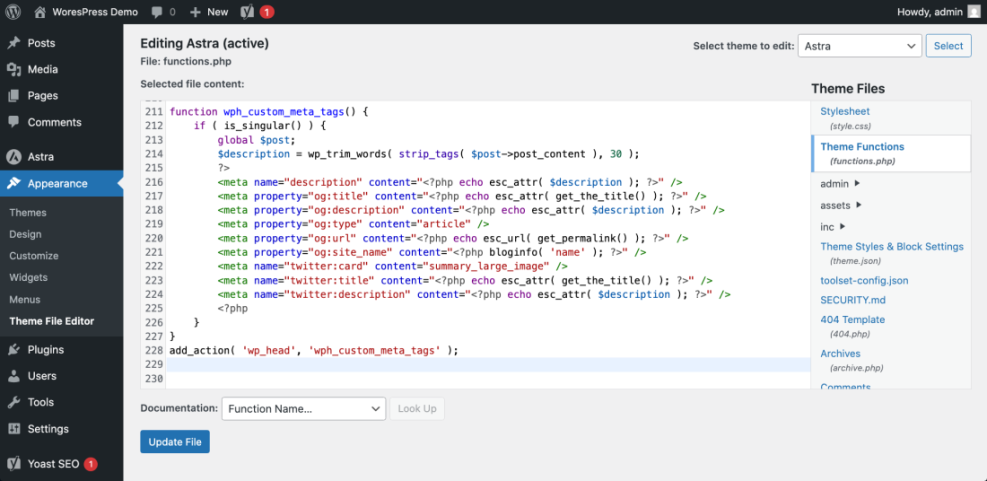
If you prefer not to use a plugin, you can Add Meta Tags in WordPress by editing your theme’s header file or using a small custom function. This is more technical and best for developers.
- Create a child theme or use a safe snippets plugin so your changes are not lost during updates.
- Open your child theme’s
header.phpfile or create a custom function hooked intowp_head. - Add basic meta tags inside the
<head>section. For example:
function wph_custom_meta_tags() {
    if ( is_singular() ) {
        global $post;
        $description = wp_trim_words( strip_tags( $post->post_content ), 30 );
        ?>
        <meta name="description" content="<?php echo esc_attr( $description ); ?>" />
        <meta property="og:title" content="<?php echo esc_attr( get_the_title() ); ?>" />
        <meta property="og:description" content="<?php echo esc_attr( $description ); ?>" />
        <meta property="og:type" content="article" />
        <meta property="og:url" content="<?php echo esc_url( get_permalink() ); ?>" />
        <meta property="og:site_name" content="<?php bloginfo( 'name' ); ?>" />
        <meta name="twitter:card" content="summary_large_image" />
        <meta name="twitter:title" content="<?php echo esc_attr( get_the_title() ); ?>" />
        <meta name="twitter:description" content="<?php echo esc_attr( $description ); ?>" />
        <?php
    }
}
add_action( 'wp_head', 'wph_custom_meta_tags' );
- Save your changes and refresh a single post page.
- View the page source and confirm the meta tags appear inside the
<head>section.
Step 7: Test Your Meta Tag Implementation
After you Add Meta Tags in WordPress, always test that they are output correctly and that search engines and social networks can read them.
- Open a page in your browser and right-click, then choose View Page Source.
- Search the source (Ctrl+F or Cmd+F) for
<title>andmeta name="description"to confirm they are correct. - Use Facebook’s sharing debugger or similar tools to preview how Open Graph tags are read.
- Use Twitter’s card validator to check Twitter Card meta tags.
- Optionally, use browser extensions or online meta tag analyzers to verify everything is in place.
Quick Comparison of Meta Tag Methods in WordPress
Use this table to choose the best way to Add Meta Tags in WordPress based on your skills and how much control you need.
| Method | Where You Use It | Main Purpose |
|---|---|---|
| SEO Plugin (Yoast, Rank Math) | WordPress dashboard » SEO settings + post editor | Quickly manage title, meta description, and social tags for all content with user-friendly controls. |
| Theme SEO Options | Appearance » Customize or theme options panel | Use built-in theme settings to set basic meta tags without extra plugins (feature varies by theme). |
| Manual Code in Theme | Child theme functions.php or header.php | Add custom meta tag logic using PHP for advanced or lightweight setups. |
| Custom Fields + Code | Custom fields in editor + wp_head hook | Store per-page meta values in fields and output them via a custom function. |
| SEO Plugin Social Settings | SEO plugin » Social / Facebook / Twitter tabs | Fine-tune Open Graph and Twitter Card tags for better social sharing previews. |
Conclusion: You’re Ready to Optimize Meta Tags in WordPress
You’ve seen several ways to Add Meta Tags in WordPress without guesswork. You can rely on a powerful SEO plugin, use theme options, or write a small amount of custom code for maximum control.
Start with an SEO plugin for titles and descriptions on key pages, then refine social meta tags and advanced settings as your site grows. Clean, accurate meta tags help search engines and visitors understand your content—and that usually leads to more clicks and better engagement.