Google Search Console is the free Google tool that shows how your WordPress site appears in search, and in this guide you will learn how to add Google Search Console to WordPress step by step.
By the end of this tutorial you will have a verified site property in Google Search Console, an XML sitemap submitted, and a clean setup that you can build on with deeper reporting and SEO audits.
For a broader analytics stack that includes traffic and conversions, you can later follow Beginner guide to WordPress speed optimization.
What You Need to Start
- A live WordPress site using your real domain, not a temporary or staging URL.
- Administrator access to your WordPress Dashboard.
- A Google account you are comfortable using for your business or site.
- Permission to install plugins or edit theme settings in WordPress.
- Your preferred SEO plugin or a header and footer code plugin (optional but recommended).
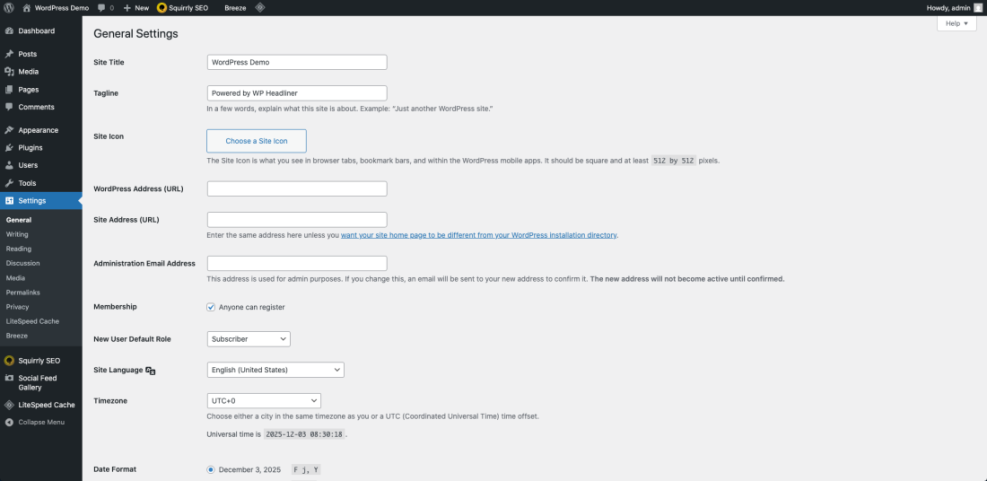
Step 1: Confirm your WordPress URL and visibility
Before you create your property in Google Search Console, confirm that WordPress uses the exact URL you want Google to track. This prevents duplicate properties and verification issues.
- Log in to your WordPress Admin area by visiting yourdomain.com/wp-admin.
- Navigate to Settings » General.
- Check the fields WordPress Address (URL) and Site Address (URL). Make sure they:
- Use the correct protocol, usually https://.
- Match each other exactly, including whether you use www or not.
- In the sidebar, go to Settings » Reading.
- Scroll down and make sure Discourage search engines from indexing this site is not checked.
- Click Save Changes if you updated any of these settings.
Verification Visit your homepage in a private or incognito window and confirm the browser address bar shows the same canonical URL you just confirmed in WordPress.
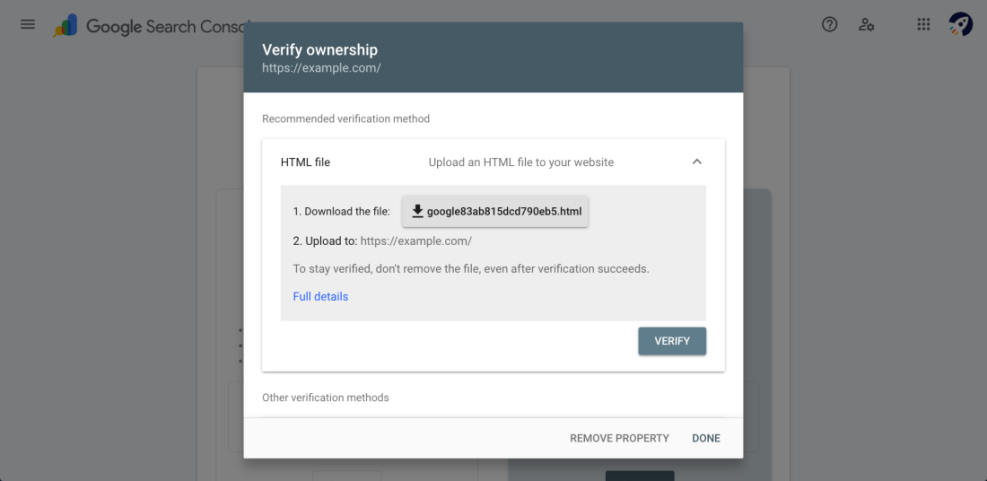
Step 2: Create your Google Search Console property
Now you will create a new property in Google Search Console so Google can start collecting data for your WordPress site.
- Open a new browser tab and go to search.google.com/search-console.
- Sign in with your preferred Google account.
- If this is your first time using the tool, you will see a welcome screen. Click Start now if prompted.
- In the upper left, click the property dropdown, then click Add property.
- In the popup, look for the panel labelled URL prefix on the right.
- Enter your full site URL exactly as it appears in your browser address bar, for example https://example.com/.
- Click Continue to move to the verification methods page.

Verification At the top of the next screen you should see your URL prefix property listed with your domain. Below that Google will show several verification method options.
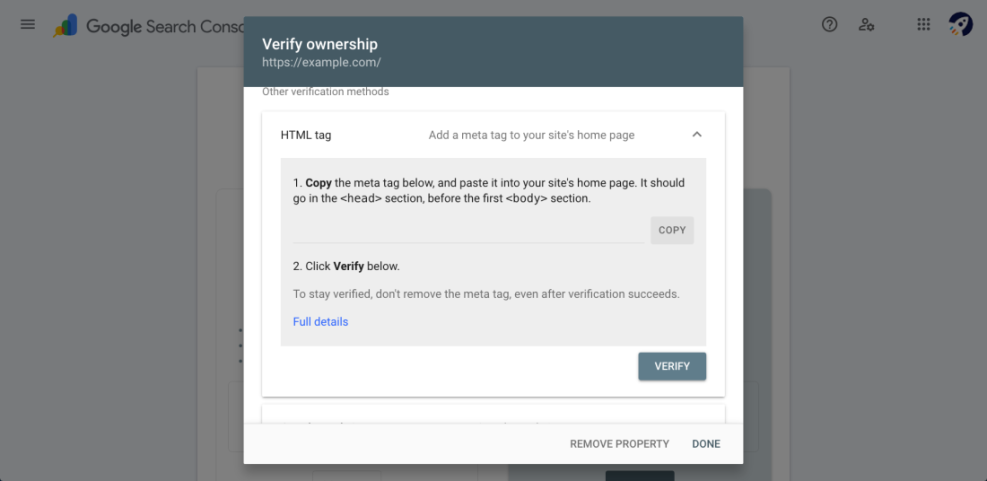
Step 3: Copy the HTML tag verification code
Google offers several ways to prove that you own the site. For WordPress users the HTML tag method is usually the simplest, because you can paste a small meta tag into your site header with a plugin.
- On the verification screen, scroll until you find HTML tag under the Other verification methods section.
- Click the HTML tag panel to expand it.
- Google will show a line of code starting with <meta name=”google-site-verification”.
- Click the Copy button, or manually select and copy the entire meta tag.
- Leave this browser tab open. Do not click Verify yet.
The code you copied will look similar to this example:
<meta name="google-site-verification" content="your-verification-code-here" />Verification Keep this exact snippet safe in your clipboard or a temporary text file. You will paste it into WordPress in the next step without changing anything.
Google Search Console Verification Methods
Before you decide how to connect your WordPress site, it helps to compare the main verification methods that Google Search Console supports.
| Verification Method | Where You Set It Up | Best For |
|---|---|---|
| HTML Tag | Meta tag in your site’s <head> (via SEO plugin or header & footer plugin) | Most WordPress sites where you have admin access and can install plugins |
| DNS Record | DNS settings at your domain registrar or DNS hosting provider | Verifying a domain property that covers all subdomains and protocols |
| Google Analytics | Existing Google Analytics tracking code on your site | Sites that already use Analytics with the same Google account |
| Google Tag Manager | Existing Google Tag Manager container on your site | Sites that manage most scripts through Tag Manager |
| Site Kit Plugin | Inside WordPress using the Site Kit by Google setup wizard | Beginners who want an easy, guided setup that also connects other Google tools |
Tip For most WordPress beginners, the HTML tag method or the Site Kit plugin is the easiest choice. DNS verification is more technical, but ideal if you want a full domain-level property.
Step 4: Add the Search Console tag to WordPress
Next you need to inject the HTML tag into the <head> section of every page so Google can see it. You can do this with a lightweight header plugin or through your SEO plugin.
- In a new tab, log in to your WordPress Admin area.
- If you do not have a way to add code to your header, navigate to Plugins » Add New.
- Search for a header and footer script plugin from WordPress.org and click Install Now, then Activate.
- In the sidebar, go to the new plugin menu or to Settings » Header & Footer (the exact name depends on the plugin you chose).
- Locate the field labelled something like Scripts in Header or Head code.
- Paste the full HTML meta tag you copied from Google into that header field.
- Click Save or Save Changes to update your settings.
If you prefer an all in one integration that can connect Analytics and other Google products, you can also install the official Site Kit by Google plugin from WordPress.org and use its setup wizard to verify Search Console automatically.
Verification Visit your homepage in a new browser tab, right click, and choose View page source. Search for google-site-verification and confirm the meta tag is present inside the <head> section.
Step 5: Verify your property and submit an XML sitemap
Once the meta tag is visible on your live site, you can tell Google to complete the verification and then submit an XML sitemap so your URLs are discovered more efficiently.
- Return to your open Google Search Console verification tab.
- Click Verify in the HTML tag panel.
- Wait a few seconds while Google checks your site. If everything is set correctly you will see a success message.
- Click Go to property to open your new Search Console property dashboard.
- In the left sidebar, click Sitemaps.
- In the Add a new sitemap field, enter your sitemap path. Common examples are:
- sitemap_index.xml for many SEO plugins.
- sitemap.xml or a custom path if you configured one.
- Click Submit to send your sitemap to Google.
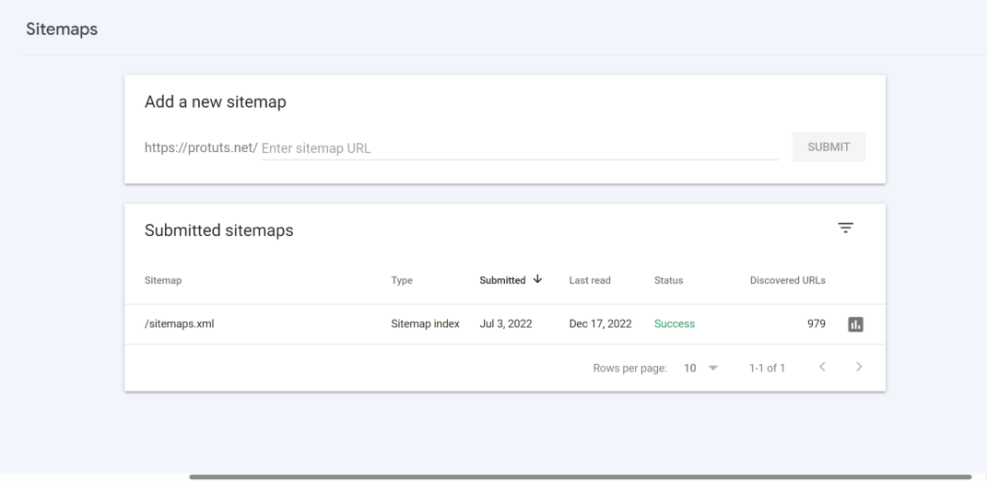
Verification After a few minutes, refresh the Sitemaps page. You should see your sitemap listed with a Status of Success or OK once Google has processed it.
When you are ready to dig deeper into the data you are collecting, refer to How to add google search console to WordPress and How to add google search console to WordPress.
Conclusion You Are Ready to Go
You have successfully added Google Search Console to WordPress, verified your site ownership, and submitted an XML sitemap. From here Google can continuously discover new content, alert you to indexing issues, and show which queries bring visitors to your site.
Keep your verification tag or plugin active so ownership remains confirmed. As traffic grows, make a habit of checking Search Console regularly, fixing coverage errors quickly, and using query data to guide your onpage optimization and content strategy.
Further Reading
- How to add google search console to WordPress
- WordPress seo complete beginners guide
- WordPress seo complete beginners guide
- How to add keywords in WordPress without hurting
- Is WordPress good for seo