Google Analytics for WordPress Setup and Tracking Basics
Beginner friendly steps to track visitors and conversions

WordPress analytics tells you what is really happening on your site, but the setup can feel confusing if you have never used Google Analytics before. When you connect the two correctly, you get reliable numbers about your visitors, pages, and conversions instead of guessing what works.
You are going to learn how Google Analytics and WordPress fit together, the safest ways to install the tracking code, and how to confirm that your data is correct. The guide starts with a quick answer, then walks through account setup, connection methods, basic reports, and a short FAQ.
WordPress Analytics Setup Quick Answer
The fastest way to get WordPress analytics working is to create a free Google Analytics 4 property, connect it to your site with a plugin, and then confirm tracking in the Realtime report. This approach avoids editing code, keeps tracking stable during theme changes, and is easy to repeat on more sites.
At a high level, you will sign in with a Google account, create an Analytics property for your domain, copy the measurement ID, and paste or connect it inside WordPress. After that, you visit your site in another browser tab and watch Google Analytics update in real time.
- Create a Google Analytics 4 account and property for your website.
- Add the GA4 tag to WordPress using a plugin, manual code, or Google Tag Manager.
- Open the Realtime report, browse your site in another tab, and check that your visit appears.
What Is the Fastest Way to Start Tracking?
For most beginners, a dedicated analytics plugin or Google’s own Site Kit plugin is the fastest way to start tracking. You click through a setup wizard, sign in to your Google account, and let the plugin place and manage the GA4 tag so you do not touch any code.
Which Method Should Most Beginners Use?
Most site owners should start with a plugin method because it keeps the tracking code safe during theme updates and gives you basic reports in the WordPress dashboard. Manual or Tag Manager setups are better later when you need custom events, multiple tags, or very fine control.
Why Analytics Tracking Matters in WordPress
Good tracking shows you what content, campaigns, and traffic sources actually bring results. Without it, you might spend weeks writing posts or running ads that never move the needle, simply because you cannot see what visitors do after they arrive.
Google Analytics 4 automatically tracks page views, scroll depth, outbound clicks, file downloads, and more. When this data flows from your WordPress site into reports, you can see which posts attract new users, which pages warm people up, and which calls to action finally convert them.
What Data Can You See in GA4?
In GA4 you can see how many users visit, which pages they view, how long they stay, what devices they use, and where they come from. You can also define conversions, such as form submissions or checkout steps, to see which traffic sources bring valuable actions instead of empty visits.
How Does Analytics Help You Grow Traffic?
Analytics helps you grow traffic by showing which channels already send engaged visitors so you can double down on them. When you see that certain posts or search terms keep people on the site longer, you can create related content and internal links that support those topics and improve SEO.
Create Your Google Analytics Account
Before you connect anything to WordPress, you need a GA4 property for your website. The property is where all of your traffic and events are stored and where you will read reports later.
Sign Up for a Free Analytics Account
- Go to the Google Analytics website and click the button to get started.
- Sign in with your Google account or create one if needed.
- Enter an account name, review data sharing settings, and continue.
- Create a new property, set the correct reporting time zone, and choose your currency.
- Select your business category, business size, and basic objectives such as getting baseline reports.
These steps give you a clean GA4 property that is ready to receive data from your WordPress site without mixing it with other domains or apps.
Get Your GA4 Measurement ID
- In Google Analytics, go to the Admin area and open your new property.
- Open the Data Streams section and choose the Web stream for your WordPress domain.
- Copy the Measurement ID that starts with G-; you will paste or connect this value in WordPress.
- Optionally review the Enhanced Measurement options if you plan to use a plugin that adds its own events.
Keep this tab open while you work in WordPress so you can easily copy the ID again or open the Realtime report when you are ready to test.
Connect Google Analytics to WordPress
Once you have a GA4 property, you have three main ways to connect tracking to WordPress. You can use a plugin that talks to Google’s API, paste the tag manually into your theme or a code manager plugin, or route everything through Google Tag Manager for more advanced setups.
Method 1: Use a WordPress Analytics Plugin
For most beginners, a plugin is the safest and most flexible option. Popular choices include Google’s Site Kit and dedicated analytics plugins that show dashboards inside WordPress while handling the tag correctly in the background.
- From your WordPress dashboard, go to Plugins » Add New and search for your chosen analytics or Site Kit plugin.
- Install and activate the plugin, then look for its new menu item in the admin sidebar.
- Start the setup wizard, connect your Google account, and choose the correct GA4 property for your site.
- Review optional settings such as enhanced link tracking, file download tracking, and eCommerce options.
From your WordPress dashboard, go to Plugins » Add New and run the plugin’s setup wizard to connect to Google.

Method 2: Add the Tracking Code Manually
If you prefer to control everything yourself, you can paste the GA4 tag directly into your header. It is best to do this using a child theme or a header/footer code manager plugin so that updates do not remove your tracking script.
- Copy the GA4 tag code snippet from your Web data stream in Google Analytics.
- In WordPress, install a header/footer code manager plugin or open your child theme’s header.php file.
- Paste the GA4 script just before the closing </head> tag so it loads early on every page.
- Save your changes and clear any caching plugin or CDN cache before testing.
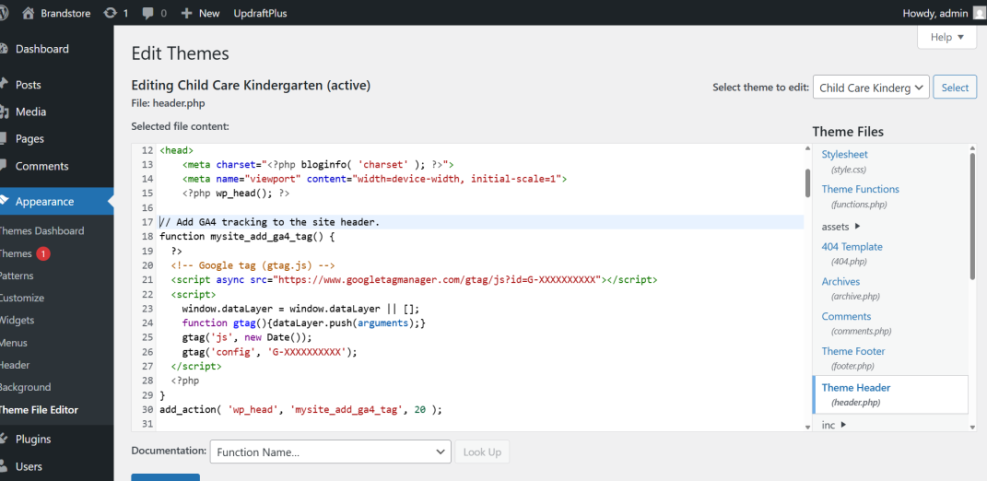
From your WordPress dashboard, go to Appearance » Theme File Editor and open header.php if you are comfortable editing theme files.

// Add GA4 tracking to the site header.
function mysite_add_ga4_tag() {
  ?>
  <!-- Google tag (gtag.js) -->
  <script async src="https://www.googletagmanager.com/gtag/js?id=G-XXXXXXXXXX"></script>
  <script>
    window.dataLayer = window.dataLayer || [];
    function gtag(){dataLayer.push(arguments);}
    gtag('js', new Date());
    gtag('config', 'G-XXXXXXXXXX');
  </script>
  <?php
}
add_action( 'wp_head', 'mysite_add_ga4_tag', 20 );
Replace G-XXXXXXXXXX with your own measurement ID. If you later switch to a plugin, remember to remove this custom code so that you do not accidentally run two tags.
Method 3: Use Google Tag Manager for Flexibility
Google Tag Manager (GTM) is ideal when you manage several tags or need custom events without touching your theme again. You add the GTM container code once, then configure GA4 and other tags from the GTM web interface.
- Create a free Tag Manager account, add a new container for your domain, and choose Web as the platform.
- Copy the GTM container snippets and paste them into your site header and body using your theme or a code manager plugin.
- In GTM, create a GA4 configuration tag, paste your measurement ID, and set the trigger to fire on all pages.
- Submit and publish your container so Tag Manager starts sending data to Google Analytics.
From your WordPress dashboard, go to Settings » Header & Footer (or your code manager’s screen) and paste the GTM container snippets into the appropriate header and body fields.
The table below compares the three main connection methods so you can pick the right fit for your site.
| Method | Difficulty | Best For | Notes |
|---|---|---|---|
| Plugin | Easy | Most site owners | Quick setup, automatic updates, dashboards in WordPress. |
| Manual Code | Medium | Developers and tinkerers | More control but depends on theme files and careful edits. |
| Tag Manager | Medium–Hard | Advanced tracking needs | Central place for multiple tags and custom events. |
Choose the method that matches your comfort level and future needs. You can always move to Tag Manager later once you are happy with your basic tracking.
Verify and Fix Your Tracking Setup
After connecting Google Analytics and WordPress, you should always confirm that data is flowing correctly. A simple check today can save you from weeks of missing or duplicated reports later.
How Do You Confirm Analytics Is Working?
An easy way to confirm tracking is to use the Realtime report in GA4. You open the Realtime view in one browser tab, visit your site in another tab or device, and watch for your visit to appear within a minute, along with the page you are viewing and your location.
Common Problems When Data Looks Wrong
- Two or more GA tags installed from multiple plugins, manual code, or GTM.
- Caching or a CDN serving old versions of pages without the new tag.
- Ad blockers or strict browser privacy settings hiding your own visits.
- Tracking disabled on key templates such as landing pages or checkouts.
You can usually solve these problems by picking a single tag method, clearing cache, testing in an incognito window, and checking your theme templates or page builder headers.
How Can You Exclude Your Own Visits?
You can exclude your own visits by creating a filter in GA4 based on your IP address or by using a browser extension that blocks the Analytics script. Some plugins also offer a setting that disables tracking for logged-in administrators so your own work sessions do not inflate your numbers.
Understand Essential GA4 Reports
Once tracking is stable, you can start using GA4 reports to make better decisions. You do not need every advanced feature to benefit; a few core screens already show you what content and traffic sources deserve more attention.
Read the Realtime Report for Quick Checks
The Realtime report shows how many users are on your site right now and what pages they view. You can use it to confirm that a new campaign is sending traffic, that a fresh blog post is getting clicks, or that your tracking still works after a plugin update or redesign.
Use Traffic Acquisition to See Where Users Come From
The Traffic Acquisition report groups users by channel, such as organic search, direct, social, and paid search. When you see which channels bring engaged visitors with low bounce rates and higher conversions, you can focus your content, SEO work, and ad budgets on the best performers.
Track Conversions That Matter to Your Site
In GA4 you can mark key events, such as form submissions, button clicks, or order completions, as conversions. After you do this, the reports show which pages and channels lead to those actions so you can refine calls to action, landing pages, and funnels instead of just chasing raw traffic.
From your Google Analytics account, go to Reports » Engagement and open the Events and Conversions screens to review which actions are already tracked.
WordPress Analytics Conclusion
When you connect Google Analytics and WordPress correctly, you move from guessing to making decisions based on real visitor behavior. The key is to choose a single tracking method, test it with Realtime, and then return to your reports regularly instead of treating setup as a one-time job.
Your next step is to pick one connection method, confirm that data flows as expected, and define at least one meaningful conversion such as a form or checkout. As your WordPress analytics data grows, you can add custom events, refine funnels, and use insights to guide content, SEO, and marketing spend.
More WordPress Guides You Might Like
Once your tracking is in place, you can improve the rest of your stack by optimizing performance, on-page SEO, and conversion points. The following planned guides fit naturally after this analytics setup.
- Beginner guide WordPress speed core web vitals
- WordPress seo complete beginners guide
- How to protect your WordPress admin area using
- Beginner guide to WordPress speed optimization
- How to create a website with WordPress
Working through these topics will help you turn raw data into real improvements in speed, rankings, and conversions, which all reinforce the value of your analytics setup.